Modern Windowpane Mosaic Crochet Blanket & Pillow – Step-by-Step Pattern
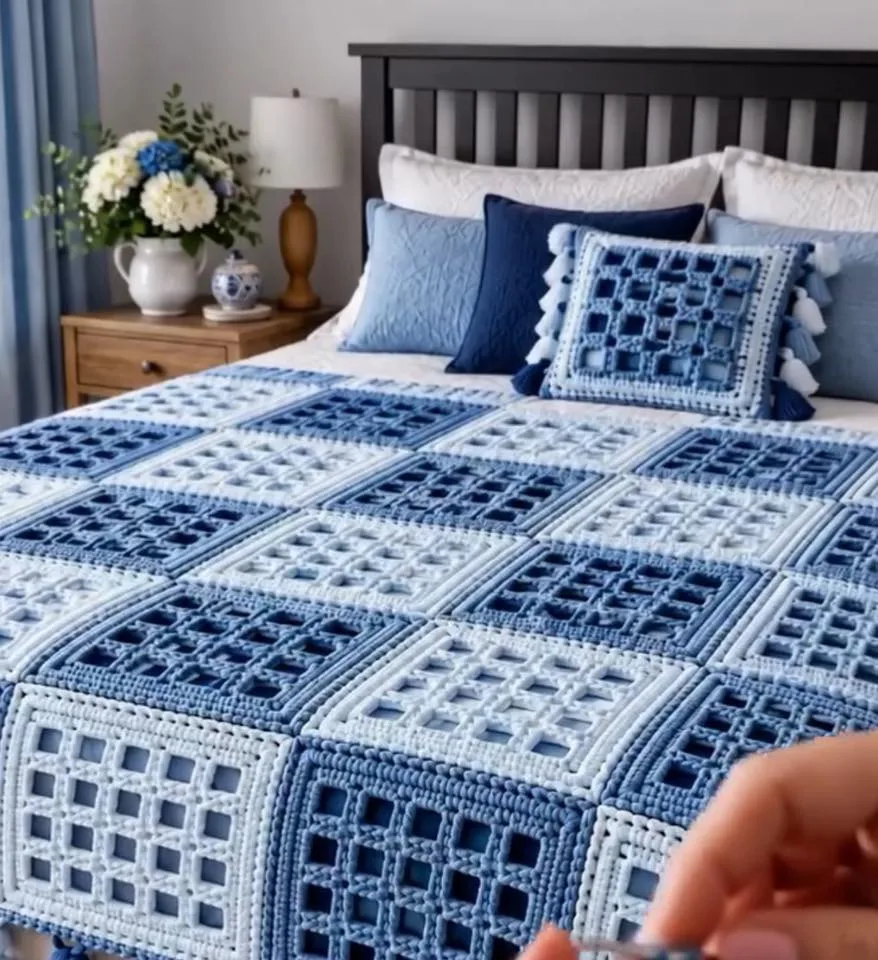
If you love bold, geometric patterns and soothing blue palettes, this crochet blanket and pillow set is for you. The project features a contemporary windowpane or lattice effect, created by assembling multiple textured square motifs. Each motif displays a gridwork of raised borders and open blocks, using different shades of blue for a modern, gradient appearance. When joined, these square motifs create a stunning, visually rhythmic statement piece that adds stylish flair to any bedroom or living space.
The set consists of a generously sized blanket—perfect as a bedspread or a cozy throw—and a matching accent pillow. Both items showcase the crisp definition of the windowpane motif, with deep ridges outlining each square. The chunky texture and interplay of light and dark blues are visually striking yet harmonious, making this a project that’s both decorative and functional. Whether you use it for warmth, decor, or as an eye-catching statement, this blanket set offers charm, comfort, and a satisfying crochet experience.
Project Overview
This project is worked using modular construction. Each motif square is crocheted separately in the round, working outward from the center and forming openwork windowpane blocks and thick, textured ridges. Once all squares are complete, they are joined together with a textured join, and the blanket is bordered for a polished finish. The pillow cover is made using the same squares and seamed around a pillow form, with optional pom-poms for extra flair.
Skill Level
Advanced Beginner to Intermediate. The pattern uses basic stitches (chain, single crochet, double crochet) with some post stitches and joining methods. Familiarity with working in the round, changing colors, and assembling motifs is helpful. The open block ‘windowpane’ design and post-stitch ridges provide a slight challenge, but the structure is easy to follow once a few motifs are completed.
Materials
- Yarn weight: Worsted weight (#4/aran), approx. 1,600–2,000g total for a full blanket and pillow set
- Yarn type: Soft acrylic or cotton-blend for durability and stitch definition
- Color A (Light Blue): approx. 500g
- Color B (Medium Blue): approx. 500g
- Color C (Deep Denim Blue): approx. 500g
- Color D (White or Soft Cream for optional accent): approx. 200g
- Crochet hook: 5.0 mm (H-8)–5.5 mm (I-9) (use the size for a firm but flexible fabric)
- Tapestry needle: for sewing and weaving in ends
- Scissors
- Stitch markers: for marking the corners if needed
- Pillow insert: Approx. 40×40 cm (16×16 in) for the pillow cover
- Pompom maker (optional): for pillow decoration
Finished Size
- Blanket: Approx. 150×180 cm (60×72 in), depending on number of squares and join style
- Motif Square: Each square approx. 25×25 cm (10×10 in) after blocking
- Pillow: Approx. 40×40 cm (16×16 in), or to fit chosen insert
To adjust size: Add or remove motif squares to lengthen or widen the blanket, or make smaller/larger pillow sizes as desired.
Gauge
1 motif square: after blocking should measure approx. 25×25 cm (10×10 in).
Gauge is important for the final size; minor variations will only slightly affect dimensions. If your square is smaller or larger, adjust hook size as needed.
Stitches and Abbreviations
- ch – chain
- sl st – slip stitch
- sc – single crochet
- dc – double crochet
- fpdc – front post double crochet
- MR – magic ring
- sp – space
- st/sts – stitch/stitches
- beg – beginning
- rep – repeat
Important Pattern Notes
- Chains at the beginning of rounds always count as the first stitch unless otherwise noted.
- Motifs are worked in joined rounds; join each round with a sl st to the top of beg ch.
- Change colors at the end of the round for clean edges. Pull through new color to finish the final sl st of the round before beginning the next.
- Right side (RS) faces up throughout; turn only if specified.
- Mark corners with stitch markers if needed.
- Keep a consistent tension for crisp post-stitch definition and neat open blocks.
Detailed Crochet Pattern
Overview of Squares
Each windowpane square features evenly spaced openwork blocks framed by solid ridges. The motif is built round by round, with post stitches outlining each window, and alternates between two or three shades of blue for maximum visual impact. Adjust color placement as you prefer.
Part 1: Basic Windowpane Motif Square
Work as many motifs as required. For a 5×7 square blanket, make 35 motifs. For a 4×4 pillow front and back, make 8 motifs (or simply use two larger squares for each pillow face).
- Round 1 (Color A): MR, ch 3 (counts as dc), 3 dc, (ch 2, 4 dc) 3 times, ch 2, join with sl st to top of beg ch-3. (16 dc, 4 ch-2 corner sps)
- Round 2: Ch 3, dc in next 3 sts, (2 dc, ch 2, 2 dc) in corner sp, *dc in next 4 sts, (2 dc, ch 2, 2 dc) in corner sp* rep 2x, join. (32 dc, 4 ch-2 sps)
- Round 3 (Color B): Fasten off Color A, join Color B in any corner. Ch 3, dc in same corner, ch 1, sk 1, dc in next st, [windowpane setup] (dc, ch 1, sk 1, dc) to next corner, (2 dc, ch 2, 2 dc) in corner, rep on all sides, join. (16 dc each side + 4 ch-2 corners + 8 ch-1 sps per side)
- Round 4: Ch 3, fpdc around each previous round dc, ch 1 over ch-1 sps, work (fpdc, ch 2, fpdc) in each corner space. Join. Fasten off.
- Round 5 (Color C): Join in any corner. Ch 3, dc in same sp, ch 1, (dc in next st, ch 1, sk 1, dc) as per windowpane spacing, (2 dc, ch 2, 2 dc) in corner, rep on all sides, join, fasten off.
- Round 6: Repeat Round 4, working fpdc around post sts of previous round and working ch 1 over ch-1 sps. Make sure to maintain the ‘square window’ placement and keep post-stitch ridges aligned.
- Round 7–8 (Optional, Alternate Colors): Continue alternating dc and fpdc rounds, working open spaces (ch 1, sk 1) to maintain window effect. For the final round, work sc evenly around for firm edges.
Each motif will have a textured grid look, with open ‘windowpane’ blocks and high-relief ridges framing each window.
Part 2: Blanket Assembly
- Arrange finished motifs in a pleasing layout, alternating light, medium, and dark blue as shown, or as preferred.
- With RS facing, whipstitch or slip stitch squares together through back loops only, for a flat, nearly invisible seam.
- If you want a raised join, use a single crochet join with RS together so a thin rope appears on the RS, echoing the motif ridges.
- Work all horizontal joins, then work all vertical joins for best alignment.
Part 3: Blanket & Pillow Border
- Once all motifs are joined, attach border color (Color D or desired accent) in any corner.
- Round 1: Ch 1, sc evenly around the entire blanket (or pillow), working 3 sc in each motif corner for sharp corners, join.
- Round 2: Ch 3, dc in each st, working (2 dc, ch 2, 2 dc) in each blanket/pillow corner; join, fasten off.
- Optional: For extra texture, add a round of fpdc to echo the motif’s post stitches.
Part 4: Pillow Assembly & Decorative Elements
- Make two motif panels for the pillow (front and back) using the same method. Sew three sides with wrong sides together, insert pillow form, and sew the final side.
- Optional: For a decorative edge, work a row of small pom-poms or tassels around pillow edge before final join, using leftover yarn in contrasting or matching blues.
- For dramatic effect, edge the pillow front with a round of contrasting sc or reverse single crochet (crab stitch).
Assembly and Finishing
- Weave in all loose ends with tapestry needle, making sure tails are secure but not bulky at seams.
- Carefully lay assembled blanket and pillow flat and pin to shape, then mist with water and allow to air dry flat (blocking), for crisp edges and alignment.
- Keep motifs square and aligned during seaming for a professional finish.
- Lightly steam (if yarn allows) for extra drape and shape retention.
Customization Ideas
- Colorways: Try monochrome gray, spring pastels, or a mix of jewel tones for a different vibe.
- Yarn Weights: Use bulky yarn for a throw, or sport/DK for a lightweight lapghan.
- Other Uses: Use individual squares as coasters, sew four for placemats, make a single motif as a trivet, or join nine for a statement pillow.
- Motif Mix: Vary the windowpane placement for a checkerboard effect, or mix with solid motifs for contrast.
- Wall Hanging: Attach dowels to free edges and suspend for bold modern decor.
Troubleshooting Tips
- Curling Motifs: Block individual squares before joining; loosen tension if motifs curl.
- Uneven Edges: Check stitch counts at corners each round. Block at the end for sharp, straight sides.
- Inconsistent Size: Ensure consistent hook size and tension; if some motifs are larger, block or redo with a smaller hook.
- Loose Color Changes: Tighten and secure color changes by pulling new yarn through the last stitch of the old color.
- Uneven Windowpanes: Align ch-1 spaces in each round for consistent windows; use stitch markers if needed.
Care Instructions
- Machine wash on gentle in cold water or hand wash if using delicate fibers.
- Launder with similar colors.
- Lay flat to dry to maintain shape and prevent stretching.
- Steam lightly for best drape, avoiding direct iron on acrylic fibers.
Final Notes
Check your stitch count at the end of each round and aim for even tension for best results. Adjust hook size if needed so your motifs assemble neatly with minimal stretching. Use this pattern and photo as a visual guide, but don’t be afraid to experiment with color placement or motif combinations to make it your own! Enjoy creating your unique modern mosaic crochet blanket and pillow set.