Modern Flower Granny Square Blanket Crochet Pattern
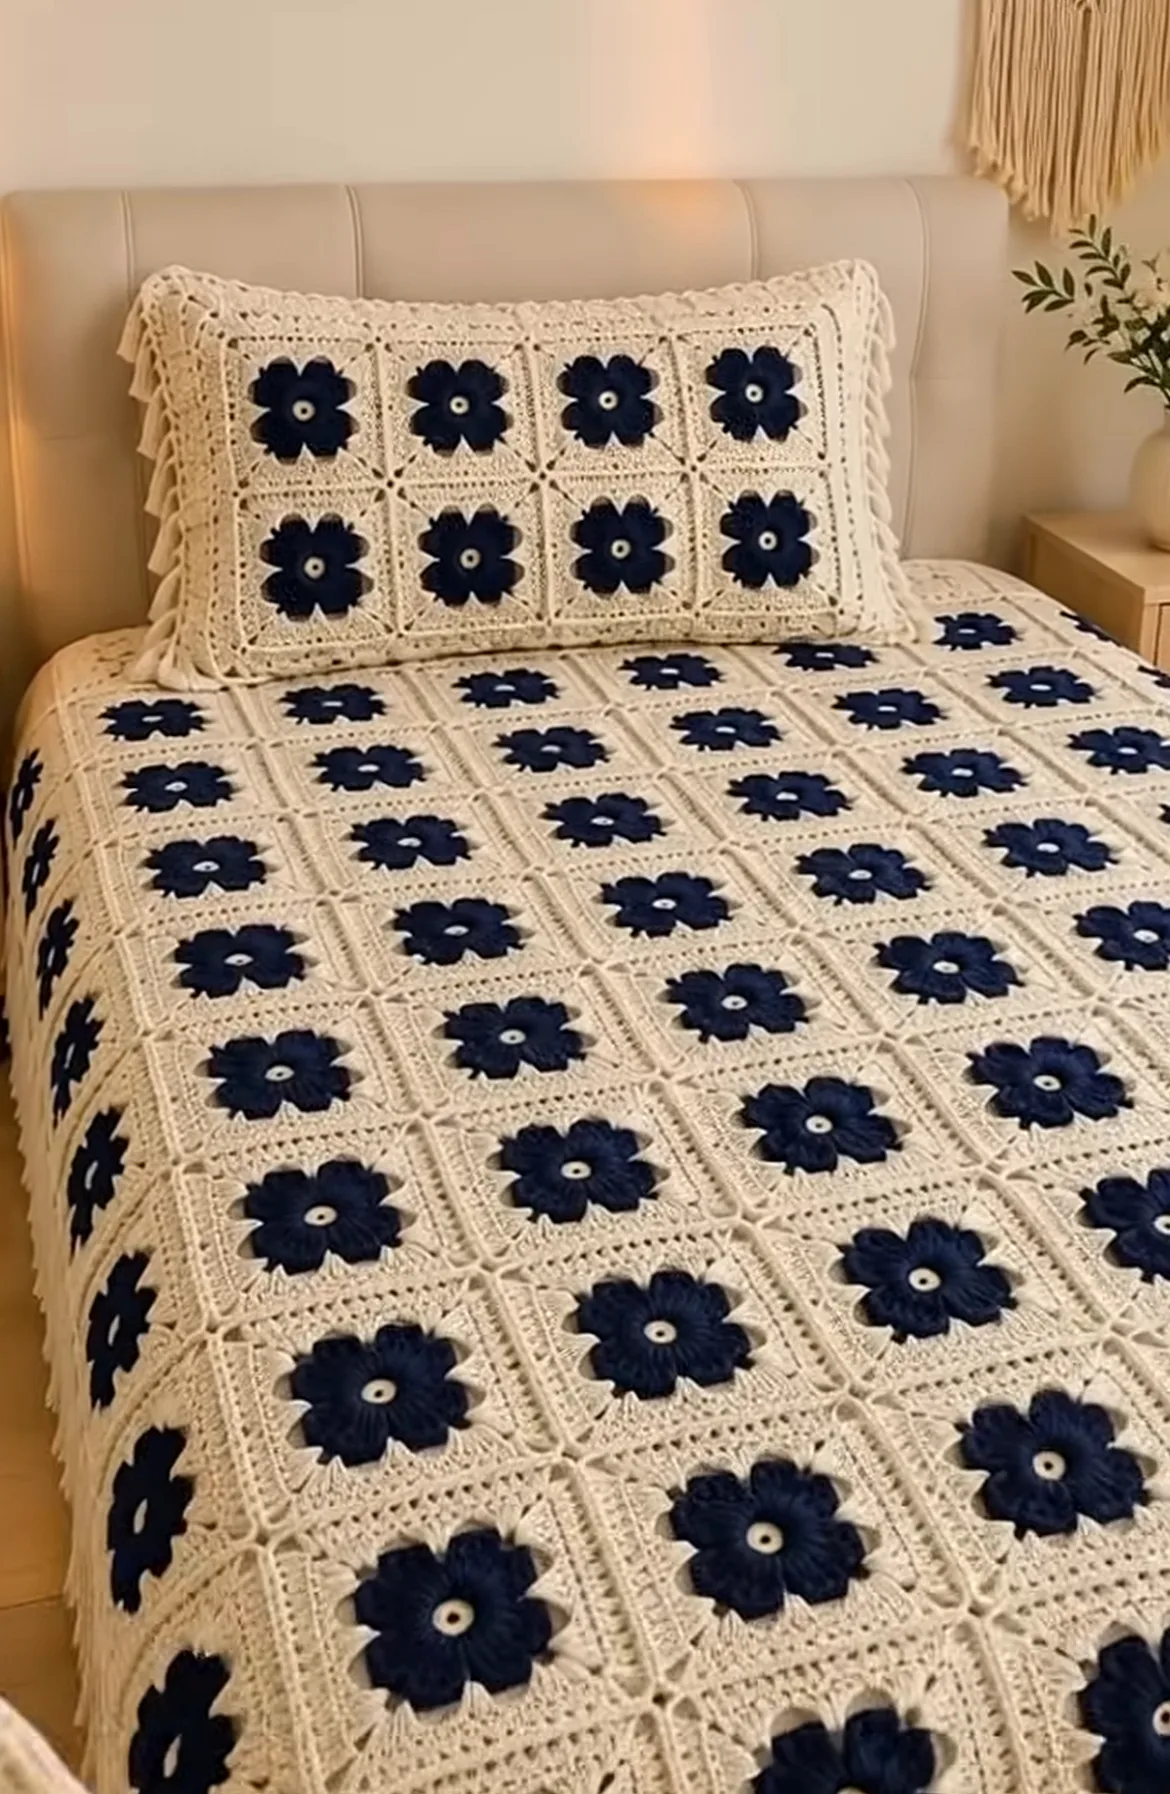
This crochet tutorial guides you through creating a stunning flower granny square blanket, showcasing three-dimensional bold flowers set into crisp, classic squares. The blanket presents a beautiful contrast: the creamy neutral of the main square really highlights the deep navy petals at the center of each motif. Each flower is surrounded by a neat square border, forming a continuous grid that gives the piece a timeless, sophisticated edge. Matching pillow covers complete the inviting and cozy set.
The finished effect is both vintage-inspired and modern, making it ideal for a bedspread, pretty throw, or stylish accent for any living room. The playful floral texture adds softness and charm, while the uniform construction makes it highly versatile. You can infuse this pattern with your own color scheme or use the classic two-tone palette for dramatic effect.
Perfect for gifting, refreshing a room, or simply enjoying the satisfying process of joining squares, this project is a delight from start to finish. Even beginners will find it manageable with patience, and experienced crocheters will enjoy its repetitive, meditative flow.
Project Overview
This flower granny square blanket is constructed from multiple identical motif squares. Each motif features a round, 3D flower placed at the center, surrounded by a solid square background that is joined to its neighbors. The project is worked in individually completed motifs, which are then joined using the join-as-you-go technique or seamed with a tapestry needle. Finally, a simple border frames the blanket and provides a polished finish. This modular approach makes it easy to customize the final dimensions and adapt leftover yarn into matching accessories, such as pillow covers.
Skill Level
Advanced Beginner to Intermediate. The pattern combines standard stitches with puff stitches and color changes, creating dimensional flowers and neat squares. Clear instructions make it suitable for adventurous beginners ready to learn new techniques, while repetitive square construction is relaxing for those with more experience.
Materials
- Yarn: Worsted weight (4) yarn
- Fiber: 100% cotton or a cotton-acrylic blend for stitch definition and durability
- Color A (Background/Cream): Approx. 1,500–2,000g depending on finished blanket size
- Color B (Flower Petals/Navy): 600–800g
- Color C (Flower Center/White or Pale): Small amount, ~50g
- Crochet Hook: 5.0 mm (H-8) or size needed to obtain gauge
- Tapestry Needle (for sewing squares together and weaving in ends)
- Scissors
- Stitch Markers (recommended for marking round starts or motif edges)
- Measuring Tape
- Blocking supplies: Pins, surface, and spray bottle (for optional blocking)
Finished Size
The blanket shown covers a queen-size bed, approximately 200 cm x 220 cm (78 in x 86 in). Each individual square is about 15 cm x 15 cm (6 in x 6 in) before joining and blocking.
- To adjust size, add or subtract motif columns and rows. For example, a lap blanket or baby throw can be made with fewer squares.
Gauge
One completed square motif should measure approximately 15 cm x 15 cm (6 in x 6 in) after blocking. Gauge is not critical; small differences will only affect finished dimensions and yarn usage. Adjust hook size to get close to the target square size.
Stitches and Abbreviations
- ch – chain
- sl st – slip stitch
- sc – single crochet
- hdc – half double crochet
- dc – double crochet
- tr – treble crochet
- MR – magic ring
- puff – puff stitch (yarn over, insert hook in stitch, yarn over and pull up a loop) x 4, yarn over, pull through all loops
- inc – increase
- beg – beginning
Important Pattern Notes
- Ch 3 at the start of a round counts as a dc unless otherwise noted.
- Each motif is started with a magic ring (or adjustable loop for center neatness).
- Color changes are made at the end of rounds for a clean look; fasten off and join new color unless otherwise specified.
- Motifs are joined after all individual squares are complete. Use join-as-you-go or seam together with a tapestry needle.
- For the right side, keep flower petals facing out; work all rounds with right side facing where possible.
- Use stitch markers to keep track of square corners or round starts if you find motifs shifting.
Detailed Crochet Pattern
Part 1: Crocheted Flower Center
- With Color C (Flower Center, e.g., pale/white), make a MR.
- Round 1: Ch 2 (does not count as hdc), work 12 hdc in MR, sl st to first hdc to join. (12 sts)
- Fasten off Color C.
Part 2: Flower Petals
- Switch to Color B (Navy). Join yarn in any hdc st from Round 1.
- Round 2: [Ch 2, puff in same st, ch 2, sl st in next st] repeat around (12 petals).
(To make a puff: Yarn over, insert hook in stitch, yarn over and pull up a loop; repeat this four times for total of 9 loops on hook, yarn over and pull through all loops. Ch 2 to close.) - At end of round, sl st to base of first ch-2.
- Round 3: In each ch-2 space behind each petal, work (sc, ch 2, sc). This creates a less visible base row for the flower and spaces for squaring off.
- Fasten off and weave ends to back of motif.
Part 3: Squaring the Flower Motif
- With Color A (Cream/Background): Join in any ch-2 space between flower petals at the back.
- Round 4:
*In first ch-2 space, work (ch 3 [counts as dc], 2 dc, ch 2, 3 dc) for first corner.*
*In next three ch-2 spaces, work 3 dc in each.*
*(Corner: in next ch-2 space, work 3 dc, ch 2, 3 dc)*
*Continue [3 dc in each of next 3 ch-2 spaces, corner in next]; repeat around.*
At end, sl st to top of beg ch-3. (You should have four corners with [3dc, ch2, 3dc] and twelve 3-dc groups total.) - Round 5: Sl st into corner ch-2 space, ch 3 (counts as dc), 2 dc, ch 2, 3 dc in first corner. *3 dc in each 3-dc group, (3 dc, ch 2, 3 dc) in each corner* around. Join with sl st. (Stitch count grows by 12 per side: 6 groups per side, 4 corners.)
- Round 6: Repeat last round, increasing the number of 3-dc groups between corners by one each side as work progresses; each side will now have 7 3-dc groups.
- Round 7 (optional, for larger squares): Repeat as above, adding more rounds to reach 15 cm (6 in) per motif. Always work (3 dc, ch 2, 3 dc) in corners, 3 dc in each 3-dc group between corners.
- Fasten off and leave a long tail for sewing if sewing motifs together, or finish off completely if using the join-as-you-go method.
Part 4: Blanket Assembly
- Arrange all completed motifs in the final layout, flower sides up.
- Join motifs. For a seamless finish, use the flat slip stitch join:
*Place motifs RS together and sl st through each pair of edge stitches along one side. Open for a barely-there seam.*
*Alternatively, join-as-you-go by working the final round of each motif and slip stitching into adjacent motifs as you work the final round.* - Continue until all squares are joined in rows and columns. Make sure corners and edges align neatly.
Part 5: Blanket Border
- With Color A (Cream), join yarn at any corner of the blanket.
- Round 1: Ch 3 (counts as dc), 2 dc in same corner, ch 2, 3 dc in same corner. *Work 3 dc in each group along the edge, (3 dc, ch 2, 3 dc) in each blanket corner* around. Join with sl st.
- Optional: Work another round of dc or sc for a thick border, or add a simple picot or shell edging for extra detail.
- Fasten off and weave in all ends around edges and joins.
- Carefully weave in all yarn tails on back of motifs and along joins, using a tapestry needle.
- Gently block the blanket to even out edges and flatten motifs. Pin damp blanket to blocking board or mattress, shape squares evenly, and allow to dry completely.
- If desired, steam block at gentle temperature for defined stitches, but do not flatten flower petals completely.
- For matching pillow covers, create a panel of motifs sized to your pillow form, join sides, and add a fabric or crocheted backing as desired.
- Try a pastel palette for a summery look, or use high-contrast brights for a pop-art effect.
- Make single motifs as coasters or wall art.
- Use DK or bulky yarn for smaller or larger squares, respectively.
- Turn two squares into a pouch, bag, or cushion cover—just seam and add a zipper or button flap.
- Border motifs with a secondary shade for a double-framed look.
- Change flower centers to bright yellow or add beads for extra texture.
- Piece Curling: If your squares curl, try increasing hook size for a looser fabric or block motifs before joining. Ensure you have correct stitch counts at each round.
- Uneven Edges: Blocking and gentle steam or wet blocking will help correct uneven edges and sizing irregularities.
- Motifs Too Large/Small: Adjust tension or hook size and redo a swatch to ensure motifs match before making the full set.
- Loose Color Changes: When changing color, pull in ends snugly and weave tails back and forth before trimming.
- Uneven Tension: Try to relax hands while crocheting and pause if hands feel fatigued; practice of similar squares helps muscle memory and consistency.
- Hand wash in cold water with gentle detergent, or machine wash on a delicate cycle inside a mesh laundry bag for cotton or cotton-blend yarns.
- Dry flat and reshape while damp. Avoid wringing or twisting to prevent misshaping squares and flowers.
Assembly and Finishing
Customization Ideas
Troubleshooting Tips
Care Instructions
Final Notes
As you work, count stitches at the end of each round to keep squares even and crisp. Adjust hook size or technique as needed to ensure a consistent gauge among motifs. Use the blanket image as a visual guide for color placement and motif assembly. Enjoy the meditative process of creating motifs and watch your project bloom one square at a time!