Cookies and Cream Cookies
The Ultimate Cookies and Cream Cookies Recipe
There are few flavor combinations as universally beloved and instantly recognizable as cookies and cream. The magical pairing of rich, dark chocolate sandwich cookies and sweet, creamy vanilla has dominated the ice cream aisle and candy bars for decades. But what happens when you take that iconic flavor profile and bake it directly into a soft, chewy, warm, and comforting homemade cookie? You get the ultimate dessert experience: Cookies and Cream Cookies. This recipe is a show-stopping treat that guarantees love at first bite, combining the nostalgic comfort of a classic chocolate chip cookie with the exciting crunch and rich flavor of your favorite cream-filled chocolate sandwich cookies.
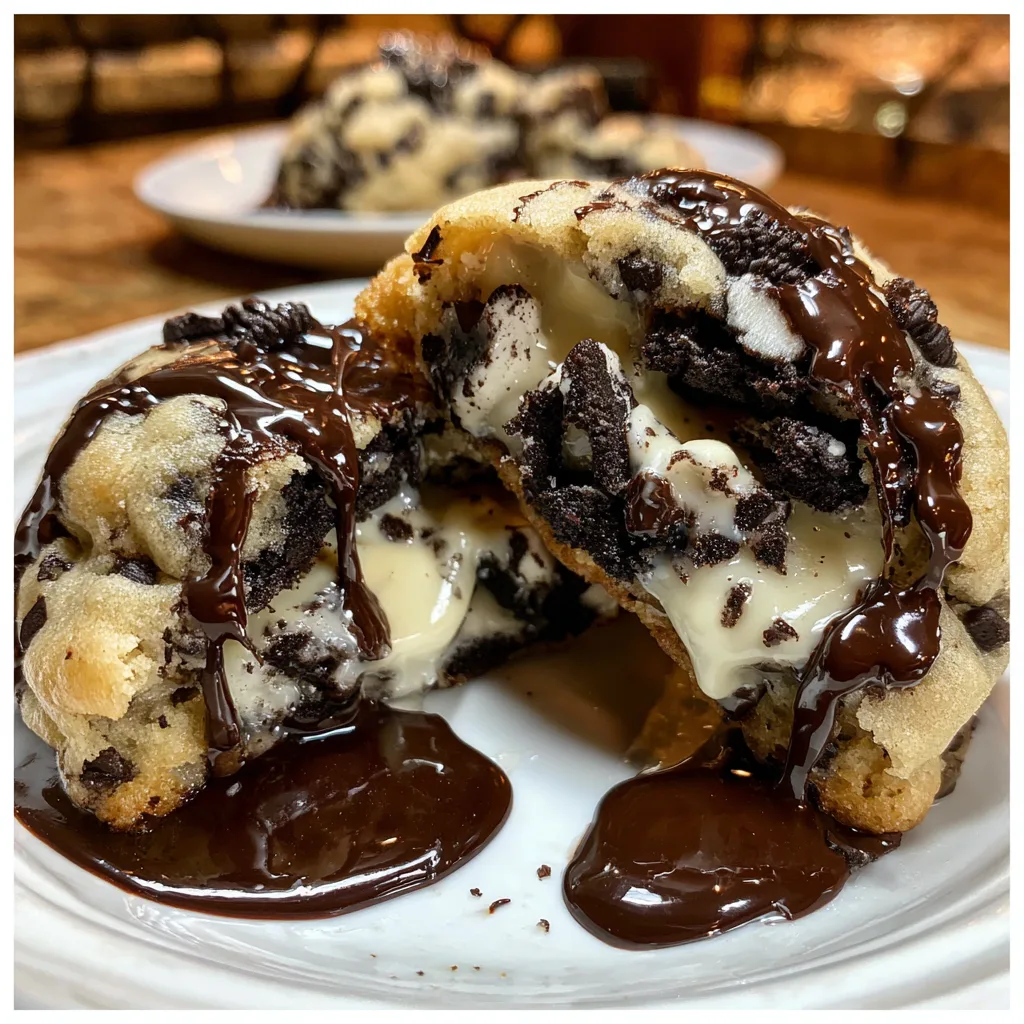
If you are tired of making the same standard chocolate chip cookies and want to bring something truly spectacular to your next potluck, bake sale, or family gathering, this is the recipe you have been searching for. The secret to these phenomenal cookies is a double-dose of cookie goodness: finely crushed cookie crumbs are blended right into the buttery dough, while larger, chunky pieces are folded in alongside sweet white chocolate chips. Every single bite is an explosion of texture and flavor, yielding a cookie that is visually stunning, incredibly satisfying, and absolutely impossible to resist.
Why You Will Absolutely Love This Recipe
There are countless reasons why these Cookies and Cream Cookies will quickly ascend to the top of your favorite baking lists. First and foremost is the texture. A truly great cookie requires a delicate balance between a slightly crispy edge and a soft, chewy, tender center. This recipe achieves that perfect harmony by using a specific ratio of brown sugar to white sugar, and by ensuring the dough is chilled before baking. The addition of the sandwich cookies provides a delightful crunch that contrasts beautifully with the soft crumb of the baked cookie dough.
Furthermore, the visual appeal of these cookies is undeniable. With their speckled, grey-ish dough (thanks to the finely crushed cookie crumbs), dotted with bright white chocolate chips and large, dramatic chunks of dark chocolate cookies, they look like they were purchased from an expensive, high-end, boutique bakery. They are the perfect photogenic treat that will have your family and friends begging for the recipe before they have even finished their first one.
Finally, despite their gourmet appearance, these cookies are incredibly straightforward to make. You do not need any special equipment beyond a standard hand mixer or stand mixer, and the ingredients are easily accessible at any local grocery store. Whether you are an experienced baker or a novice looking to impress, this foolproof recipe will guide you to cookie perfection every single time.
The Essential Ingredients Breakdown
To achieve the perfect texture and flavor, it is crucial to understand the role each ingredient plays in this recipe. Here is a detailed look at what you will need:
- – All-Purpose Flour: The foundation of our cookies. Be sure to measure your flour correctly by spooning it into the measuring cup and leveling it off, rather than scooping directly from the bag, which can pack the flour and lead to dry, dense cookies.
- – Baking Soda and Baking Powder: We use a combination of both leavening agents. Baking soda helps the cookies spread and brown, while baking powder provides a slight lift, keeping them thick and soft.
- – Salt: Essential for balancing the intense sweetness of the white chocolate and the sugars. It enhances the overall flavor profile of the cookie.
- – Unsalted Butter: Using unsalted butter allows you to control the exact amount of sodium in your recipe. The butter must be softened to room temperature so it can easily cream with the sugars, creating air pockets that lead to a tender cookie.
- – Granulated White Sugar and Light Brown Sugar: White sugar contributes to crispy edges, while brown sugar (which contains molasses) provides moisture, chewiness, and a deep, caramel-like flavor.
- – Large Eggs: Eggs bind the ingredients together and provide structure and moisture. Make sure your eggs are at room temperature so they incorporate seamlessly into the butter mixture.
- – Pure Vanilla Extract: A crucial flavor enhancer that complements both the white chocolate and the cream filling of the sandwich cookies. Always use pure vanilla extract, not imitation, for the best results.
- – Chocolate Sandwich Cookies (like Oreos): The star of the show! You will need these in two forms: finely crushed into crumbs to flavor and color the dough, and roughly chopped into chunks for texture.
- – White Chocolate Chips: These mimic the sweet cream filling of the sandwich cookies and add a wonderful creaminess to every bite. High-quality white chocolate chips will melt beautifully and taste superior.
Step-by-Step Instructions to Cookie Perfection
Follow these detailed instructions to ensure your Cookies and Cream Cookies turn out flawlessly every single time.
- Prepare the Dry Ingredients: In a medium-sized mixing bowl, whisk together the all-purpose flour, baking soda, baking powder, and salt. Set this bowl aside. Whisking aerates the flour and ensures the leavening agents are evenly distributed.
- Prepare the Cookie Add-ins: Take your chocolate sandwich cookies and divide them into two batches. Place the first batch in a food processor or a zip-top bag and crush them until they are fine crumbs. Take the second batch and roughly chop them into large, distinct chunks. Set both aside.
- Cream the Butter and Sugars: In the large bowl of a stand mixer fitted with the paddle attachment, or in a large bowl using a hand mixer, combine the softened unsalted butter, granulated white sugar, and light brown sugar. Beat on medium-high speed for 2 to 3 minutes until the mixture is light in color, fluffy, and visibly aerated. Do not rush this step; creaming is essential for the cookie’s final texture.
- Add the Wet Ingredients: Scrape down the sides and bottom of the bowl with a rubber spatula. Add the room-temperature eggs one at a time, beating well after each addition until fully incorporated. Add the pure vanilla extract and mix until combined.
- Incorporate the Dry Ingredients: Turn your mixer to the lowest speed. Gradually add the flour mixture to the wet ingredients, mixing just until the flour disappears. Do not overmix, as this will develop the gluten and result in tough, hard cookies.
- Fold in the Flavor: Remove the bowl from the mixer. Using a large rubber spatula or wooden spoon, gently fold in the finely crushed cookie crumbs until the dough turns a speckled, greyish color. Then, gently fold in the white chocolate chips and the large cookie chunks, reserving a handful of chips and chunks to press into the tops of the cookies later.
- Chill the Dough: This is a mandatory step for thick cookies! Cover the bowl of dough tightly with plastic wrap and place it in the refrigerator to chill for at least 1 hour, or up to 48 hours. Chilling solidifies the butter, which prevents the cookies from spreading into flat puddles in the oven, and it allows the flavors to meld and deepen.
- Preheat and Prep: When you are ready to bake, preheat your oven to 350 degrees F (175 degrees C). Line two large baking sheets with high-quality parchment paper or silicone baking mats.
- Scoop the Dough: Remove the dough from the refrigerator. Using a large cookie scoop (about 2 to 3 tablespoons of dough per cookie), scoop the dough and roll it into smooth balls. Place the dough balls onto the prepared baking sheets, leaving at least 2 inches of space between each one to allow for spreading.
- The Bakery Secret: Take the reserved white chocolate chips and cookie chunks and gently press them into the tops and sides of the dough balls. This ensures that when the cookies bake and spread, they will have a gorgeous, textured, bakery-style appearance with mix-ins visible on the surface.
- Bake to Perfection: Bake in the preheated oven for 10 to 12 minutes. The edges should look set and slightly golden brown, but the centers will still look very soft, puffy, and slightly underbaked. This is exactly what you want! They will continue to cook on the hot pan after you remove them from the oven.
- Cool and Serve: Let the cookies cool on the baking sheet for a full 5 to 10 minutes before carefully transferring them to a wire cooling rack to cool completely. Serve warm with a tall glass of cold milk.
Expert Tips for Bakery-Style Results
Baking is a science, and small adjustments can make a massive difference in your final product. Keep these expert tips in mind:
Do Not Overmix the Dough: Once you add the flour, mix only until you can no longer see streaks of white. Overmixing develops the gluten in the flour, turning what should be a tender, soft cookie into a tough, bread-like hockey puck. Fold in your mix-ins gently.
The Importance of Room Temperature Ingredients: Your butter must be softened, but not melting or greasy. It should yield slightly when pressed with a finger, but still hold its shape. Room temperature eggs mix much more easily into the batter, preventing the mixture from separating or curdling.
Do Not Skip the Chill Time: While it is tempting to bake the cookies immediately, chilling the dough is what gives these cookies their incredible thickness and chewy texture. If you bake them right away, the warm butter will melt instantly in the oven, resulting in thin, flat, crispy cookies.
Underbake Slightly for Soft Centers: The secret to a chewy cookie that stays soft for days is to pull them out of the oven when they look slightly underdone in the very center. The residual heat from the baking pan will finish setting the cookie as it cools.
Fun Flavor Variations to Try
Once you have mastered the classic Cookies and Cream Cookie, feel free to experiment with these delicious variations:
Double Chocolate Cookies and Cream: For the ultimate chocolate lovers, substitute 1/2 cup of the all-purpose flour with 1/2 cup of high-quality, unsweetened Dutch-process cocoa powder. This creates a rich, dark chocolate cookie base studded with the white chocolate chips and Oreo chunks.
Golden Cookies and Cream: Swap the classic black chocolate sandwich cookies for the golden vanilla variety. This creates a sweeter, more vanilla-forward cookie that tastes remarkably like a birthday cake.
Mint Chocolate Cookies and Cream: Use mint-flavored chocolate sandwich cookies and swap the white chocolate chips for dark chocolate chips or Andes mint baking chips. Add a 1/4 teaspoon of peppermint extract to the dough for a refreshing holiday twist.
Peanut Butter Cookies and Cream: Use peanut butter stuffed chocolate sandwich cookies and swap the white chocolate chips for peanut butter chips. The combination of chocolate, peanut butter, and creamy cookie base is out of this world.
Storage and Freezing Guidelines
These cookies are so delicious that leftovers are rare, but if you find yourself with extras, here is how to keep them tasting fresh:
Room Temperature Storage: Store the completely cooled baked cookies in an airtight container at room temperature for up to 5 days. To keep them extra soft, place a small slice of plain white bread in the container with the cookies. The cookies will absorb the moisture from the bread, keeping them perfectly chewy.
Freezing Baked Cookies: Allow the baked cookies to cool completely. Place them in a single layer on a baking sheet and freeze for 1 hour. Once solid, transfer the cookies to a freezer-safe zip-top bag or container. They can be frozen for up to 3 months. Thaw at room temperature for a few hours before eating.
Freezing Cookie Dough: This is highly recommended so you can have fresh cookies on demand! Scoop the dough into balls and place them on a baking sheet. Freeze until solid (about 1-2 hours). Transfer the solid dough balls to a freezer-safe bag. You can bake them straight from frozen; simply add an extra 1 to 2 minutes to the total baking time.
Frequently Asked Questions
Can I use a different brand of sandwich cookies?
Absolutely. While Oreos are the classic choice, you can use any brand of chocolate sandwich cookie with a cream filling. Just ensure they have a similar texture and ratio of cookie to cream.
Why did my cookies spread so much and become flat?
The most common culprit for flat cookies is butter that was too warm or melted when making the dough. The second most common reason is skipping the dough-chilling step. Finally, ensure your baking soda is fresh and active, and that you did not accidentally use too little flour.
Can I make these gluten-free?
Yes, you can easily adapt this recipe. Substitute the all-purpose flour with a high-quality 1:1 gluten-free baking flour blend that contains xanthan gum. You must also ensure you purchase certified gluten-free chocolate sandwich cookies, which are widely available in most supermarkets.
These Cookies and Cream Cookies are destined to become a beloved staple in your baking repertoire. They offer the perfect combination of nostalgia, incredible flavor, and irresistible texture. Gather your ingredients, preheat that oven, and get ready to enjoy one of the best cookies you will ever bake!
Cookies and Cream Cookies
Ingredients
Equipment
Method
- In a medium bowl, whisk together the flour, baking soda, baking powder, and salt. Set aside.
- In a large bowl using a mixer, cream the softened butter, granulated sugar, and brown sugar on medium-high speed until light and fluffy (about 2-3 minutes).
- Add the eggs one at a time, mixing well after each. Stir in the vanilla extract.
- Turn mixer to low and gradually add the dry flour mixture, mixing just until combined. Do not overmix.
- Gently fold in the finely crushed cookie crumbs, the large cookie chunks, and the white chocolate chips using a spatula.
- Cover the bowl tightly with plastic wrap and chill the dough in the refrigerator for at least 1 hour.
- Preheat oven to 350°F (175°C). Line two large baking sheets with parchment paper.
- Using a large cookie scoop (about 2-3 tablespoons), form the dough into balls and place them 2 inches apart on the baking sheets.
- Press reserved white chocolate chips and cookie chunks into the tops of the dough balls.
- Bake for 10-12 minutes until the edges are lightly golden but centers are still soft.
- Allow cookies to cool on the baking sheet for 5-10 minutes before transferring to a wire rack to cool completely.