Cotton Candy Bites
The Ultimate Cotton Candy Cloud Bites Recipe: A Fluffy Homemade Treat
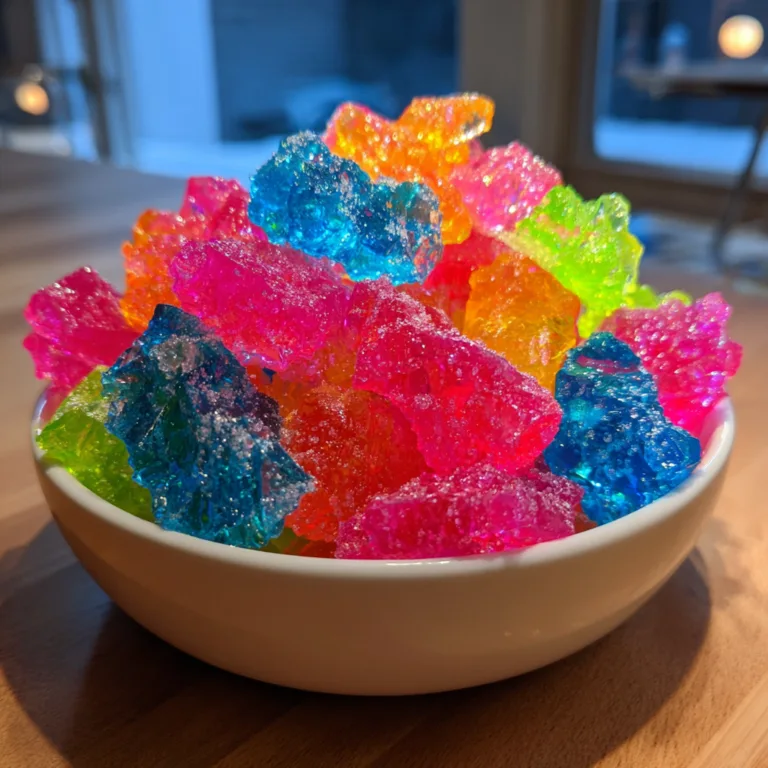
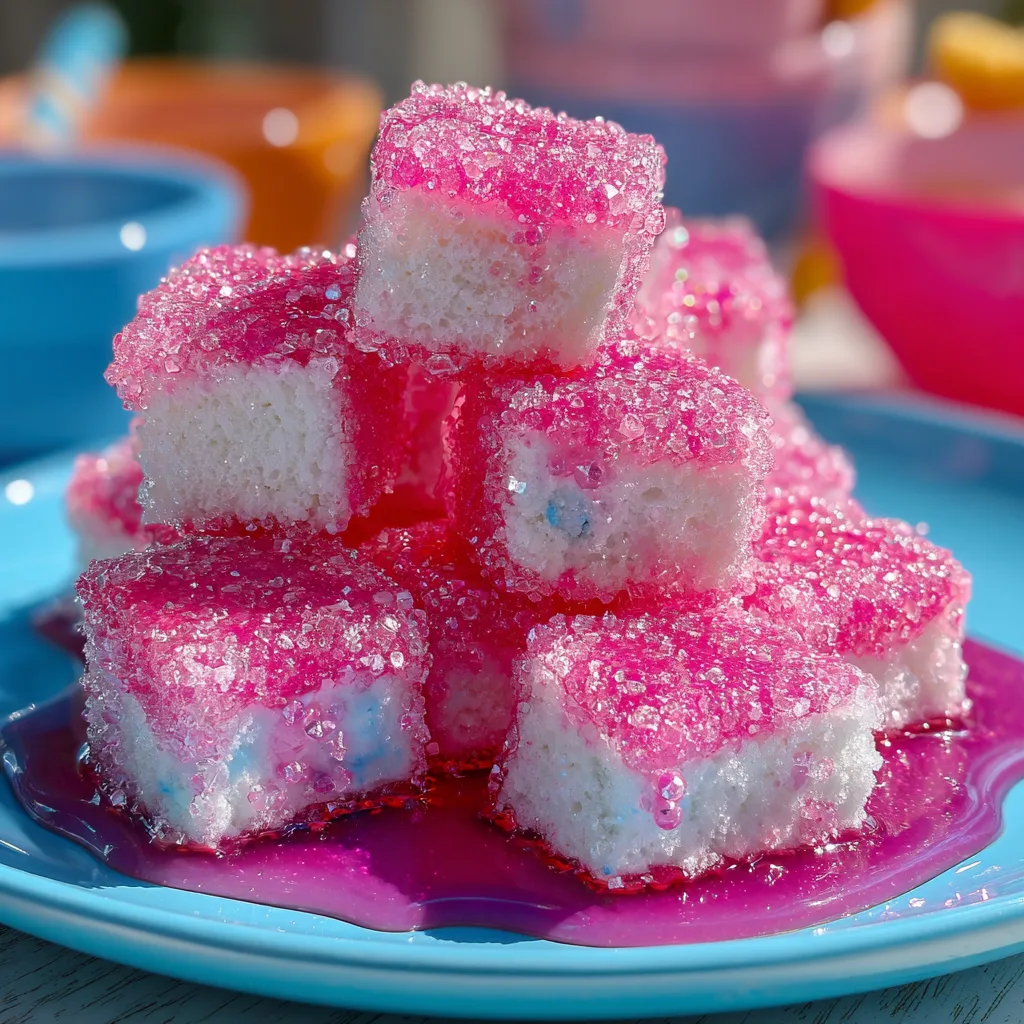
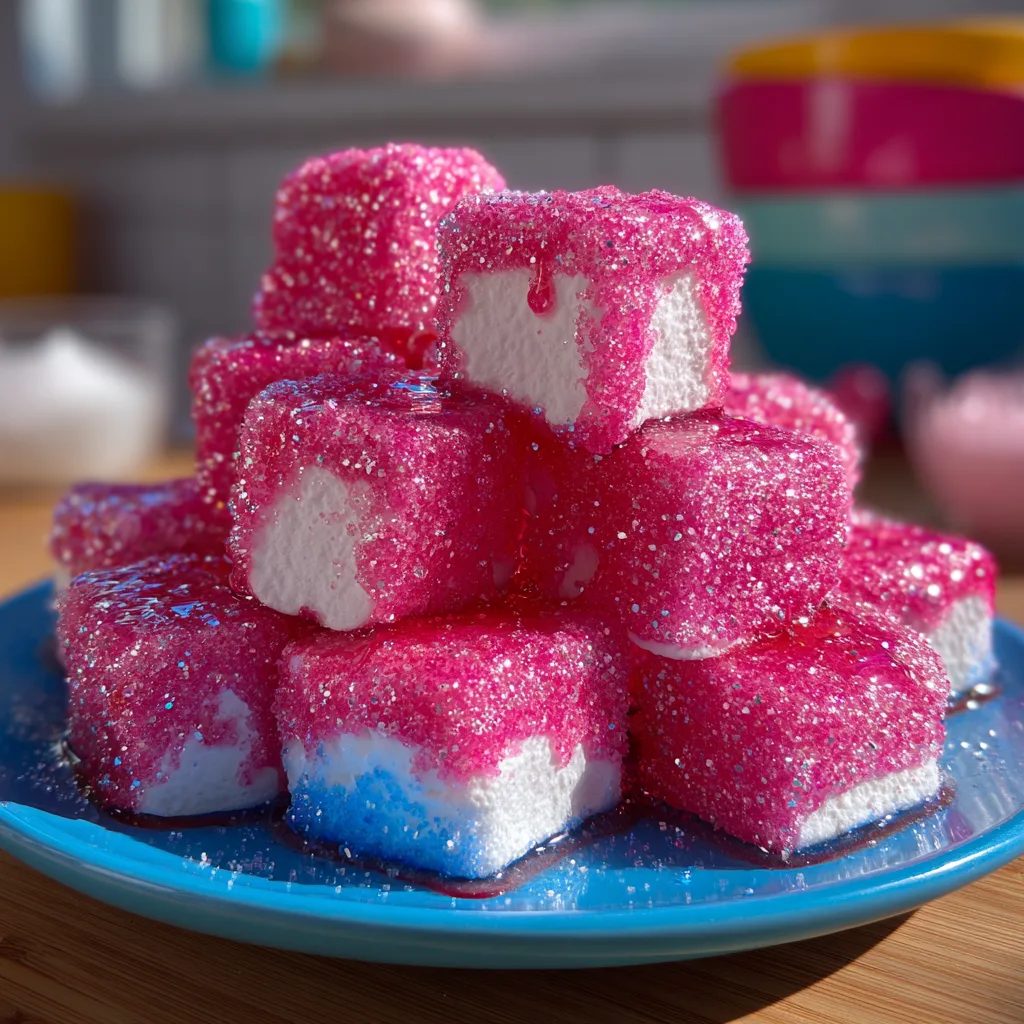
There is an undeniable, universal magic associated with the flavor and texture of cotton candy. It instantly transports us to the nostalgic joy of childhood carnivals, summer fairs, and amusement parks. The spun sugar dissolving instantly on the tongue is a sensory experience that is hard to replicate. However, what if you could capture that exact, whimsical flavor profile and infuse it into a pillowy, soft, and utterly decadent homemade marshmallow? Enter the Cotton Candy Cloud Bite—a striking, two-toned marshmallow cube coated in sparkling pink sugar that looks as incredible as it tastes.
Making marshmallows from scratch might seem like an intimidating culinary feat reserved for professional confectioners, but it is actually an incredibly straightforward and deeply rewarding process. With a few basic ingredients, a candy thermometer, and a stand mixer, you can create a dessert that completely overshadows store-bought alternatives in both texture and flavor. This comprehensive guide will walk you through the entire science and art of crafting these beautiful, bouncy, cotton-candy-flavored confections right in your own kitchen.
The Science of Homemade Marshmallows
To master the Cotton Candy Cloud Bite, it is essential to understand what a marshmallow actually is. At its core, a marshmallow is a foam stabilized by gelatin. It is created by whipping air into a hot sugar syrup until it cools into a fluffy, semi-solid state.
The Gelatin Bloom: The foundation of any good marshmallow is unflavored gelatin. Gelatin is a protein derived from collagen that, when hydrated and heated, forms a flexible matrix that traps air bubbles. The first step in this recipe is “blooming” the gelatin. This involves sprinkling the gelatin powder evenly over cold water and letting it sit. The granules absorb the water, swelling and softening, which ensures they will dissolve completely and smoothly when the boiling hot sugar syrup is poured over them later. If you skip the blooming process, your marshmallows will have hard, unpleasant lumps of undissolved gelatin.
The Sugar Syrup: The second crucial component is the sugar syrup, typically a mixture of granulated sugar, water, and corn syrup. The corn syrup is not just for sweetness; it is an “interfering agent.” It prevents the granulated sugar from crystallizing as it boils. If you were to boil sugar and water alone, it would likely turn into hard candy or crystallize back into a grainy solid. Corn syrup ensures your marshmallow remains impeccably smooth.
Temperature Control (The Soft-Ball Stage): The most critical phase of marshmallow making is boiling the syrup to the correct temperature: 240°F (115°C), known as the “soft-ball stage.” At this temperature, the sugar concentration is perfect. If the temperature is too low, your marshmallows will be a weeping, sticky puddle that never sets. If the temperature gets too high, you will end up with tough, rubbery marshmallows. A reliable candy thermometer is your best friend in this recipe.
Achieving the Perfect Cotton Candy Flavor
Vanilla is the standard flavoring for traditional marshmallows, but for our Cloud Bites, we need something distinctly different. The unmistakable flavor of cotton candy cannot be achieved with just sugar alone; it requires a specific flavoring extract.
Cotton Candy Extract: You can find high-quality cotton candy extract online or in specialty baking supply stores. This extract mimics the caramelized, slightly fruity, spun-sugar notes of actual cotton candy. Because extracts can vary wildly in strength depending on the brand, it is usually best to start with a teaspoon and adjust slightly. You add the extract at the very end of the whipping process. Adding it to the boiling sugar syrup would evaporate the delicate volatile compounds that give the extract its flavor.
The Art of the Two-Toned Cloud Bite
What makes these specific marshmallows stand out is their stunning visual presentation. They feature a bright blue center enveloped by a stark white exterior, all rolled in vibrant pink sugar. Achieving this look requires a bit of timing and technique.
Piping vs. Layering: There are two main ways to achieve the color contrast. The easiest method for home cooks is layering. Once the marshmallow fluff is fully whipped, you divide it. You leave the majority of it white, and you dye a smaller portion bright blue using gel food coloring. You then spread a thin layer of white fluff into your prepared pan, pipe or spread the blue fluff in a thick line down the center, and cover it completely with the remaining white fluff. When you slice the set marshmallow block, the cross-section reveals that beautiful blue core.
Gel vs. Liquid Food Coloring: It is highly recommended to use gel food coloring rather than liquid drops. Gel coloring is highly concentrated, meaning you only need a tiny amount to achieve a vibrant hue. Liquid coloring adds unnecessary water to the marshmallow mixture, which can slightly alter the delicate texture and stability of the fluff.
The Magic of the Pink Sugar Coating
Traditional marshmallows are dusted with a mixture of powdered sugar and cornstarch to prevent them from becoming a sticky mess. For our Cotton Candy Cloud Bites, we elevate this step by using sparkling pink sanding sugar.
The pink sugar serves a dual purpose. Visually, it provides that iconic carnival color palette (pink and blue). Texturally, it gives the exterior of the soft, pillowy marshmallow a delightful, slight crunch that mimics the crystallized nature of real cotton candy. If you cannot find pink sanding sugar, you can easily make your own by placing regular granulated sugar in a zip-top bag, adding a single drop of pink gel food coloring, and rubbing the bag vigorously between your hands until the color is evenly distributed.
Essential Equipment for Marshmallow Making
Before you begin, ensure you have the right tools. Making marshmallows is a time-sensitive process once the sugar syrup reaches its target temperature.
- – Stand Mixer: A stand mixer fitted with a whisk attachment is highly recommended. Whipping the hot syrup into fluff takes about 10 to 12 minutes of continuous high-speed mixing. Doing this with a hand mixer is possible, but it is exhausting and can burn out the motor of weaker models.
- – Candy Thermometer: Absolutely non-negotiable. You cannot guess when the syrup reaches 240°F.
- – Heavy-Bottomed Saucepan: A good saucepan distributes heat evenly, preventing the sugar syrup from burning on the bottom before it reaches the correct temperature.
- – Parchment Paper and Cooking Spray: Marshmallow is incredibly sticky. You must line your setting pan with parchment paper and generously grease it with non-stick cooking spray to have any hope of removing the final block intact.
Ingredients
Gather the following ingredients to create a large batch of these whimsical treats. Accuracy in measuring is crucial in candy making.
- – 2 1/2 tablespoons unflavored gelatin powder (about 3 standard packets)
- – 1/2 cup cold water (for blooming the gelatin)
- – 1/2 cup cold water (for the sugar syrup)
- – 1 1/2 cups granulated sugar
- – 1 cup light corn syrup
- – 1/4 teaspoon kosher salt
- – 1 1/2 teaspoons high-quality cotton candy extract
- – 2 drops blue gel food coloring
- – 1 cup pink sanding sugar (or granulated sugar dyed pink)
- – Non-stick cooking spray
- – Powdered sugar (for dusting your knife)
Step-by-Step Instructions
- Prepare Your Pan: Line an 8×8-inch baking pan with parchment paper, leaving an overhang on the sides to act as handles. Generously spray the parchment paper with non-stick cooking spray. Do not skip the spray!
- Bloom the Gelatin: Pour 1/2 cup of cold water into the bowl of your stand mixer. Evenly sprinkle the 2 1/2 tablespoons of unflavored gelatin powder over the water. Do not stir it. Attach the bowl to the mixer fitted with the whisk attachment and let it sit for at least 10 minutes while you prepare the syrup.
- Boil the Sugar Syrup: In a medium heavy-bottomed saucepan, combine the granulated sugar, light corn syrup, salt, and the remaining 1/2 cup of cold water. Stir gently just to combine. Place the saucepan over medium-high heat. Attach your candy thermometer to the side of the pan, ensuring the tip is submerged in the liquid but not touching the bottom of the pan.
- Reach the Soft-Ball Stage: Allow the mixture to boil without stirring. Stirring can cause sugar crystals to form on the sides of the pan. Watch the thermometer closely until it reaches exactly 240°F (115°C). This usually takes about 8 to 10 minutes. Immediately remove the pan from the heat.
- Whip the Marshmallow: Turn your stand mixer (which holds the bloomed gelatin) onto low speed. Carefully and slowly pour the hot sugar syrup down the side of the bowl into the gelatin. Pouring it down the side prevents the hot syrup from hitting the whisk and splashing you.
- Increase Speed: Once all the syrup is added, gradually increase the mixer speed to high. Whip the mixture for 10 to 12 minutes. You will watch it transform from a clear, yellowish liquid into a massive, thick, opaque, stark-white fluff. The bowl should be lukewarm to the touch when it is done.
- Add the Extract: During the last minute of whipping, pour in the 1 1/2 teaspoons of cotton candy extract and whip until fully incorporated.
- Separate and Color: Working very quickly (as the marshmallow will begin to set), scoop out about 1/3 of the white fluff into a separate bowl. Add 1 to 2 drops of blue gel food coloring to this smaller portion and fold it in with a greased rubber spatula until you have a vibrant, even blue color.
- Assemble the Cloud Bites: Scrape half of the remaining white marshmallow fluff into your prepared 8×8 pan. Smooth it out into an even layer using a heavily greased spatula. Next, carefully spoon or pipe the blue marshmallow fluff into a thick layer directly in the center, leaving a border of white around the edges. Finally, dollop the remaining white fluff over the top and spread it gently to completely encase the blue center.
- Let it Set: Spray a final piece of parchment paper with cooking spray and gently press it, greased side down, onto the top of the marshmallow to smooth it out. Let the marshmallow set at room temperature for at least 6 to 8 hours, preferably overnight. Do not put it in the refrigerator, as the humidity will make it incredibly sticky.
- Cut and Coat: Once fully set, use the parchment overhangs to lift the marshmallow block out of the pan. Pour your pink sanding sugar into a large, shallow bowl. Spray a large, sharp knife with cooking spray, or dust it heavily with powdered sugar. Slice the marshmallow block into 1-inch to 1.5-inch cubes. Wash and re-grease your knife as it gets sticky.
- The Final Touch: Toss each individual sticky marshmallow cube into the bowl of pink sanding sugar, rolling it around to ensure all six sides are completely coated and no sticky spots remain. Serve and enjoy!
Pro Tips for Marshmallow Success
Dealing with Stickiness: Marshmallow fluff is one of the stickiest substances in the culinary world. The key to maintaining your sanity is cooking spray. Spray your spatulas, spray your hands, and spray your knives. If your knife starts dragging and tearing the marshmallows while cutting, stop, clean the blade under hot water, dry it, and re-grease it.
Do Not Scrape the Pan: When you pour the hot sugar syrup into the mixer, do not try to scrape every last bit of syrup out of the saucepan. The syrup on the sides of the pan cools faster and may have crystallized. Scraping it into the mixer could introduce hard sugar crystals into your fluffy marshmallows.
Variations and Customizations
The beauty of a basic marshmallow recipe is that it is a blank canvas. Once you perfect this technique, you can let your imagination run wild.
Different Flavors and Colors: Swap the cotton candy extract for peppermint extract and use red and green coloring for holiday marshmallows. Use strawberry extract and dust them with freeze-dried strawberry powder instead of sugar for a gourmet fruit experience. Add a teaspoon of vanilla bean paste for a luxurious, classic treat.
Fun Shapes: Instead of cutting them into cubes, you can use greased metal cookie cutters to stamp out stars, hearts, or actual cloud shapes. Just be sure to coat the sticky cut edges in your pink sugar immediately.
Storage Instructions
Homemade marshmallows do not contain the heavy preservatives found in commercial brands, so their shelf life is slightly shorter, though still quite generous.
Store your fully coated Cotton Candy Cloud Bites in an airtight container at room temperature. They will stay soft, fluffy, and fresh for up to three weeks. If you live in a particularly humid climate, you might notice the sugar coating becoming slightly damp after a few days; simply toss them in a little more pink sugar to revive their crunch. Never store homemade marshmallows in the refrigerator or freezer, as the condensation upon thawing will melt the sugar coating and ruin the texture.
Conclusion
Creating Cotton Candy Cloud Bites at home is a magical culinary project that yields spectacular results. The contrast of the bouncy, fluffy texture with the crunchy sugar coating, combined with the nostalgic burst of carnival flavor, makes them an unforgettable treat. Whether you are packaging them up as beautiful edible gifts, serving them at a themed birthday party, or simply enjoying them as a decadent weekend project, these homemade marshmallows are guaranteed to impress. Gather your ingredients, watch your candy thermometer closely, and prepare to taste a cloud.
Cotton Candy Cloud Bites
Ingredients
Equipment
Method
- Line an 8×8 pan with parchment paper and generously spray with non-stick cooking spray.
- In the bowl of a stand mixer, pour in 1/2 cup cold water and sprinkle the gelatin evenly over the top. Let it sit (bloom) for 10 minutes.
- In a medium saucepan, combine the granulated sugar, corn syrup, salt, and remaining 1/2 cup cold water. Place over medium-high heat.
- Clip a candy thermometer to the pan and boil the mixture without stirring until it reaches exactly 240°F (115°C). Remove from heat immediately.
- Turn the stand mixer on low speed and carefully pour the hot syrup down the side of the bowl into the bloomed gelatin.
- Gradually increase the speed to high and whip for 10-12 minutes until the mixture is thick, white, and fluffy. Add the cotton candy extract during the last minute.
- Quickly remove 1/3 of the white fluff to a separate bowl and fold in the blue food coloring until vibrant.
- Spread half of the remaining white fluff into the prepared pan. Layer the blue fluff in the center, and cover completely with the rest of the white fluff.
- Let the marshmallows set at room temperature for 6-8 hours or overnight.
- Remove the block from the pan. Using a heavily greased knife, cut into cubes. Roll each sticky cube in the pink sanding sugar until fully coated.