Crochet Christmas Spiral Santa Ornament
📖 Introduction
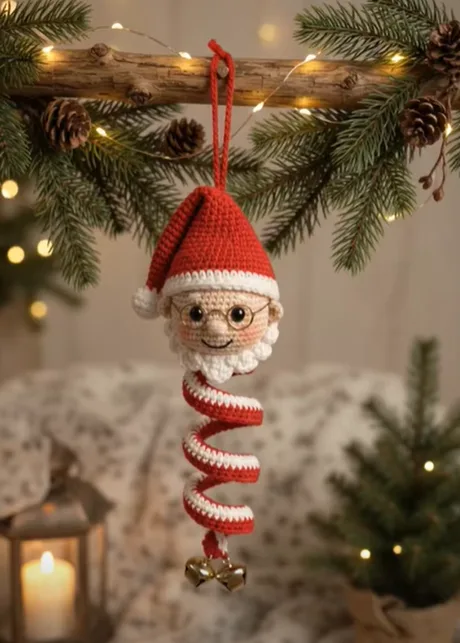
Add a touch of playful magic to your holiday decor with the Crochet Christmas Spiral Santa Ornament 🎅✨. This delightful kinetic ornament combines classic amigurumi character design with a bouncy, spiraling body that dances when hung on a tree or mantel. The design in “Crochet Christmas Spiral Santa Ornament 🎅✨.jpg” features a detailed, smiling Santa face complete with wire spectacles, a textured white beard, and a traditional red stocking cap. Beneath the head, a long red-and-white striped spiral replaces the traditional body, finished with festive jingle bells that chime with every movement.
This project is a fantastic way to showcase your amigurumi skills while creating a unique, eye-catching piece. The whimsical nature of the bouncing spiral makes it an exceptional gift for children and adults alike, or a standout piece for a holiday craft fair. Because it uses small amounts of yarn, it’s also an excellent stash-buster for those leftover skeins of red, white, and skin-tone yarn from larger seasonal projects.
Personalization is incredibly easy with this pattern. You can easily modify the skin tone, switch the hat colors for a woodland or vintage Santa aesthetic, or adjust the length of the spiral body to fit your specific display needs.
🔍 Main Pattern Overview
This pattern is constructed in four primary modules that are crocheted separately and then assembled to create the final bouncing character.
First, you will create a simple spherical head in a beige or peach tone. Next, you will crochet the classic red Santa hat featuring a folded white brim and a miniature pom-pom. The facial details are added using a textured scalloped beard, safety eyes, basic embroidery for the smile, and a small piece of craft wire for his signature glasses.
Finally, the defining feature of this ornament—the kinetic body—is created using a single, long strip of red crochet that naturally coils upon itself due to strategic increases. A crisp white edging is applied to the spiral to give it a peppermint-stripe effect, and two small gold jingle bells are attached to the very bottom. A sturdy red loop at the top of the hat allows for easy hanging.
🎯 Skill Level
Intermediate
While the basic crochet stitches are beginner-friendly, this pattern requires precision in assembly, small-scale facial embroidery, and the manipulation of craft wire to create the glasses.
Techniques Involved:
- Working in continuous rounds and flat rows
- Invisible decreases and strategic increases
- Hyperbolic crochet (forcing a flat piece to curl)
- Basic facial embroidery (nose and mouth)
- Shaping craft wire for accessories
- Multi-part assembly and alignment
📏 Finished Size
- Overall Length: Approximately 8 inches (20 cm) from the top of the hat to the bottom of the bells, un-stretched.
- Head Width: Approximately 2.5 inches (6.5 cm).
- Spiral Width: Approximately 1.25 inches (3 cm) across the coiled tube.
- Note: The bouncy nature of the spiral means the ornament will stretch downwards slightly under its own weight when hung. Yarn weight and hook size will directly impact the final scale.
🧮 Gauge
Suggested Gauge: 5 sc and 5 rows = 1 inch (2.5 cm).
For the amigurumi head and hat, maintaining a tight, dense fabric is critical so the fiberfill stuffing does not show through the stitches. For the spiral body, a slightly looser tension will result in a more flexible, bouncy coil, but it should still be tight enough to maintain a structural curl.
🧶 Required Yarn Amounts
Estimates per single ornament using medium #4 worsted weight yarn:
- Red (Hat, Spiral, Hanging Loop): Approximately 35 yards (32 meters).
- White (Beard, Hat Brim, Pom-pom, Spiral Edging): Approximately 20 yards (18 meters).
- Beige / Skin Tone (Head): Approximately 15 yards (14 meters).
- Total Project Estimate: Under 75 yards per ornament.
🧰 Materials
- Hook: US E/4 (3.5 mm) crochet hook.
- Yarn: Medium #4 worsted weight cotton or acrylic yarn in Red, White, and Beige.
- Eyes: One pair of 6mm black safety eyes.
- Stuffing: High-quality polyester fiberfill.
- Wire: 4 inches of thin gold or copper craft wire (20-22 gauge) for the glasses.
- Bells: Two small (10mm – 12mm) gold jingle bells.
- Tools: Tapestry needle, scissors, stitch markers, small needle-nose pliers (for wire).
- ⚠️ Safety Note: Because this design uses small safety eyes, sharp craft wire, and miniature bells, it is strictly intended as a decorative ornament and is NOT a toy for young children or pets.
🔤 Abbreviations – US Terms
- MR – magic ring
- ch – chain
- sl st – slip stitch
- sc – single crochet
- hdc – half double crochet
- dc – double crochet
- inc – increase (2 sc in the same st)
- dec – invisible decrease (sc 2 sts together using front loops only)
- st(s) – stitch(es)
- yo – yarn over
- FO – fasten off
📝 Notes Before You Begin
- Continuous Rounds: The head and hat are worked in continuous spirals. Do not join with a slip stitch or chain 1 at the end of rounds unless explicitly stated. Use a stitch marker to keep track of the first stitch of each round.
- The Spiral Effect: The kinetic body curls because multiple stitches are forced into a single chain, causing the fabric to buckle and twist into a helix.
- Facial Features: It is highly recommended to attach the safety eyes and embroider the nose before closing the head sphere, as securing the backings and hiding yarn tails is much easier while the piece is open.
🪡 Complete Pattern
🧠 Head
This forms the base sphere for Santa’s face. Worked in continuous rounds.
Yarn/Color: Beige / Skin Tone
Starting Point: Top of the head
R1: MR 6. (6)
R2: inc in each st around. (12)
R3: (1 sc, inc) x6. (18)
R4: (2 sc, inc) x6. (24)
R5: (3 sc, inc) x6. (30)
R6: (4 sc, inc) x6. (36)
R7-12: sc in each st around. (36) [6 rounds total]
Pause here to add facial features:
- Insert 6mm safety eyes between R9 and R10, spaced about 4 stitches apart.
- Using a scrap of Beige yarn, embroider a small horizontal nose centered between and slightly below the eyes (wrap the yarn horizontally across 2 stitches 3-4 times).
- Using a single strand of black embroidery floss, stitch a small, gentle smile one round below the nose.
- (Optional) Use a soft pink blush or a dab of pink yarn to add rosy cheeks just outside and below the eyes.
R13: (4 sc, dec) x6. (30)
R14: (3 sc, dec) x6. (24)
R15: (2 sc, dec) x6. (18)
Begin stuffing the head firmly. Continue stuffing as you close.
R16: (1 sc, dec) x6. (12)
R17: dec x6. (6)
FO, leaving a long tail. Thread the tail through the front loops of the remaining 6 stitches, pull tight to close the hole, and weave in the end securely.
🎓 Santa’s Hat
Worked in continuous rounds from the tip down to the brim.
Yarn/Color: Red (R1-16), White (R17-18)
Starting Point: Tip of the hat
R1: With Red, MR 4. (4)
R2: (1 sc, inc) x2. (6)
R3: sc in each st around. (6)
R4: (1 sc, inc) x3. (9)
R5: sc in each st around. (9)
R6: (2 sc, inc) x3. (12)
R7: sc in each st around. (12)
R8: (3 sc, inc) x3. (15)
R9: sc in each st around. (15)
R10: (4 sc, inc) x3. (18)
R11: (5 sc, inc) x3. (21)
R12: (6 sc, inc) x3. (24)
R13: (3 sc, inc) x6. (30)
R14: (4 sc, inc) x6. (36)
R15-16: sc in each st around. (36) [2 rounds]
R17: Change to White. sc in each st around. (36)
R18: sc in each st around. (36)
FO, leaving a long White tail for sewing the hat to the head.
Mini Pom-pom: With White, MR 6. inc in each st around (12). sc in each st around for 1 round (12). dec x6 (6). Stuff lightly. FO, leaving a long tail. Sew to the tip (R1) of the red hat.
🧔 Beard & Mustache
Worked flat in rows to create a textured, scalloped framing for the face.
Yarn/Color: White
Starting Point: Top edge of the beard
Row 1: Ch 20. sc in the 2nd ch from the hook and in each ch across. (19)
Row 2 (Scallops): Ch 1, turn. (Skip 1 st, 5 dc in the next st, skip 1 st, sl st in the next st) repeat across until the end.
You should have approximately 5 distinct scallop shells.
FO, leaving a long tail for sewing. The straight edge (Row 1) will attach to the face, while the scallops will point downwards.
🌀 Spiral Body
Unlike a tapered tree, this kinetic body maintains a uniform thickness to create a spring effect.
Yarn/Color: Red (Row 1), White (Row 2)
Starting Point: Top attachment point of the spiral
Row 1 (The Coil): With Red, ch 45.
Starting in the 2nd ch from the hook, place 2 hdc in every single chain across.
Stitch count: 88 hdc.
FO Red, leaving a long tail for attaching the spiral to the head.
(Note: The piece will twist aggressively. Let it curl organically.)
Row 2 (The Peppermint Edge): Attach White yarn to the first stitch of Row 1. Ch 1, sc in each stitch across the entire outer edge of the red coil. Stitch count: 88 sc. FO White, weave in this specific end.
🔔 Bells & Hanger
- Bells: Using a scrap of Red yarn, tie the two gold jingle bells securely to the very bottom point of the spiral body. Weave the tails up into the bottom coils to hide them.
- Hanger: Cut a 10-inch length of Red yarn. Thread it through the very top point of the Santa hat (near the pom-pom). Tie the ends together in a secure knot to form a hanging loop. Rotate the yarn so the knot is hidden inside the hat.
🎨 Styling / Assembly / Stability / Final Shaping
Assembly order is critical for aligning Santa’s facial features correctly.
- Attach the Hat: Lightly stuff the red portion of the hat. Place it on the head at a slight angle, pulling the white brim down just above the safety eyes. Use the long white tail to sew the brim securely to the head.
- Attach the Beard: Pin the straight edge of the beard in a “U” shape around the face, starting from the left edge of the hat brim, running under the smile, and ending at the right edge of the hat brim. Sew it in place. The scallops should flair outward slightly.
- Forming the Glasses: Take your 4-inch piece of craft wire. Using small pliers or a pen barrel, wrap the wire to form two small circles with a tiny bridge in between. Bend the side arms straight back. Carefully insert the sharp ends of the wire arms directly into the crocheted head, right beside the eyes.
- Attach the Spiral: Thread the long red tail from the top of the spiral body onto a tapestry needle. Sew the top of the spiral securely to the exact bottom center (R17) of the beige head. Reinforce this with several passes, as the head will bear the kinetic weight of the bouncing spiral.
- Final Shaping: Twist the spiral body manually to ensure the white sc edge stacks neatly on the outside of the coil, creating a uniform, spring-like cylinder.
💡 Helpful Crochet Tips
- 💡 Wire Safety: To prevent the wire glasses from eventually slipping out, you can add a tiny drop of craft glue to the tips of the wire arms before inserting them into the head.
- 💡 Perfecting the Coil: If your red and white spiral looks messy after crocheting, hold the top and bottom and stretch it gently, then let it snap back. Twist it in the direction of the stitches to train the helix.
- 💡 Invisible Finish: When finishing the white edge of the spiral, use an invisible fasten-off technique so the bottom tip where the bells hang looks clean and professional.
- 💡 Hat Positioning: Don’t sew the hat completely straight. Giving it a slight slouch to one side or tilting the pom-pom backward gives Santa a much more dynamic, charming character.
- 💡 Beard Placement: Ensure the beard doesn’t cover up the embroidered smile. Pinning the pieces before sewing is the best way to double-check facial proportions.
- 💡 Tight Tension for Rings: When working the Magic Ring for the head, pull the tail as tightly as possible to ensure no stuffing leaks out the top, as the hat will not cover the exact top center if placed at an angle.
🧼 Care Instructions
Due to the delicate wire glasses, safety eyes, and metal bells, this ornament cannot be machine washed.
- Cleaning: Spot clean only using a cotton swab dipped in mild soapy water. Dab gently at any stains.
- Drying: Allow to air dry completely in a well-ventilated area to prevent rust on the metal components.
- Storage: Wrap the ornament gently in tissue paper and store it flat in a rigid box. Do not place heavy items on top of it, as this will permanently crush the wire glasses and flatten the bouncy spring of the spiral body.
❓ FAQ
❓ Can I make this without craft wire?
Yes. If you are concerned about the wire or don’t have any on hand, you can embroider the glasses using a thin black or metallic gold yarn. Simply stitch two circles around the eyes and a small bridge across the nose.
❓ My spiral isn’t bouncing; it’s just hanging loosely. How do I fix this?
A lack of “bounce” usually means the tension was too loose or the yarn is too heavy. You can try dropping down half a hook size for the spiral portion to create a stiffer, more resilient fabric that springs back when stretched.
❓ Can I substitute the jingle bells with something else?
Absolutely. If you don’t have bells, you can crochet a small red or white bauble, attach a mini pom-pom, or even hang a small wooden star or snowflake charm from the bottom tip.
❓ How do I stop the hat from flopping over too much?
Make sure you are adding enough fiberfill stuffing inside the red cone of the hat before sewing it to the head. The stuffing provides the structural support needed to keep the hat upright and voluminous.
❓ Is there a way to make the spiral longer?
Yes! The kinetic coil is easily adjustable. Simply start with a longer foundation chain (e.g., chain 60 or 70 instead of 45). Follow the exact same instructions for the rows, and you will end up with a much longer, droopier spring.