Custard Cream Puff Squares
Golden Custard-Filled Puff Pastry Squares: The Ultimate Creamy Indulgence
There is a specific kind of magic that happens when you combine buttery, shattering layers of puff pastry with a cool, velvety cream filling. It is a texture contrast that has defined some of the world’s most beloved desserts, from the French Mille-feuille to the Italian Sporcamuss. But today, we are stripping away the intimidation of professional patisserie and embracing a rustic, home-style comfort dessert that looks like a million dollars but costs pennies of effort to make. Enter the Golden Custard-Filled Puff Pastry Squares.
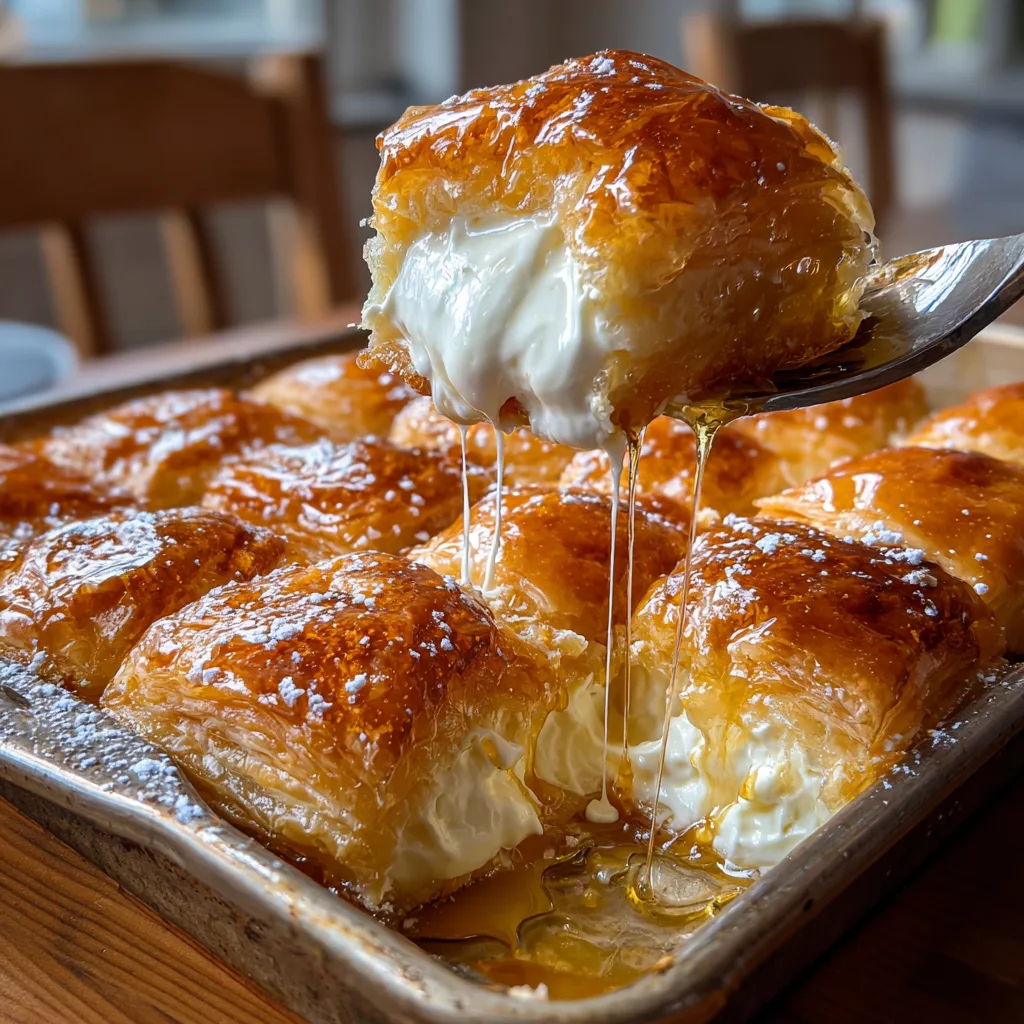
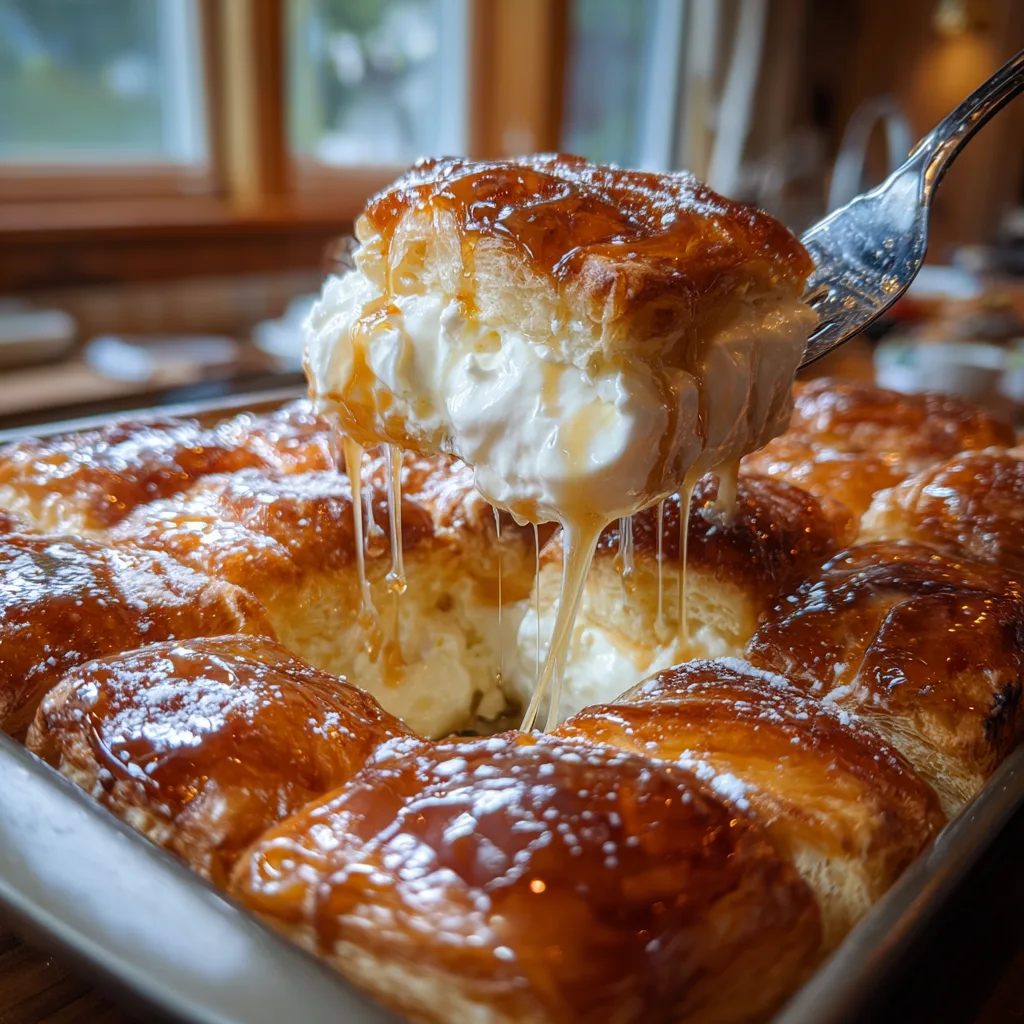
Imagine pulling a tray out of the oven, the pastry puffed to golden heights, glistening with a honey-butter glaze. But the real secret lies inside. Unlike dry pastries that rely solely on the dough for flavor, these squares are packed generously with a diplomat-style cream—a cloud-like hybrid of custard and whipped cream that is neither too heavy nor too sweet. It is the kind of dessert that makes your guests stop mid-sentence, fork hovering, as they take that first bite of crunchy shell and luscious interior.
This recipe is designed for the modern home cook. We are skipping the hours of laminating dough by hand (unless you are feeling particularly brave!) and using high-quality store-bought puff pastry to achieve that professional rise. The result is a tray of pull-apart bliss that is perfect for brunch, afternoon tea, or a decadent midnight snack. In this comprehensive guide, we will walk you through not just the “how-to,” but the “why” behind getting that perfect puff and the silky smooth filling.
Why You Will Love This Recipe
It is rare to find a dessert that balances elegance with ease so perfectly. Here is why this recipe is about to become a permanent fixture in your baking rotation:
- Texture Heaven: The exterior is crispy, caramelized, and flaky, while the interior is cool, soft, and creamy. It is a sensory experience in every bite.
- Visual Appeal: With its glossy golden top and dusting of snow-white powdered sugar, this dish looks incredibly appetizing on any table.
- Versatile Filling: While we use a vanilla custard cream here, the base is neutral enough to accept flavors like lemon zest, almond extract, or even a swirl of hazelnut spread.
- Crowd Pleaser: The pull-apart nature of the baking tray makes it ideal for sharing. Everyone gets a corner or a center piece, depending on their preference for crunch or softness.
Ingredients
The beauty of this recipe lies in the simplicity of its components. High-quality ingredients will yield the best results.
For the Pastry Base
- Puff Pastry Sheets: 2 packages (approx. 17 oz / 500g total), thawed but still cold.
- Egg Wash: 1 large egg beaten with 1 tablespoon of water (for that deep golden shine).
- Coarse Sugar: Optional, for sprinkling on top before baking to add crunch.
For the Custard Cream Filling
- Heavy Whipping Cream: 2 cups (480ml), very cold. This provides the volume and fluffiness.
- Instant Vanilla Pudding Mix: 1 box (3.4 oz). This is the secret stabilizer that keeps the cream thick without weeping.
- Whole Milk: 1/2 cup (120ml), to dissolve the pudding initially.
- Powdered Sugar: 1/2 cup (60g), adjusted to taste.
- Vanilla Bean Paste: 1 teaspoon (or high-quality extract) for those distinct black specks and rich aroma.
For the Glaze and Garnish
- Honey or Maple Syrup: 1/4 cup, warmed slightly for brushing.
- Unsalted Butter: 1 tablespoon, melted into the honey for a glossy sheen.
- Powdered Sugar: For dusting the final dish.
Instructions
Phase 1: Preparing the Pastry
1. Preheat and Prep:
Preheat your oven to 400°F (200°C). This high initial temperature is crucial for puff pastry; the steam needs to expand rapidly to create layers before the butter melts. Line a 9×13 inch baking pan with parchment paper, leaving an overhang on the sides for easy lifting.
2. Cut the Squares:
Unroll your thawed puff pastry sheets on a lightly floured surface. Using a pizza cutter or a sharp knife, cut the sheets into even squares. Depending on the size of your sheets, aim for about 12 to 15 squares total. Do not drag the knife; press down and cut cleanly to avoid sealing the edges, which prevents rising.
3. Arrange and Bake:
Place the squares into the prepared baking pan. It is okay if they touch slightly; this creates a “pull-apart” effect. Brush the tops generously with the egg wash, being careful not to let the egg drip down the cut sides (which acts like glue and stops the rise). Bake for 20-25 minutes, or until they are puffed high and deeply golden brown.
4. Cool Down:
Remove from the oven. They will look like golden pillows. Transfer them immediately to a wire rack to cool completely. Do not attempt to fill them while hot, or the cream will melt into a soup.
Phase 2: The Cream Filling
5. Mix the Base:
In a small bowl, whisk together the cold milk and the instant pudding mix until smooth. Let it sit for 2 minutes to thicken into a paste.
6. Whip the Cream:
In a large mixing bowl (preferably chilled), whip the heavy cream, powdered sugar, and vanilla on medium-high speed until soft peaks form.
7. Combine:
Add the thickened pudding mixture to the whipped cream. Continue whipping on high speed until stiff, glossy peaks form. The pudding mix acts as a stabilizer, ensuring your filling stays thick and voluminous even at room temperature.
Phase 3: Assembly
8. The Split:
Once the pastry squares are cool, use a serrated knife to gently slice them horizontally. You can either slice the whole block of squares at once if they baked together, or slice them individually. Lift the “lids” off and set aside.
9. The Fill:
Pipe or spoon a generous mountain of the cream filling onto the bottom layers of the pastry. Spread it evenly to the edges. Place the pastry “lids” back on top of the cream.
10. The Glaze:
Mix the honey and melted butter together. Brush this warm glaze over the tops of the assembled pastries. It will give them that irresistible “liquid glass” shine seen in the photos.
11. Final Touch:
Just before serving, dust heavily with powdered sugar. Serve immediately.
Tips for Pastry Perfection
Working with puff pastry can be temperamental. Here are expert tips to ensure success:
- Keep it Cold: Puff pastry relies on layers of cold butter. If the dough gets warm and sticky, the butter will melt out of the dough rather than steaming inside it. If you are working slowly, put the dough back in the fridge for 10 minutes before baking.
- The “Shock” Factor: Do not be tempted to lower the oven temperature. The thermal shock is what creates the puff. If your oven has hot spots, rotate the pan halfway through baking.
- Don’t Squish the Layers: When cutting the pastry, press straight down. A sawing motion can seal the delicate layers together, resulting in a flat, dense cookie rather than a puffed pastry.
Creative Variations
Once you master the base recipe, the variations are endless:
- Chocolate Hazelnut: Swirl 1/4 cup of Nutella into the cream filling before piping. Top the pastries with chopped roasted hazelnuts.
- Berry Bliss: Add a layer of fresh raspberry or strawberry jam on the bottom pastry before adding the cream. Top with fresh berries.
- Lemon Cloud: Fold 2 tablespoons of lemon curd into the whipped cream for a bright, citrusy flavor that cuts through the richness.
- Savory Twist: Omit the sugar and vanilla. Fill with a whipped herb cream cheese and smoked salmon mixture for an elegant brunch appetizer.
Serving and Storage
Serving:
These are best enjoyed fresh on the day they are made. The contrast between the crisp pastry and the wet cream is at its peak within the first 4 hours of assembly.
Storage:
If you have leftovers (which is unlikely!), store them in an airtight container in the refrigerator for up to 2 days. The pastry will soften slightly due to the moisture from the cream, becoming more like a soft éclair or Napoleon cake, which is delicious in its own right.
The Science of the “Dip”
You might notice some versions of this recipe involve a “milk bath” poured over the hot pastry. This technique, similar to the Egyptian dessert Om Ali or the viral Crinkle Cake, creates a custardy bottom layer. If you prefer that texture, pour 1/2 cup of sweetened condensed milk mixed with 1/2 cup of warm milk over the pastries immediately after they come out of the oven. Let the pastry absorb the liquid before cooling and filling. This results in a dessert that is crispy on top and pudding-like on the bottom.
Conclusion
The Golden Custard-Filled Puff Pastry Squares are a testament to the fact that impressive desserts do not need to be complicated. By utilizing a few smart shortcuts like store-bought pastry and instant pudding stabilizer, you create a dessert that tastes like it came from a Viennese coffee house. Whether you are baking for a holiday, a birthday, or just a Tuesday night craving, this recipe delivers maximum satisfaction with minimal stress.
Golden Custard-Filled Puff Pastry Squares
Ingredients
Equipment
Method
- Preheat oven to 400°F (200°C). Line a 9×13 baking pan with parchment paper.
- Unroll puff pastry sheets and cut into equal squares (approx 12-15 total). Place into the baking pan.
- Whisk egg with water and brush the tops of the pastry squares liberally.
- Bake for 20-25 minutes until puffed and deep golden brown. Cool completely on a wire rack.
- Whisk milk and pudding mix in a small bowl until thickened.
- In a large bowl, whip heavy cream, powdered sugar, and vanilla until soft peaks form.
- Add the pudding mixture to the whipped cream and beat until stiff peaks form.
- Slice cooled pastries in half horizontally. Pipe or spread filling onto bottom halves.
- Replace tops. Mix honey and melted butter, then brush over the tops. Dust with powdered sugar before serving.