Easter Dirt Cake Casserole
The Ultimate Easter Dirt Cake Casserole Recipe: A Springtime Showstopper
When the snow finally melts away, the flowers begin to bloom, and the gentle warmth of spring fills the air, it is officially time to celebrate the season of renewal. And what better way to welcome spring and celebrate Easter than with a vibrant, playful, and absolutely mouth-watering dessert? Enter the Easter Dirt Cake Casserole. This delightful, no-bake treat takes the nostalgic, beloved classic dirt cake and gives it a festive, colorful makeover that will be the centerpiece of your holiday table.
If you have never experienced the magic of a dirt cake, you are in for an incredible treat. Do not let the playful name fool you; this dessert is a sophisticated, deeply satisfying combination of textures and flavors. It perfectly marries the rich, dark cocoa crunch of crushed chocolate sandwich cookies with the velvety, airy sweetness of a cream cheese and whipped cream blend, all layered with smooth, rich vanilla pudding. For this Easter variation, we top our “dirt” with vibrant pastel candy eggs and cheerful spring sprinkles, transforming a humble pot of edible soil into a blooming spring garden that kids and adults alike will completely devour.
Why You Will Fall in Love with This Easter Dirt Cake Casserole
There is a reason why dirt cake has remained a staple at potlucks, family gatherings, and holiday parties for decades. This Easter Dirt Cake Casserole variation amplifies all the best qualities of the original recipe. Here is why this dessert deserves a permanent spot in your spring recipe rotation:
- Completely No-Bake: Holidays are stressful enough without having to fight for precious oven space. This entire casserole is made without turning on the oven once, making it the perfect stress-free addition to a busy cooking schedule.
- Incredibly Kid-Friendly: Children are naturally drawn to this dessert. The concept of eating “dirt” is delightfully subversive for kids, and the bright, colorful candy eggs make it visually irresistible. Plus, it is a fantastic recipe to let the little ones help make!
- Make-Ahead Magic: Desserts that taste better the next day are a host’s best friend. This casserole actually requires time to chill so the layers can set and the cookie crumbs can soften slightly, absorbing the sweet moisture from the pudding and cream layers. Make it the night before and forget about it until dessert time!
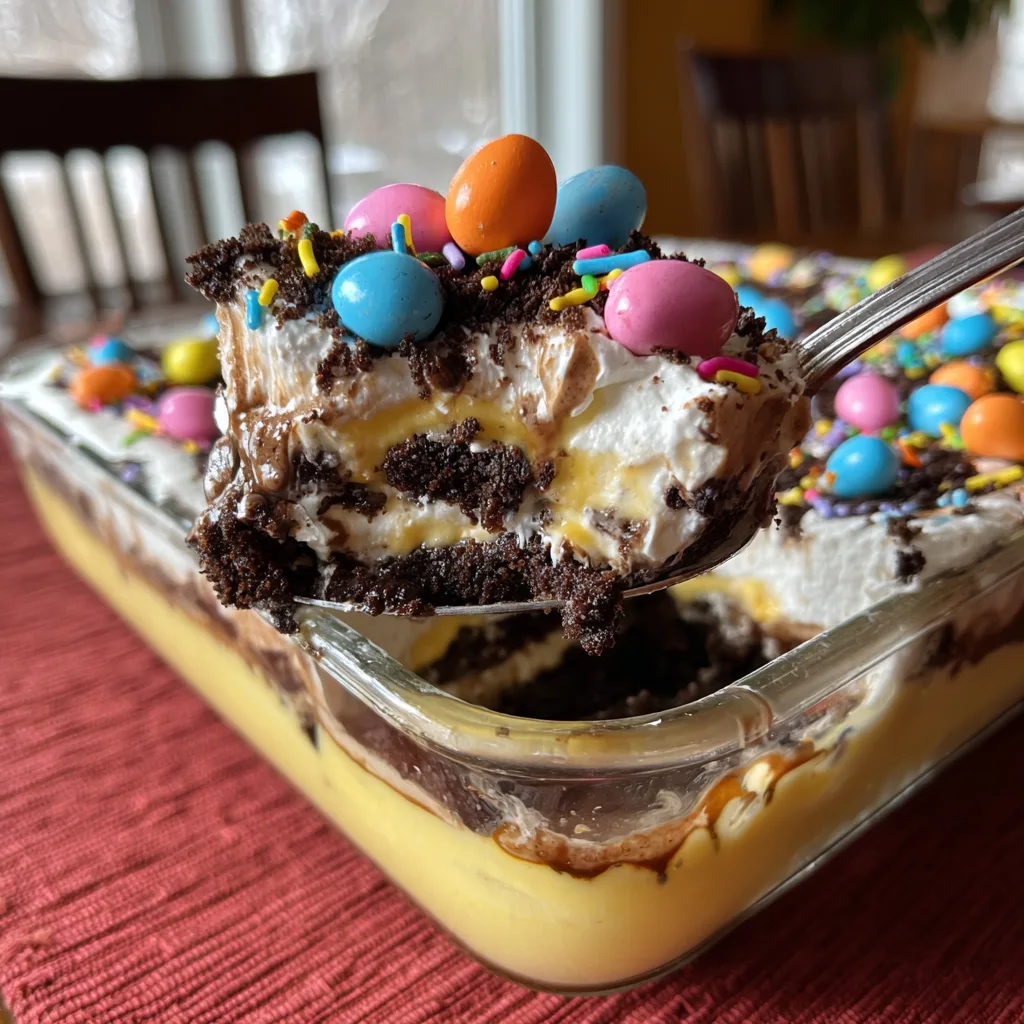
- Stunning Presentation: By building this dessert in a clear glass 9×13 baking dish, you show off the beautiful, distinct layers. The stark contrast between the dark cookie crumbs, the snowy white cream, and the sunny yellow pudding is a feast for the eyes before you even take a bite.
- Crowd-Pleasing Flavors: You simply cannot go wrong with the combination of chocolate cookies, cream cheese, and vanilla pudding. It is a universally beloved flavor profile that appeals to picky eaters and seasoned foodies alike.
The Anatomy of the Perfect Dirt Cake Casserole
To truly master the Easter Dirt Cake Casserole, it helps to understand the purpose and composition of each distinct layer. The magic happens when these layers are built with care and allowed to meld together in the refrigerator.
Layer 1: The Foundation (The First Dirt Layer)
The base of our casserole is made of finely crushed chocolate sandwich cookies (like Oreos). Some recipes mix the cookies with melted butter to form a solid crust, but for a true, authentic “dirt” texture, we leave the crumbs loose and dry. As the dessert sits in the fridge, the moisture from the creamy layer above will gently soften the top of these crumbs while leaving the very bottom slightly crunchy, providing incredible textural contrast.
Layer 2: The Cloud (The Cream Cheese Layer)
This is arguably the most decadent part of the dessert. A blend of softened cream cheese, butter, and powdered sugar is whipped until incredibly smooth, and then a generous amount of whipped topping is folded in. The cream cheese provides a slight tang that beautifully balances the sweetness of the pudding and cookies, while the whipped topping gives the layer a light, airy, mousse-like consistency.
Layer 3: The Golden Center (The Pudding Layer)
Instant vanilla or French vanilla pudding is whisked with cold milk until thick and luscious. This layer provides essential moisture to the dessert and a smooth, creamy texture that ties the chocolate and cream cheese layers together. Using instant pudding is key here; it sets up quickly and firmly, ensuring your casserole slices beautifully instead of turning into a soup.
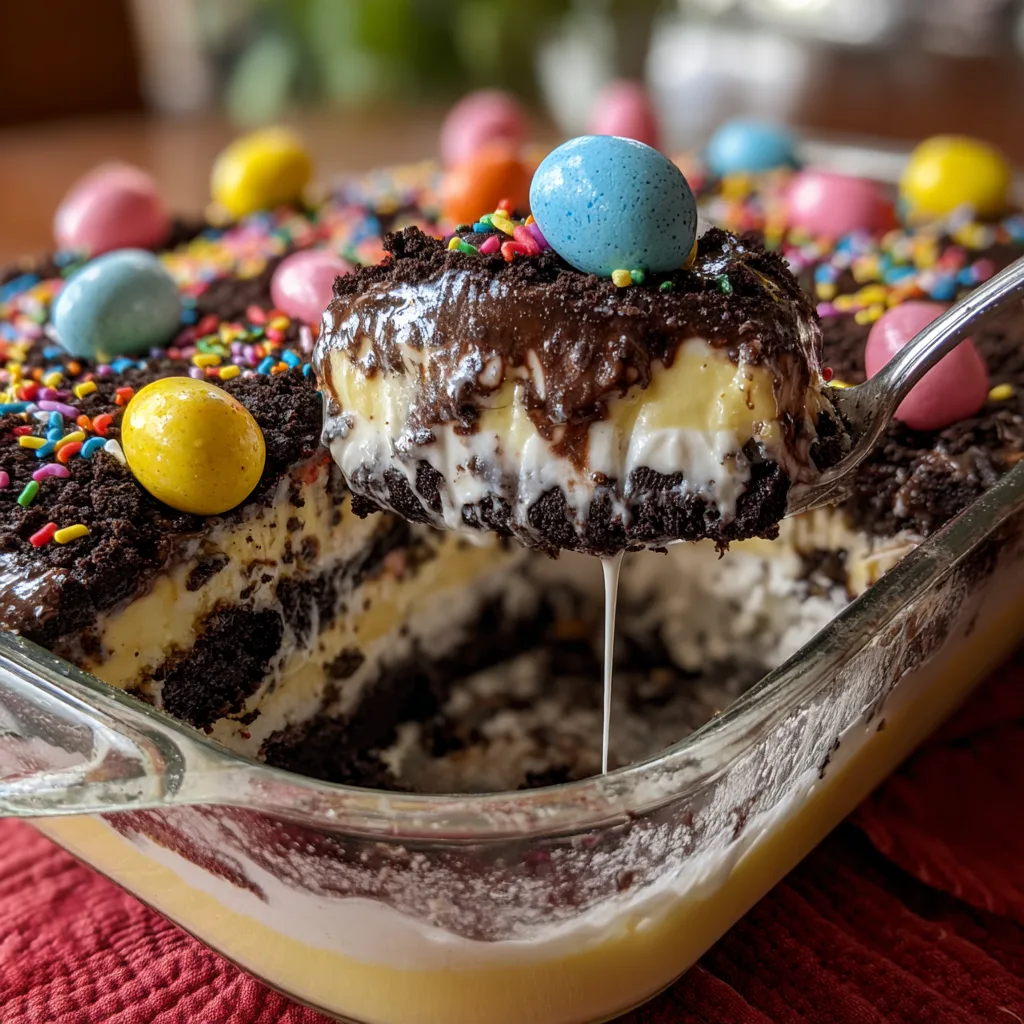
Layer 4: The Top Soil and Decor (The Final Dirt and Candy)
We repeat the cookie crumb layer on top, creating the visual of freshly tilled soil. But because this is an Easter celebration, we do not stop there! The “dirt” is heavily adorned with pastel chocolate candy eggs—giving the illusion of a hidden Easter egg hunt—along with colorful spring sprinkles to add a final pop of joyful color.
Essential Ingredients for Your Easter Dessert
Gather these simple, easily accessible ingredients to create your springtime masterpiece:
For the Dirt Layers
- – 1 family-size package (about 19 oz) of chocolate sandwich cookies (Oreos or similar brand)
For the Cream Cheese Layer
- – 1 block (8 oz) cream cheese, fully softened at room temperature
- – 1/4 cup (half a stick) unsalted butter, softened
- – 1 cup powdered sugar (confectioners’ sugar)
- – 1 teaspoon pure vanilla extract
- – 1 tub (8 oz) frozen whipped topping (like Cool Whip), thawed
For the Pudding Layer
- – 2 boxes (3.4 oz each) instant vanilla pudding mix (French vanilla also works wonderfully)
- – 3 cups cold whole milk (avoid skim milk for the best texture)
For the Easter Decorations
- – 1 1/2 cups pastel candy-coated chocolate eggs (like Cadbury Mini Eggs or similar)
- – 2 to 3 tablespoons spring-themed sprinkles (pastels, flower shapes, etc.)
Step-by-Step Instructions
Creating this masterpiece is simple, but requires a bit of patience during the chilling process. Follow these detailed steps for guaranteed success.
- Prepare the “Dirt”: Place the entire package of chocolate sandwich cookies (including the cream filling) into a food processor. Pulse until the cookies are reduced to fine crumbs that resemble potting soil. If you do not have a food processor, place the cookies in a large, heavy-duty zip-top bag, seal it tightly, and crush them thoroughly with a rolling pin. Divide the crumbs in half.
- Create the Base Layer: Take a clear glass 9×13 inch baking dish. Spread exactly half of the crushed cookie crumbs evenly across the bottom of the dish. Do not press them down too hard; just ensure the bottom is fully covered.
- Whip the Cream Cheese Mixture: In a large mixing bowl, use a hand mixer or stand mixer on medium speed to beat the softened cream cheese and softened butter together until completely smooth and free of lumps. Slowly add the powdered sugar and vanilla extract, beating until creamy and well incorporated.
- Fold in the Whipped Topping: Using a rubber spatula, gently fold the thawed whipped topping into the cream cheese mixture. Use a sweeping, under-and-over motion to keep the mixture light and airy. Do not overmix, or the cream will deflate.
- Add the Cream Layer to the Dish: Carefully spoon the cream cheese mixture over the bottom layer of cookie crumbs. Because the crumbs are loose, dropping dollops across the dish and gently connecting them with an offset spatula is the best way to spread it without pulling up the dirt layer. Spread it into an even, flat layer.
- Mix the Pudding: In a separate medium bowl, whisk together the two boxes of instant vanilla pudding mix and the cold milk. Whisk vigorously for about 2 minutes until the pudding begins to noticeably thicken. Let it sit for 3 to 5 minutes to firm up slightly before pouring.
- Layer the Pudding: Pour the thickened vanilla pudding evenly over the white cream cheese layer. Use a clean spatula to spread it smoothly into the corners of the dish.
- Add the Top Soil: Take the remaining half of your crushed cookie crumbs and sprinkle them generously and evenly over the pudding layer. This forms your final “dirt” layer.
- Decorate for Easter: Scatter the pastel candy eggs across the top of the dirt. Distribute them evenly so every scoop gets some candy! Finish by dusting the top with your bright, colorful spring sprinkles.
- Chill to Set: This is the most crucial step! Cover the baking dish tightly with plastic wrap or aluminum foil. Place it in the refrigerator for at least 4 hours, though overnight (8-12 hours) is highly recommended. The chilling time allows the pudding to fully set, the flavors to meld, and the cookie layers to achieve the perfect moisture level.
- Serve and Enjoy: Remove from the fridge just before serving. Use a large serving spoon to scoop deeply into the dish, ensuring you get all the delicious layers in one go.
Pro Tips for the Best Dirt Cake Casserole
Take your dessert from good to great with these expert tips:
- Room Temperature Ingredients: It is absolutely vital that your cream cheese and butter are truly softened to room temperature before beating them. If they are even slightly cold, you will end up with tiny, unappetizing white lumps of cream cheese in your otherwise smooth filling.
- Do Not Skimp on Chilling: While it might be tempting to dig in right away, chilling the dessert is what transforms it from a messy pile of ingredients into a cohesive, sliceable casserole. Overnight is always best.
- Pudding Varieties: While vanilla is classic, you can easily change the flavor profile! Try using chocolate pudding for a double-chocolate dirt cake, or cheesecake-flavored pudding for an extra rich treat.
- Homemade Whipped Cream Alternative: If you are completely averse to frozen whipped toppings (like Cool Whip), you can make your own stabilized whipped cream. Whip 1.5 cups of heavy whipping cream with a tablespoon of powdered sugar until stiff peaks form, and fold that in instead.
Creative Variations for Other Holidays
The best part about learning this base recipe is that it is infinitely customizable for any time of year! Once you master the Easter version, try these fun variations:
Halloween Graveyard Dirt Cake
Use Milano cookies half-buried in the top dirt layer to look like tombstones. You can use black decorating gel to write “RIP” on the cookies. Add gummy worms crawling out of the dirt and candy pumpkins scattered around.
Summer Beach Bum Casserole
Instead of chocolate sandwich cookies, use crushed graham crackers or vanilla wafers for the top and bottom layers to mimic golden sand. Top with cocktail umbrellas, gummy bears lounging on peach ring “inner tubes,” and a few white chocolate shells.
St. Patrick’s Day Pot of Gold
Dye the vanilla pudding layer green with food coloring. Top the dirt with gold foil-wrapped chocolate coins and vibrant rainbow candy belts arching across the top of the casserole dish.
How to Store Your Dirt Cake Casserole
Because this dessert relies heavily on dairy products, proper storage is essential for both food safety and maintaining the best texture.
Refrigeration: Keep the casserole covered tightly with plastic wrap, an airtight lid, or aluminum foil. It will stay fresh and delicious in the refrigerator for up to 4 days. Keep in mind that the longer it sits, the softer the cookie crumbs will become. By day four, the crunch will be mostly gone, but it will still taste incredible, similar to an icebox cake.
Freezing: Dirt cake freezes surprisingly well! If you want to make it well in advance or save leftovers, wrap the dish tightly in two layers of plastic wrap and one layer of aluminum foil. Freeze for up to 2 months. To serve, let it thaw in the refrigerator overnight. Note that freezing may cause the candy coatings on the eggs to crack slightly or bleed color, so you may want to add the candy decorations after it thaws.
Frequently Asked Questions (FAQ)
Can I use a different type of cookie for the dirt?
Yes! While chocolate sandwich cookies are traditional for that dark, soil-like appearance, you can use any crisp cookie. Chocolate graham crackers, chocolate wafers, or even vanilla sandwich cookies (if you want “sand” instead of “dirt”) work perfectly.
My cream cheese layer has lumps, what did I do wrong?
This happens when the cream cheese and butter are not warm enough before mixing. To fix a lumpy cream cheese mixture, you can try microwaving the bowl (if microwave-safe) for just 5-10 seconds to gently warm it, then beat it again on high until smooth before adding the whipped topping.
Do I have to use instant pudding? Can I cook pudding on the stove?
You really should use instant pudding for this recipe. Cook-and-serve pudding has a different texture and consistency, and it requires boiling. If you pour hot cooked pudding over the cream cheese layer, it will melt the whipped topping and ruin the dessert. If you insist on making homemade or cook-and-serve pudding, you must let it cool completely in the fridge until it is totally cold and firm before layering it in the casserole.
Conclusion
The Easter Dirt Cake Casserole is a triumph of fun, flavor, and festive flair. It brings together the simple joys of childhood desserts with a beautiful presentation that is perfect for any spring celebration. The rich layers of chocolate cookie crumbs, the smooth tang of the cream cheese filling, and the comforting sweetness of the vanilla pudding create a dessert experience that is truly hard to beat. Easy to make, incredibly delicious, and fun to decorate, this no-bake recipe is guaranteed to become a treasured tradition for your family’s Easter holiday. So grab your ingredients, crush up those cookies, and enjoy bringing a little bit of sweet spring magic to your kitchen!
Easter Dirt Cake Casserole
Ingredients
Equipment
Method
- Crush the entire package of chocolate sandwich cookies into fine crumbs using a food processor or a rolling pin. Spread exactly half of the crumbs evenly in the bottom of a 9×13 inch glass baking dish.
- In a large mixing bowl, beat the softened cream cheese and butter together until completely smooth. Add the powdered sugar and vanilla extract, and mix until well combined.
- Gently fold the thawed whipped topping into the cream cheese mixture until smooth and fluffy. Carefully dollop and spread this mixture in an even layer over the crushed cookie base.
- In a separate bowl, whisk together the instant vanilla pudding mix and the cold milk for about 2 minutes until it begins to thicken. Let sit for 3 minutes to firm up slightly.
- Pour the thickened vanilla pudding over the cream cheese layer, spreading it evenly to the edges.
- Sprinkle the remaining crushed chocolate cookies evenly over the top of the pudding to create the final dirt layer.
- Decorate the top with pastel candy-coated chocolate eggs and spring sprinkles.
- Cover tightly and refrigerate for at least 4 hours, or preferably overnight, before serving to allow layers to set.