Easy Bunny Eggs
Easy Bunny Eggs: The Ultimate Kids’ Easter Breakfast
There is a special kind of magic that happens on holiday mornings, especially when there are little ones involved. Easter morning is often a whirlwind of basket hunting, chocolate eating, and excitement. Amidst the sugar rush and the chaos, getting a nutritious, protein-packed breakfast into your children can feel like a impossible task. Enter the Bunny Egg: a simple, adorable, and incredibly delicious way to start the day that your kids will actually beg to eat.
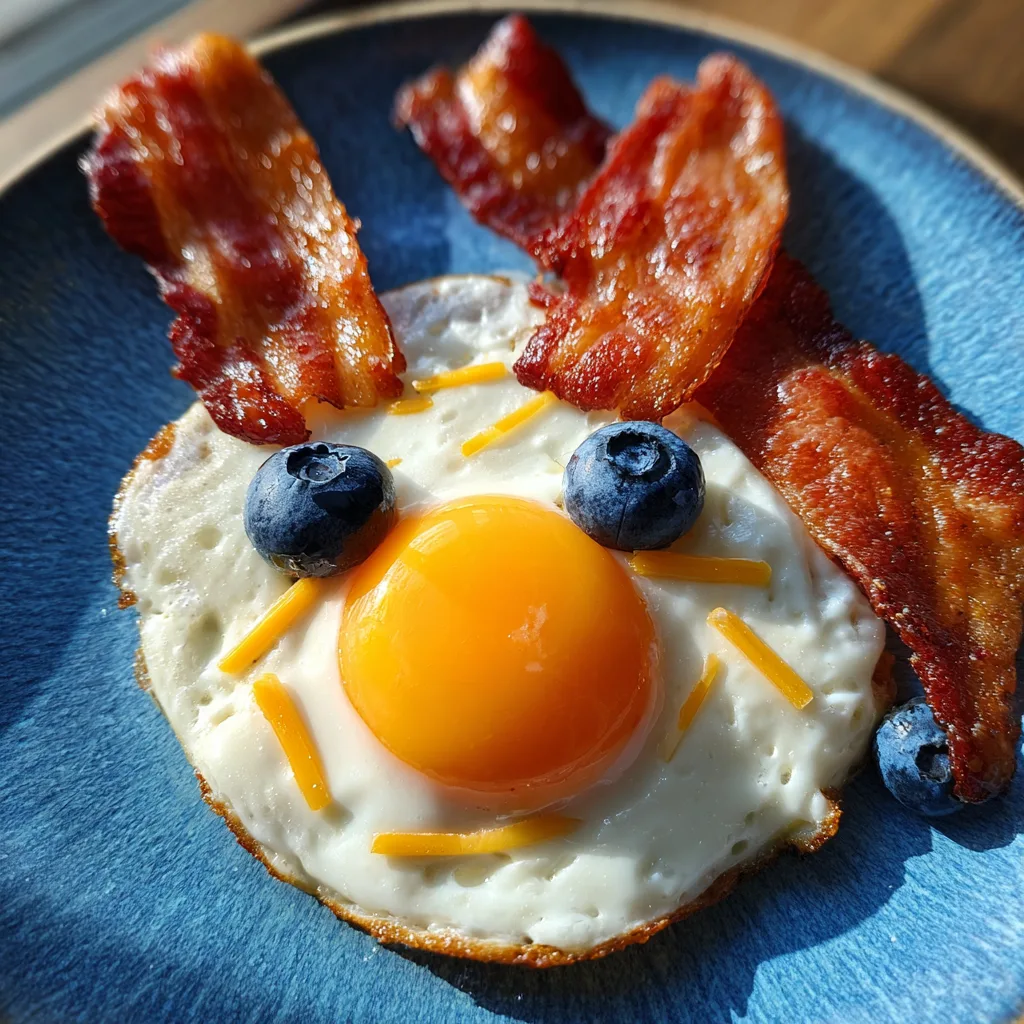
This isn’t just a breakfast; it’s a core memory in the making. Transforming a standard bacon-and-egg plate into a cute bunny face takes almost no extra effort, but the reaction you get is priceless. The sunny-side-up yolk creates a bright, cheerful nose, crispy bacon strips make for savory ears, and a few simple garnishes bring the character to life. It is the perfect balance of fun presentation and classic comfort food flavors.
In this guide, we are going to walk you through exactly how to craft this adorable plate. We will cover the secret to the perfect sunny-side-up egg (no slimy whites allowed!), how to get your bacon to stand up straight as “ears,” and plenty of variations to suit picky eaters or dietary restrictions. Let’s hop to it!
Why This Recipe Wins Easter Morning
You might be thinking, “Do I really have time for food art?” The answer is yes, because this recipe is deceptively simple. Here is why it should be on your menu:
- Speed: It takes the same amount of time to cook as a regular breakfast. The “assembly” takes less than 30 seconds per plate.
- Nutrition: Before the jelly beans and chocolate bunnies take over, this meal provides a solid foundation of healthy fats and high-quality protein to keep energy levels stable.
- Picky-Eater Approved: Something about anthropomorphizing food makes it infinitely more edible to toddlers and young children. Even kids who are usually skeptical of eggs tend to dive in when it looks like a cartoon character.
- Customizable: Don’t have blueberries? Use olives. No bacon? Use sausage links. It is highly adaptable to whatever you have in your fridge.
Ingredients You Will Need
To create this culinary masterpiece, you need very few items. The key here is freshness, as simple ingredients shine when they are high quality.
The Main Components:
- Eggs: Large or extra-large eggs work best. You want a nice surface area for the “face.” Fresh eggs tend to hold their shape better in the pan, keeping the yolk centered and the whites from spreading too thin.
- Bacon: thick-cut bacon is ideal. It holds its shape better when cooked and stands up straighter as “ears” compared to thin, flimsy strips.
- Blueberries: Two fresh blueberries per bunny make the perfect eyes. They provide a tiny burst of sweetness that surprisingly complements the salty bacon.
- Cheddar Cheese: You will need a block of cheese to slice into thin strips, or thick-shredded cheese from a bag. This creates the “whiskers.”
- Butter or Oil: For frying the eggs. Butter adds a delicious flavor that pairs well with the “morning comfort” vibe.
- Salt and Pepper: To season the egg. Keep the pepper away from the “face” area if you want a clean look, or use white pepper.
Step-by-Step Instructions
Step 1: Prepare the “Ears” (The Bacon)
The bacon needs to be cooked until it is crispy enough to hold a straight shape, but not so brittle that it shatters.
Method: Lay your bacon strips in a cold pan and turn the heat to medium. Cooking from cold helps render the fat slowly, reducing curling. Cook until golden brown and stiff. Transfer to a paper towel-lined plate to drain excess grease.
Tip: If your bacon curls too much, cut the strips in half after cooking to get the straightest sections for the ears.
Step 2: The Perfect Sunny-Side Up Egg
This is the most critical step. You want a bright yellow yolk (the nose) and fully set whites (the face).
Heat the Pan: Melt a tablespoon of butter in a non-stick skillet over medium-low heat. You don’t want the heat too high, or the bottom will burn before the top is set.
Crack the Egg: Gently crack the egg into the pan. If the yolk slides off center, use a spatula to gently nudge it back to the middle before the white sets.
The Steam Trick: To ensure the whites are fully cooked without flipping the egg (which would hide the yellow nose), add 1 teaspoon of water to the pan and immediately cover with a tight-fitting lid. Let it steam for 30-60 seconds. This cooks the top layer of the white while keeping the yolk runny and glossy.
Step 3: The Assembly
Once your egg is cooked, carefully slide it onto your serving plate. Now, bring the bunny to life:
1. Ears: Tuck two strips of bacon slightly under the top edge of the egg white, angling them outwards.
2. Eyes: Place two blueberries on the upper part of the egg white, just above the yolk.
3. Whiskers: Arrange 3-4 strips of cheese on either side of the yolk (the nose).
Serve immediately while warm!
Tips for Success
Yolk Positioning:
Sometimes, despite our best efforts, the yolk migrates to the edge of the pan. To fix this, you can separate the egg first. Put the white in the pan, let it set slightly, and then gently slide the yolk right into the center.
Bacon Alternatives:
If you don’t eat pork or want a healthier option, turkey bacon works well, though it is often straighter and easier to work with! Sausage links cut in half lengthwise also make excellent ears.
Cheese Melting:
If you want the whiskers to look “attached,” place the cheese on the egg immediately after taking it out of the pan. The residual heat will slightly melt the cheese, adhering it to the egg white.
Creative Variations
Make this recipe your own with these fun swaps:
The “Vegetarian” Bunny:
Swap the bacon ears for slices of toast cut into long ovals, or use roasted asparagus spears for a green, spring-themed bunny.
The “Scrambled” Bunny:
Does your child refuse runny yolks? No problem. Make a round circle of scrambled eggs (use a biscuit cutter or egg ring in the pan). Use a cherry tomato or a grape for the nose since you lose the yolk.
Sweet & Savory:
Instead of cheese whiskers, use thin apple slices. The apple pairs beautifully with the cheddar and bacon flavors.

Serving Suggestions
While the Bunny Egg is the star of the show, you can round out the meal to make it a hearty Easter brunch:
- Fruit Salad: A bowl of melon balls and strawberries adds color and vitamins.
- Toast Points: Serve triangular toast on the side for dipping into that delicious runny yolk.
- Smoothie: A small orange or carrot smoothie fits the “bunny” theme perfectly (bunnies love orange vegetables!).
Final Thoughts
The Bunny Egg Breakfast is a testament to the fact that food doesn’t have to be complicated to be special. With just a few minutes of extra care in plating, you can start a holiday tradition that your children will look back on fondly. It is joyous, delicious, and exactly the kind of fuel they need for a day of celebration.
So this weekend, grab that skillet, crisp up some bacon, and get ready to see the biggest smiles at your breakfast table. Happy cooking!
Easy Bunny Eggs Breakfast
Ingredients
Equipment
Method
- Cook bacon in a skillet over medium heat until crispy and straight. Transfer to paper towel to drain.
- Wipe skillet or use a clean non-stick pan. Melt butter over medium-low heat.
- Crack egg gently into the pan, keeping the yolk intact. Add 1 tsp water and cover with lid for 1-2 minutes until whites are set but yolk is still runny.
- Slide egg onto a plate.
- Tuck the two bacon strips under the top of the egg to form ears.
- Place two blueberries on the egg white for eyes.
- Arrange cheese strips on either side of the yolk to form whiskers. Serve immediately.