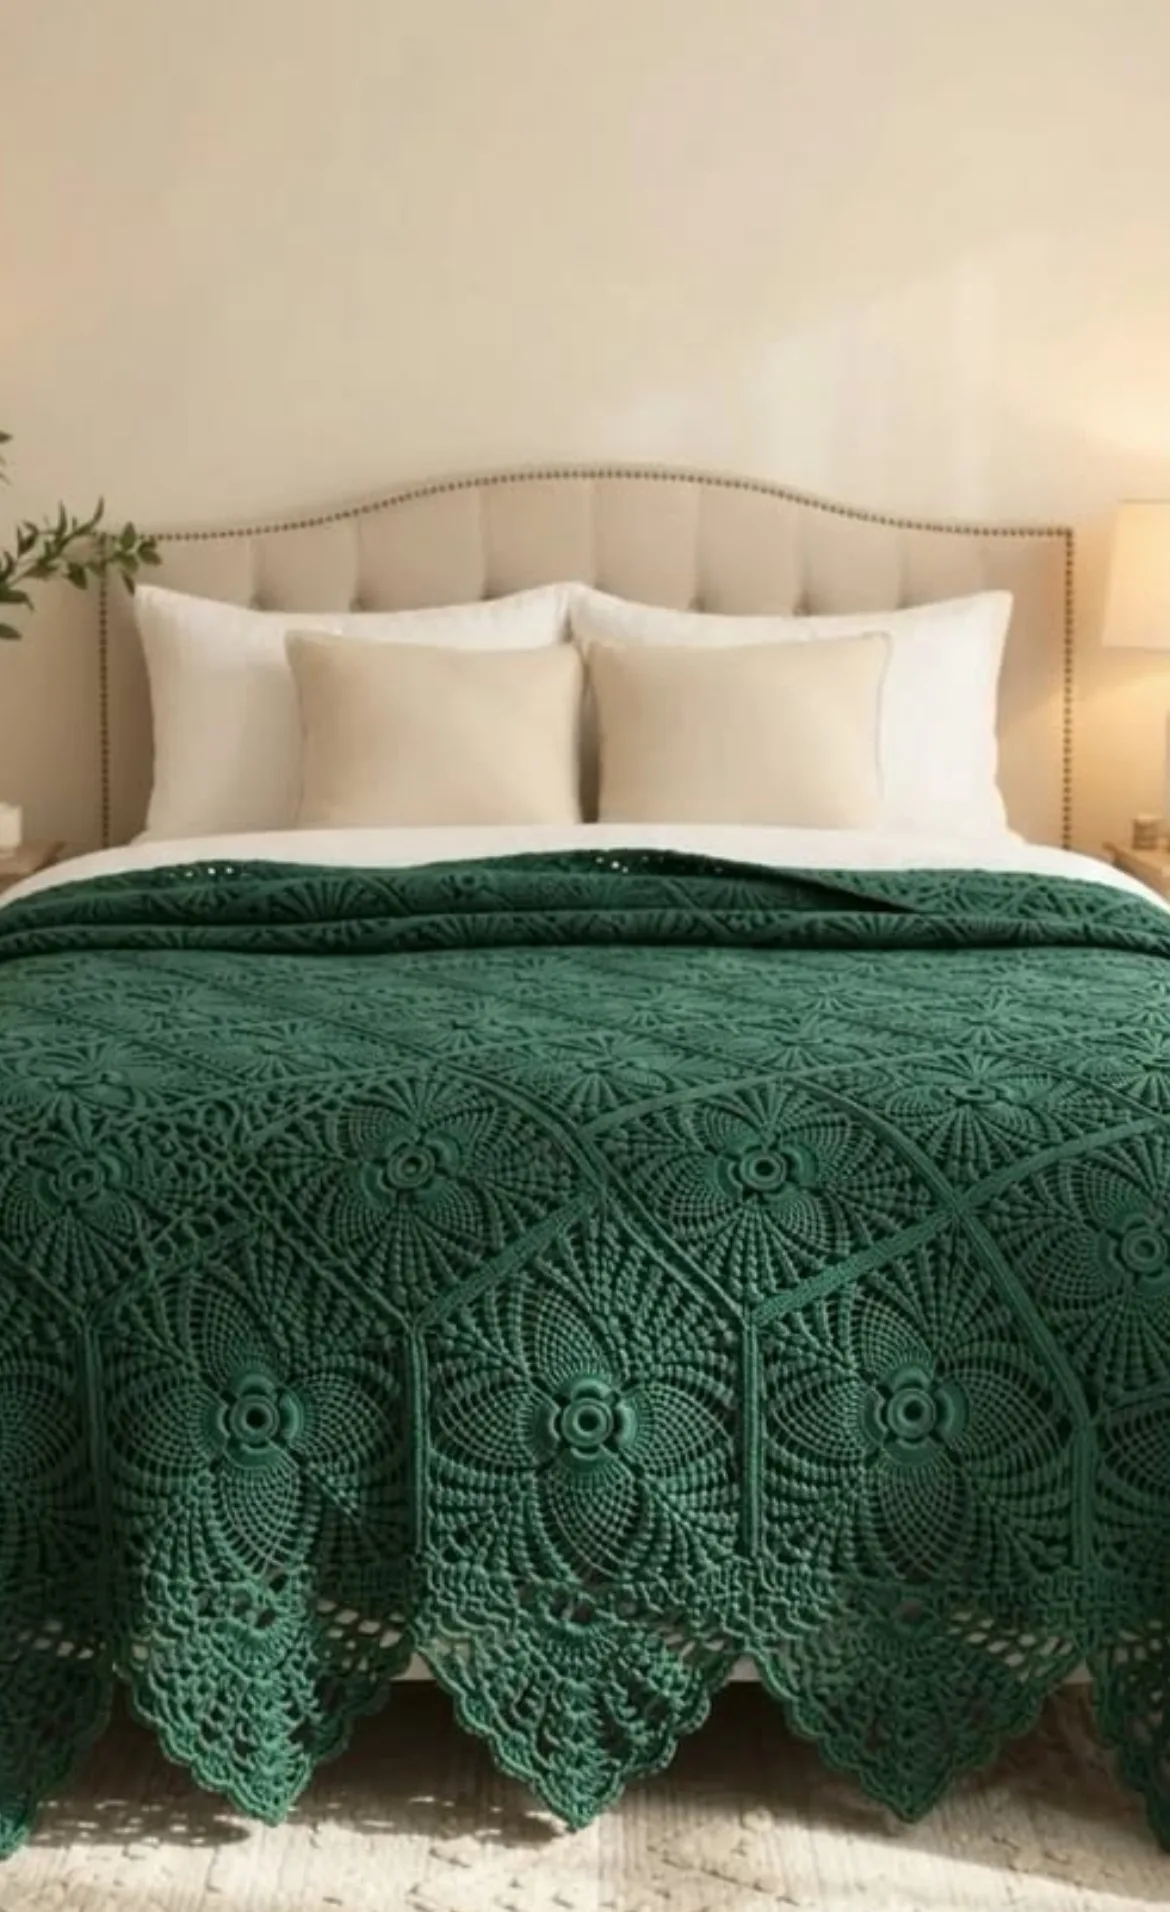
Elegant Emerald Motif Bedspread – Intricate Vintage-Style Crochet Blanket Pattern
Introduction
This project captures the timeless beauty of classic vintage crochet design, reimagined in a captivating emerald green. The finished bedspread is lush and eye-catching, composed of an array of identical motifs joined seamlessly to create a luxurious, lacy look. Each motif bursts outward from a dimensional floral center, radiating delicately with textural spokes and openwork. The overall shape is a harmonious blend of repeating geometric forms, completed by a dramatic scalloped lace border that gracefully drapes over the edge of the bed.
This bedspread, while stunning laid across a bed, is also suitable as a statement throw, a grand wall hanging, or even a showpiece tablecloth when sized down. The rich, jewel-toned color and intricate patterning make it a focal point in any room. Crafters will find immense satisfaction in the interplay of classic stitches and modern vibrance – a worthwhile project for anyone looking to add a sophisticated, handmade heirloom to their home.
Project Overview
The bedspread is constructed from separate motif pieces that are worked in the round (not in rows). Each motif begins at the center, expanding outward with layers of dense and lacy stitches, finished by gentle points. Motifs are joined as you go, forming a grid that covers the bed. The final step is working a coordinating border that enhances the scalloped edges, giving the blanket a decorative finish.
Skill Level
Intermediate. While the individual stitches themselves are familiar to most crocheters, the pattern involves motif construction, joining-as-you-go, careful counting, and working with a lacy gauge. Comfort with reading patterns and joining motifs is recommended before starting this project.
Materials
- Yarn: Use a DK (Light Worsted, #3) weight yarn for balanced drape and texture. Cotton or a cotton-acrylic blend is ideal for crisp stitch definition and long-term durability.
- Color: Approximately 1,600g – 2,000g (about 3.5 – 4.4 lbs or 2,800-3,600 yards) of solid emerald green, or color of choice for queen-size (adjust amounts for larger or smaller blankets).
- Crochet Hook: 4.0 mm (G-6) or 4.5 mm (US 7) – adjust if needed to match gauge and desired drape.
- Tapestry needle: For weaving in ends and joining motifs if needed.
- Scissors
- Stitch markers: Optional, useful for marking round starts or motif corners.
- Measuring tape
- Blocking mat and pins: For achieving perfect motif shape and size.
Finished Size
The approximate finished size, as pictured, fits a standard queen bed:
- Centimeters: 220 cm x 220 cm
- Inches: 87″ x 87″
To resize: add or subtract motifs in both directions. For twins, use fewer motifs; for king, add more. Each motif should measure about 26 cm (10.25″) across before joining and blocking.
Gauge
One finished motif after blocking should measure approximately 26 cm (10.25″) across, point to point. Gauge is not critical for fit, but variation may alter the size of the finished blanket and yardage required.
Stitches and Abbreviations
- ch – chain
- sl st – slip stitch
- sc – single crochet
- hdc – half double crochet
- dc – double crochet
- tr – treble crochet
- picot – ch 3, sl st in 1st ch made
- MR – magic ring
- sp – space
- st(s) – stitch(es)
- rep – repeat
- inc – increase (2 sts in same st or sp)
- dec – decrease (crochet 2 sts together)
Important Pattern Notes
- Chains at the start of each round count as a stitch unless otherwise stated.
- Work motifs in joined rounds: join with a sl st at the end of each round unless specified.
- When changing yarn or color (if desired), finish the last pull-through of the previous stitch with the new yarn.
- Right side should always be facing outward as you work rounds.
- Mark the first stitch of each round if necessary for clarity.
- Joining motifs as you go (JAYG) will yield a neater finish. Use a tapestry needle for whipstitching if necessary.
- If working as a tablecloth or small throw, use lighter yarn and smaller hooks for a lacier look.
Detailed Crochet Pattern
PART 1: Main Motif (Make as many as needed for blanket size)
Center Floral Burst
- Round 1: Make a MR, ch 3 (counts as dc), 15 dc in ring. Join with sl st to top of ch-3. (16 dc)
- Round 2: Ch 1, sc in same st, [ch 2, skip 1 st, sc in next st] around. Join with sl st to 1st sc. (8 sc, 8 ch-2 sps)
- Round 3: Sl st into next ch-2 sp, ch 3 (counts as dc), 3 dc in same sp, [4 dc in next ch-2 sp] around. Join. (32 dc)
- Round 4: Ch 1, sc in same st, [ch 3, skip 3 dc, sc in next dc] around. Join. (8 sc, 8 ch-3 sps)
- Round 5: Sl st into ch-3 sp, ch 3 (dc), (2 dc, ch 2, 3 dc) in same sp (forms petal), [(3 dc, ch 2, 3 dc) in each ch-3 sp] around. Join. (8 petals total)
- Round 6: Sl st to ch-2 sp, ch 4 (tr), (2 tr, ch 1, 3 tr) in same sp; [in next ch-2 sp work (3 tr, ch 1, 3 tr)] around. Join. (48 tr, 8 ch-1 sps)
- Round 7: Ch 1, sc in same sp, [ch 5, skip to next ch-1 sp, sc in ch-1 sp] around. Join. (8 sc, 8 ch-5 sps)
- Round 8: Sl st into ch-5 sp, ch 3, 7 dc in same sp (8 dc total in each ch-5 sp), rep around for each ch-5 sp. Join. (64 dc)
- Round 9: Ch 1, sc in same st, [ch 3, skip 3 sts, sc in next st] around. Join. (16 sc, 16 ch-3 sps)
- Round 10: Sl st into next ch-3 sp, ch 4 (counts as tr), 4 tr in same sp (5 tr in each ch-3 sp); repeat around. Join. (80 tr)
- Round 11: Ch 1, sc in same st, [ch 2, skip 4 sts, sc in next st] around. Join. (16 sc, 16 ch-2 sps)
- Round 12: Sl st into ch-2 sp, ch 1, 7 sc in same sp (7 sc in each ch-2 sp), join. (112 sc)
- Round 13: Ch 1, sc in each st around. Join. (112 sc)
Motif Expansion (Shape into a large octagon)
- Ch 3 (counts as dc), dc in next 12 sts, (2 dc, ch 3, 2 dc) in next st (forms corner), [dc in next 13 sts, (2 dc, ch 3, 2 dc) in next st] 7 times, join. (17 dc between corners)
- Ch 3, dc in each dc until ch-3 corner, (2 dc, ch 3, 2 dc) in ch-3 sp, repeat around. Join.
- Repeat previous round 3 more times, adding 4 sts to each segment between corners per round.
Each motif should block out to a finished diameter of approximately 26 cm (10.25″).
PART 2: Joining Motifs
Lay out motifs in rows. Align each motif corner to corner and join using join-as-you-go (JAYG) method on the final round:
- For each new motif, on the final round, when reaching a ch-3 corner sp, work ch 1, sl st in corresponding corner of adjoining motif, ch 1 to replace the normal ch-3. Continue dc as usual. Along motif sides, join with a sl st to corresponding dc on adjoining motif.
- Alternatively, complete all motifs, lay them out, and sew together using mattress or whip stitch, matching corners for a smooth finish.
PART 3: Scalloped Lacy Border
Once all motifs are joined in a grid, work the lacy border around the perimeter:
- Join yarn at any point. Ch 1, sc evenly spaced along straight sides, working 2 sc in each dc and 3 sc in each corner. Join.
- Ch 3, [skip 1, dc in next st, ch 2, skip 1, dc in next st] around; in each external corner: (dc, ch 2, dc, ch 2, dc) in same corner st.
- Next round: Sl st into next ch-2 sp, [ch 5, sc in next ch-2 sp] around. Corners: ch 7 instead of ch 5 for deeper points.
- Final round: In each ch-5 or ch-7 loop, work (sc, hdc, 5 dc, hdc, sc) for scallop. In each corner, work (sc, hdc, 7 dc, hdc, sc) for deeper points.
Fasten off and weave in ends.
PART 4: Finishing Touches
- Steam block or wet block finished blanket for best results, stretching motifs to even dimension and shape.
- Use rust-resistant pins to stretch points of scallops and corners for a crisp edge.
Assembly and Finishing
- After joining all motifs and completing the border, carefully weave in all yarn tails with a tapestry needle.
- Place the entire blanket in lukewarm water with a gentle detergent, blot out excess moisture, and lay flat on a clean towel or blocking mats (never hang when wet).
- Shape each motif and border point to desired geometry using pins. Allow to air dry fully before removing pins.
- Keep the blanket folded flat to maintain the motif shape and border crispness.
Customization Ideas
- Swap emerald for classic white, soft pastels, or ombré yarn for a different mood.
- Work with lighter yarn and smaller hook for a delicate tablecloth or wall hanging.
- Change up the number of motifs to fit twin/full/king beds, or make a single-square for a decorative throw pillow.
- Crochet just a handful of motifs and seam into a chic market bag or tote.
- Remove the border for a more modern, geometric edge.
- Add surface slip stitch embroidery along motifs for contrast and extra textural punch.
Troubleshooting Tips
- Curling motifs: Ensure you aren’t working too tightly; blocking is vital for flat, even motifs.
- Uneven edges: Make sure stitch counts are consistent on all motif sides and corners.
- Motif too large or small: Adjust hook size up or down and check yarn weight.
- Loose color changes: Securely fasten yarn, always change color at last yarn-over of previous stitch.
- Uneven tension: Practice working with similar pressure throughout; frequent blocking helps even fabric.
Care Instructions
- Gently hand-wash in cold or lukewarm water using a mild detergent.
- Rinse thoroughly, then lay flat on a towel to dry. Avoid twisting or wringing.
- Store folded, not hung, to prevent stretching and preserve border points.
Final Notes
For a polished finish, check stitch counts at the end of each motif round, and keep an eye on joining placement to ensure a neat layout. Adjust your hook or tension as needed for consistent gauge. Use the motif photo as a visual guide to ensure you’re capturing the right lacy spirit. Enjoy creating this heirloom-worthy bedspread and the compliments it will surely attract!