Homemade Cosmic Brownies
The Ultimate Homemade Cosmic Brownies: Better Than Store-Bought
There is something undeniably magical about opening your lunchbox to find a little plastic-wrapped rectangle of pure chocolate joy. For generations, those iconic, colorful, candy-studded treats have been the crown jewel of the school cafeteria. But what if I told you that you could recreate that exact same magic in your own kitchen? Not only can you recreate it, but you can elevate it to a completely new level of decadence. Welcome to the ultimate guide to making homemade copycat cosmic brownies.
This recipe isn’t just a nod to a childhood favorite; it is a massive upgrade. By ditching the artificial preservatives and utilizing high-quality cocoa powder, real butter, and heavy cream, you get a brownie that is infinitely richer, far more intensely chocolatey, and boasts a texture that will absolutely melt in your mouth. Get ready to embark on a baking journey that will bring a wave of sweet nostalgia right into your home.
Why You Will Fall in Love with This Homemade Copycat Recipe
Let’s be honest, the store-bought versions hold a special place in our hearts purely because of nostalgia. However, as adults with developed palates, taking a bite of the packaged version often reveals a somewhat artificial flavor and a slightly waxy chocolate coating. This homemade version solves all of those problems while keeping the visual fun completely intact.

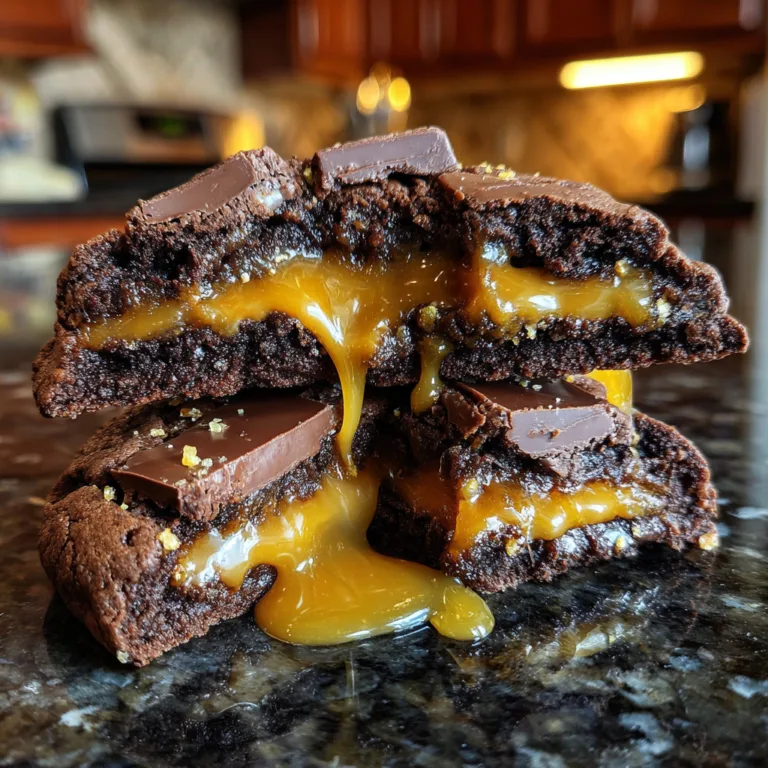
First and foremost, the texture of this homemade recipe is unparalleled. We are aiming for maximum density here. You want a brownie that leans more toward a thick block of fudge rather than a light, airy slice of cake. To achieve this, we omit traditional leavening agents like baking powder and baking soda entirely. The result is a profoundly chewy, ultra-dense base that perfectly mimics the original, but tastes like it came from a high-end bakery.
Secondly, the frosting is a revelation. Instead of a hardened, sugary glaze, we use a simple, rich, and incredibly glossy chocolate ganache. When this ganache sets, it provides that signature smooth, slightly firm top layer that yields to a luxurious, creamy bite. And of course, the vibrant crunch of those candy-coated chocolate chips provides the perfect textural contrast to the soft brownie below.
The Anatomy of the Perfect Fudgy Brownie
Creating the ultimate fudgy texture is a science. If you have ever baked a batch of brownies only to have them turn out dry or cakey, you understand the frustration. The secret to our copycat cosmic brownies lies in the moisture-to-flour ratio and the specific mixing techniques employed.
In this recipe, we use a combination of melted butter and oil. Butter provides an unbeatable, rich dairy flavor, while a touch of neutral oil ensures the brownie remains incredibly moist and chewy for days after baking. Oil is liquid at room temperature, which prevents the brownies from drying out once they cool.
Furthermore, the sugar content plays a vital role. Granulated sugar provides structure, while brown sugar adds a deep, molasses-like undertone and, most importantly, contributes to the chewy, fudgy center. When you mix your sugars into the warm melted butter, it helps to dissolve the sugar granules, creating a shiny, crackly top—though in this case, that beautiful top will be generously blanketed by chocolate ganache.
Understanding Your Ingredients
To achieve the best possible results, it is important to understand what each ingredient brings to the mixing bowl. Here is a deep dive into the stars of this cosmic show:
- Dutch-Process Cocoa Powder: This is crucial. Dutch-process cocoa has been treated with an alkalizing agent to reduce its natural acidity. This gives it a darker color, a smoother, more mellow flavor, and allows it to dissolve easier. It is the secret to getting that ultra-dark, intensely chocolatey base without any bitterness.
- Unsalted Butter: Always use unsalted butter in baking so you can control the sodium levels yourself. The butter is melted to encourage a dense, chewy crumb rather than a light, aerated one.
- Eggs: Eggs act as the binding agent. Using room temperature eggs allows them to incorporate much more easily into the batter, preventing overmixing.
- Heavy Cream and Chocolate Chips: These two ingredients are all you need for the iconic frosting. The hot cream melts the chocolate chips to create a glossy, pourable ganache that firms up beautifully in the refrigerator.
- Rainbow Candy-Coated Chocolate Chips: You cannot call them cosmic without the rainbow crunch! If you cannot find the mini candy-coated chips, mini M&Ms make an excellent and accessible substitute.
Ingredients List
For the Brownie Base:
– 3/4 cup unsalted butter, melted
– 2 tablespoons neutral oil (like canola or vegetable)
– 1 cup granulated sugar
– 3/4 cup packed light brown sugar
– 2 large eggs, room temperature
– 1 tablespoon vanilla extract
– 3/4 cup Dutch-process cocoa powder
– 1 cup all-purpose flour
– 1/2 teaspoon salt
For the Glossy Ganache Frosting:
– 1 1/2 cups semi-sweet chocolate chips
– 1/2 cup heavy cream
– 1/3 cup rainbow candy-coated chocolate chips (or mini M&Ms)
Step-by-Step Instructions
Follow these steps closely to ensure your kitchen produces the ultimate nostalgic treat.
- Prepare the Pan and Oven: Preheat your oven to 350°F (175°C). Line an 8×8 or 9×9-inch square baking pan with parchment paper, leaving enough overhang on the sides so you can easily lift the brownies out later. Lightly grease the parchment paper to ensure absolutely no sticking occurs.
- Mix the Wet Ingredients: In a large mixing bowl, whisk together the warm melted butter, neutral oil, granulated sugar, and brown sugar. Whisk vigorously for about a minute until the mixture is smooth and well combined. This helps start the sugar dissolving process.
- Incorporate Eggs and Vanilla: Add the room temperature eggs one at a time, whisking well after each addition. Pour in the vanilla extract and whisk until the batter looks slightly lighter in color and completely uniform.
- Fold in the Dry Ingredients: Place a fine-mesh sieve over your bowl and sift in the Dutch-process cocoa powder, all-purpose flour, and salt. Sifting is highly recommended here to remove any stubborn lumps in the cocoa powder. Using a rubber spatula, gently fold the dry ingredients into the wet mixture. Stop mixing as soon as you no longer see any dry streaks of flour. Overmixing will lead to tough brownies.
- Bake the Base: Pour the thick batter into your prepared baking pan. Use your spatula to spread it into an even layer, ensuring it reaches all four corners. Bake in the preheated oven for 20 to 25 minutes. The edges should look set, but the center will still appear slightly soft. A toothpick inserted into the center should come out with moist crumbs attached, not wet batter.
- Cool Completely: This is the hardest part. Allow the brownies to cool completely in the pan on a wire rack. They must be entirely room temperature before you add the frosting, otherwise, the ganache will melt right off the sides.
- Make the Ganache: Place your semi-sweet chocolate chips in a heat-proof bowl. In a small saucepan, heat the heavy cream over medium heat just until it begins to gently simmer (do not let it come to a rolling boil). Pour the hot cream over the chocolate chips. Let it sit completely undisturbed for 5 minutes. After 5 minutes, gently whisk the mixture starting from the center and moving outward until you have a smooth, dark, glossy ganache.
- Frost and Decorate: Pour the warm ganache over the cooled brownie base still in the pan. Use an offset spatula to smooth it out into a perfectly even layer. Immediately sprinkle the rainbow candy-coated chocolate chips evenly across the top before the ganache sets.
- Chill and Slice: Place the pan in the refrigerator for at least 1 to 2 hours to allow the ganache to firm up completely. Once chilled, use the parchment paper overhang to lift the brownies out of the pan. Using a sharp knife dipped in hot water and wiped dry between each cut, slice the brownies into standard rectangles to mimic the classic look.
Pro-Tips for the Best Results
Baking is an exact science, and making minor tweaks to your process can yield major improvements in your final product. Keep these professional tips in mind when making your cosmic brownies:
The Hot Knife Method: The biggest challenge when making frosted brownies is cutting them cleanly without smearing the chocolate ganache all over the beautiful edges. To achieve bakery-quality, razor-sharp cuts, fill a tall glass with very hot water. Dip a large, sharp chef’s knife into the water to heat the blade. Wipe the blade completely dry with a paper towel, make one firm cut down the brownies, and then repeat the process (dip, wipe, cut) for every single slice. It takes extra time, but the visual perfection is worth it.
Do Not Overbake: Residual heat is a powerful thing. When you pull your brownies out of the oven, they will continue to bake in the hot pan as they sit on your counter. If you wait until a toothpick comes out completely clean from the center, your brownies are already overcooked and will dry out. Pull them when there are still sticky, moist crumbs attached to the tester.
Patience is Key: Trying to frost warm brownies is a recipe for disaster. The cream-based ganache will turn into a runny mess and soak into the brownie instead of sitting proudly on top. Give your base the time it needs to cool down to room temperature.
Creative Variations and Substitutions
While this recipe aims to perfectly replicate the classic, the beauty of home baking is that you are the boss of your own kitchen. Here are some fun ways to switch up the formula:
Different Toppings: Can’t find the mini rainbow chocolate chips? No problem. Mini M&Ms work perfectly. You can also use regular chocolate chips, white chocolate chips, peanut butter chips, or even colorful festive sprinkles depending on the holiday season. Chopped walnuts or pecans also add a sophisticated, grown-up crunch.
Espresso Enhancement: Chocolate and coffee are best friends. Adding one teaspoon of instant espresso powder to the dry ingredients will not make the brownies taste like coffee; instead, it will dramatically enhance and deepen the rich chocolate flavor profile of the cocoa powder.
Gluten-Free Option: To make these gluten-free, substitute the all-purpose flour with a high-quality 1:1 gluten-free baking flour that contains xanthan gum. The texture holds up wonderfully due to the dense, fudgy nature of the batter.
Storage and Freezing Guide
Because this recipe utilizes a cream-based ganache, proper storage is slightly different than a standard naked brownie.
Room Temperature vs. Refrigerator: Technically, because the cream in the ganache has been boiled and combined with sugar (chocolate), it is generally safe at cool room temperature for a day or two. However, to maintain the perfect snappy texture of the frosting and to keep the brownies ultra-fudgy, it is highly recommended to store them in an airtight container in the refrigerator. They will easily keep for up to 7 days in the fridge.
Freezing: These brownies freeze exceptionally well! If you want to save a batch for later, wrap the uncut block (or individual slices) tightly in plastic wrap, then place them in a heavy-duty freezer bag or airtight container. They will stay fresh in the freezer for up to 3 months. To enjoy, simply let them thaw in the refrigerator overnight, or let a slice sit at room temperature for about 20 minutes before eating.
Frequently Asked Questions (FAQ)
Why did my brownies sink in the middle?
A slight dip in the middle is actually perfectly normal for an ultra-fudgy brownie that doesn’t use leavening agents. However, if they sank dramatically, it usually means they were severely underbaked, or the batter was aggressively overmixed, which whipped too much air into the eggs that eventually collapsed during baking.
Can I use standard unsweetened cocoa powder instead of Dutch-process?
You can, but the results will be noticeably different. Regular unsweetened cocoa powder is more acidic and has a lighter color and sharper flavor. Dutch-process cocoa is what gives these brownies their signature dark, almost black appearance and smooth, bakery-style flavor. If you must use regular cocoa, the recipe will still function, but the taste profile will shift.
Why is my ganache not setting up?
If your ganache is still a liquid mess after hours in the fridge, your ratio of cream to chocolate was likely off. Ensure you are accurately measuring the heavy cream (liquid measuring cup) and the chocolate chips (dry measuring cup or by weight). Using a lower-fat milk instead of heavy cream can also prevent the ganache from setting properly.

Can I double this recipe?
Absolutely! You can easily double the ingredients and bake the batter in a 9×13-inch baking pan. You will need to increase the baking time slightly, usually by about 5 to 10 minutes. Keep a close eye on them and use the toothpick test to determine exactly when to pull them out of the oven.
Serving Suggestions and Final Thoughts
While these homemade cosmic brownies are absolutely spectacular on their own, straight from the fridge, you can certainly dress them up for a party. Try serving a room-temperature brownie with a large scoop of premium vanilla bean ice cream right on top. The contrast between the cold ice cream and the dense, rich chocolate is a match made in heaven.
Whether you are baking these to surprise your kids, to bring to a nostalgic-themed party, or simply to treat yourself on a cozy weekend, this recipe is guaranteed to become a permanent fixture in your baking repertoire. Say goodbye to the plastic wrappers and hello to the most incredible, glossy, fudgy, colorful brownies you will ever create in your own kitchen.
Homemade Cosmic Brownies
Ingredients
Equipment
Method
- Preheat oven to 350°F (175°C). Line an 8×8-inch baking pan with parchment paper and lightly grease.
- In a large bowl, vigorously whisk the melted butter, oil, granulated sugar, and brown sugar together for one minute.
- Whisk in the eggs one at a time, followed by the vanilla extract, until the mixture is smooth.
- Sift in the cocoa powder, flour, and salt. Gently fold with a rubber spatula just until no dry flour streaks remain.
- Pour the batter into the prepared pan and smooth the top. Bake for 20-25 minutes until a toothpick comes out with moist crumbs.
- Allow the brownies to cool completely in the pan on a wire rack.
- For the ganache, place chocolate chips in a bowl. Heat heavy cream until just simmering, then pour over the chips. Let sit for 5 minutes.
- Gently whisk the ganache until smooth and glossy. Pour over the cooled brownies and spread evenly.
- Immediately sprinkle the rainbow candies evenly over the top. Chill in the refrigerator for 1-2 hours to set before slicing.