Mint Oreo Bark Recipe
The Ultimate 4-Ingredient Mint Oreo Bark Recipe
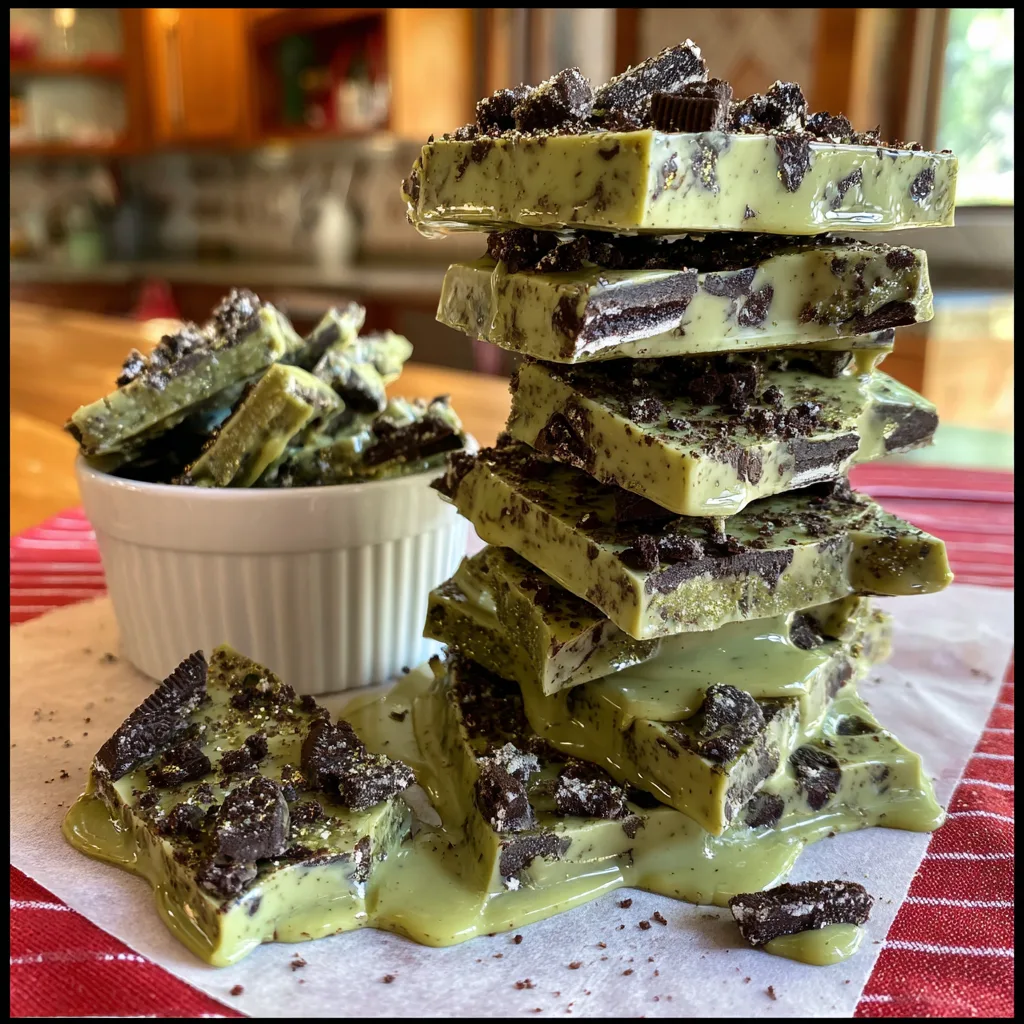
When it comes to homemade treats that deliver maximum flavor with minimal effort, few things can compete with the absolute brilliance of a perfectly crafted chocolate bark. Today, we are diving deep into a universally loved classic: the 4-Ingredient Mint Oreo Bark. This incredibly easy, no-bake dessert is an absolute showstopper, boasting a vibrant green hue, a refreshing burst of cool mint, and the deeply satisfying crunch of classic chocolate sandwich cookies. Whether you are whipping up a quick treat for St. Patrick’s Day, preparing festive holiday gift tins for Christmas, or simply satisfying a midnight sweet tooth, this recipe is guaranteed to become a permanent fixture in your culinary repertoire.
There is a special kind of magic that happens when you combine creamy, sweet white chocolate with the sharp, cool essence of peppermint and the dark, slightly bitter crunch of Oreo cookies. It is a symphony of textures and flavors that tastes like it took hours of careful tempering and preparation, yet it comes together in mere minutes. In this comprehensive guide, we will explore the nuances of selecting the best ingredients, the science behind melting chocolate perfectly without seizing, and creative ways to customize and package your bark for any occasion. Prepare to become the most popular person at your next potluck!
Why You Will Fall in Love with This 4-Ingredient Marvel
In a world of complex, multi-step baking recipes that require exact measurements and specialized equipment, this Mint Oreo Bark stands out as a beacon of simplicity. Here is why you will find yourself making it time and time again:
Unbeatable Simplicity: As the title proudly states, you only need four basic ingredients to make this happen. There is no flour to measure, no eggs to crack, and absolutely no baking involved. It is an entirely stovetop or microwave-friendly process.
Incredibly Fast Prep Time: The active preparation time for this recipe is roughly ten minutes. The hardest part is simply waiting for the chocolate to set in the refrigerator before you can break it apart and enjoy it.
Kid-Friendly Fun: Because there is no hot oven involved, this is a fantastic recipe to make with children. They will absolutely love smashing the Oreo cookies in a plastic bag and helping to swirl the green food coloring into the melted chocolate.
Highly Giftable: Homemade candy makes for one of the most thoughtful and appreciated gifts. Packed in a beautiful cellophane bag tied with a ribbon, or nestled inside a decorative holiday tin, this bark looks gourmet and tastes divine.
Breaking Down the 4 Essential Ingredients
When a recipe relies on so few ingredients, the quality and type of each component become paramount. Let us take a closer look at what you need to create the perfect Mint Oreo Bark.
1. The Base: White Chocolate or Vanilla Candy Melts
The foundation of this bark is a creamy, sweet white base. You have two primary options here: high-quality white chocolate chips/bars, or vanilla-flavored candy melts (also known as almond bark).
– White Chocolate: If you choose real white chocolate, ensure it contains actual cocoa butter. It will provide a richer, more authentic flavor and a creamier melt. Brands like Ghirardelli or Guittard work beautifully.
– Candy Melts: Candy melts or vanilla almond bark are significantly easier to work with because they are formulated to melt smoothly and set up firmly without needing to be tempered. If you are a beginner, candy melts are the foolproof route.
2. The Flavor: Peppermint Extract
This is where the magic happens. You want to use pure peppermint extract, not “mint” extract. General mint extract is often a blend of peppermint and spearmint, which can sometimes make your chocolate taste a bit like toothpaste. Pure peppermint extract provides that sharp, clean, festive flavor that pairs perfectly with chocolate.
3. The Color: Green Food Coloring
To achieve that striking, vibrant green color associated with mint chocolate treats, you will need a touch of food coloring. We highly recommend using gel food coloring rather than liquid food drops. Liquid food coloring contains water, and even a tiny drop of water can cause melted chocolate to seize up and become a gritty, lumpy mess. Gel food coloring is concentrated and water-free, ensuring a smooth, beautifully tinted chocolate.
4. The Crunch: Classic Oreo Cookies
Standard Oreo cookies provide the necessary texture and deep cocoa flavor to balance the sweet white chocolate. You can use standard Oreos, Double Stuf, or even Mint Oreos if you want to double down on the peppermint flavor. You will want to crush them into irregular chunks—some large pieces for visual appeal, and some finer crumbs to distribute throughout the bark.
The Art of Melting Chocolate Perfectly
The only technical skill required for this recipe is melting your chocolate or candy melts correctly. Chocolate is notoriously temperamental and can burn or seize if mishandled. Here are the two best methods for flawless melting.
The Microwave Method:
This is the fastest method, but it requires vigilance. Place your white chocolate or candy melts in a microwave-safe, perfectly dry bowl. Microwave on 50% power for 30 seconds. Remove the bowl and stir. It will not look melted yet, but stirring distributes the heat. Return to the microwave for another 30 seconds at 50% power, and stir again. Repeat this process in 15-to-30-second bursts until the chocolate is about 90% melted. Remove from the microwave and keep stirring; the residual heat will melt the remaining lumps, leaving you with smooth, glossy chocolate.
The Double Boiler Method:
This method offers more control and is less likely to scorch your chocolate. Fill a saucepan with about an inch or two of water and bring it to a gentle simmer. Place a heatproof glass or metal bowl over the saucepan, ensuring the bottom of the bowl does not touch the boiling water. Add your chocolate to the bowl and stir continuously as the gentle steam heats the bowl and melts the chocolate. Once smooth, carefully remove the bowl from the heat (wipe the condensation off the bottom of the bowl so no water drips into your mixture).
Step-by-Step Instructions for Mint Oreo Bark
Now that your ingredients are prepped and you know how to melt the chocolate safely, let us put it all together.
- Prepare Your Workspace: Line a large baking sheet with parchment paper or a silicone baking mat. This ensures your bark will not stick to the pan and makes cleanup a breeze.
- Crush the Cookies: Place about 12 to 15 Oreo cookies into a large zip-top bag. Squeeze out the air and seal it. Using a rolling pin, the back of a measuring cup, or your hands, crush the cookies into rough chunks. Avoid pulverizing them into fine dust; you want distinct, bite-sized pieces for texture. Set aside.
- Melt the Chocolate: Using either the microwave or double boiler method described above, melt 12 ounces of white chocolate chips or vanilla candy melts until completely smooth and fluid.
- Flavor and Color: Once the chocolate is melted and removed from the heat, immediately stir in 1/2 teaspoon of pure peppermint extract and 2-3 drops of green gel food coloring. Stir vigorously until the color is uniform. If you want a darker green, add one more drop of gel color and stir again.
- Fold in the Crunch: Pour about 3/4 of your crushed Oreo cookies into the melted green chocolate. Gently fold them in using a rubber spatula until the cookies are evenly coated.
- Spread the Bark: Pour the entire mixture onto your prepared baking sheet. Using an offset spatula or the back of a spoon, spread the mixture out into an even layer, about 1/4 to 1/3 inch thick. It does not need to reach the edges of the pan or be perfectly rectangular; rustic edges are part of the charm!
- Top it Off: Immediately sprinkle the remaining 1/4 of the crushed Oreos evenly over the top of the wet chocolate. Gently press them down with your hands so they adhere to the bark as it sets.
- Chill and Set: Place the baking sheet in the refrigerator for 30 to 45 minutes, or until the chocolate is completely firm and set.
- Break and Serve: Remove the pan from the fridge. Using your hands or a heavy knife, break or chop the bark into irregular pieces. Serve immediately or store for later!
Tips and Tricks for Flawless Bark Every Time
While this recipe is incredibly forgiving, a few pro-tips can elevate your Mint Oreo Bark from good to bakery-quality.
Avoid the Enemy: Water. Chocolate’s worst enemy is water. Even a single drop of water from a wet spoon, a splashed double boiler, or liquid food coloring can cause melted white chocolate to “seize”—turning it from a smooth liquid into a stiff, grainy paste that cannot be saved. Ensure all bowls, spatulas, and spoons are bone dry before starting.
Do Not Overdo the Extract. Peppermint extract is potent. Start with 1/2 teaspoon. If you love a very aggressive mint flavor, you can bump it up to 3/4 teaspoon, but be careful. Too much extract can also alter the chemical structure of the chocolate and cause seizing, or it can simply overpower the subtle flavors of the cookie and cocoa butter.
The Temperature of Your Pan. If you want your bark to spread easily without setting up too quickly, ensure your baking sheet is at room temperature. If you are making multiple batches and chilling the pan in between, let the pan warm back up before spreading the next batch, otherwise the chocolate will harden the second it hits the cold metal.
Exciting Variations and Add-Ins
The beauty of chocolate bark is that it serves as a blank canvas for your creativity. Once you master the basic 4-ingredient recipe, try these fun variations!
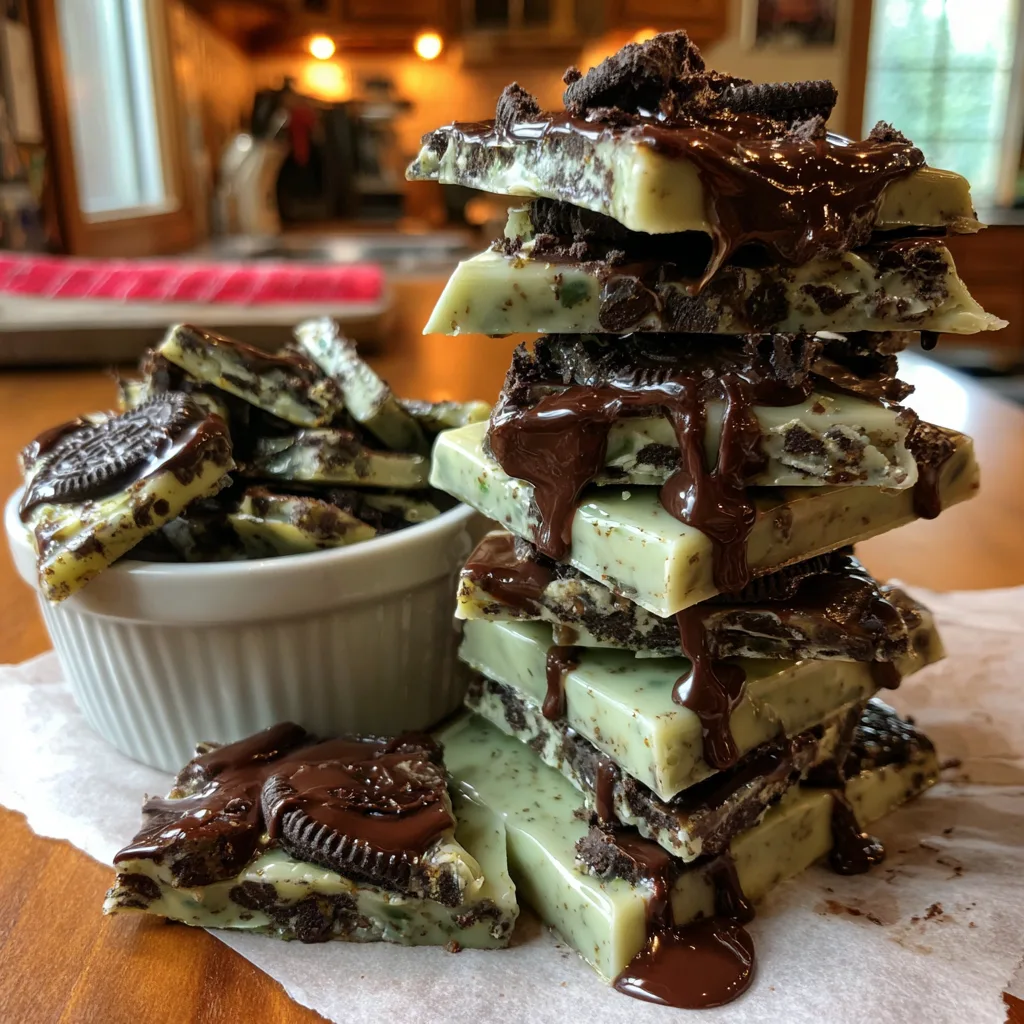
The Double Chocolate Mint: Instead of using just white chocolate, melt a small batch of semi-sweet or dark chocolate separately. Spread your green mint Oreo layer first. Then, drizzle the dark chocolate heavily over the top before it sets. Use a toothpick to swirl the dark chocolate into the green chocolate for a beautiful marbled effect.
Andes Mint Explosion: Chop up a handful of Andes mints and sprinkle them over the top of the wet bark along with the reserved Oreo crumbs. This adds an extra layer of chocolatey mint flavor and a beautiful visual contrast.
Festive Sprinkles: If you are making this for St. Patrick’s Day, sprinkle some gold sanding sugar or shamrock sprinkles over the top. If making it for Christmas, add some crushed candy canes or red and green sprinkles alongside the Oreos.
Proper Storage and Shelf Life
Mint Oreo Bark is wonderfully resilient and lasts a long time if stored correctly, making it the ultimate make-ahead dessert.
Room Temperature: If your home is relatively cool (below 70°F or 21°C), you can store the broken bark pieces in an airtight container on the counter for up to 2 weeks. Keep it away from direct sunlight or heat sources like the stove.
Refrigerator: If you prefer your chocolate snappy and cold, or if you live in a warm, humid climate, store the bark in an airtight container or zip-top bag in the refrigerator. It will stay fresh and delicious for up to 3 weeks.
Freezer: Yes, you can freeze chocolate bark! Place the pieces in a freezer-safe bag, squeeze out as much air as possible, and freeze for up to 3 months. When you are ready to eat it, let it sit at room temperature for about 15 minutes to soften slightly so you do not break a tooth on the frozen cookies!
Frequently Asked Questions
Why did my white chocolate turn thick and clumpy?
This is called seizing. It happens if the chocolate gets too hot (scorching) or if any liquid (water or liquid food coloring) is introduced. Always use a dry bowl, melt slowly on 50% power, and use gel food coloring.
Can I use dark or milk chocolate instead of white?
Absolutely! You will not be able to dye it green, but a dark chocolate peppermint bark with Oreos is phenomenally delicious. Simply skip the green food coloring and follow the rest of the recipe exactly.
Do I have to use peppermint extract?
No, if you are not a fan of mint, you can simply omit the extract and the food coloring, and you will have a fantastic, classic Cookies and Cream White Chocolate Bark.
Conclusion
There you have it—a comprehensive guide to creating the easiest, most impressive 4-Ingredient Mint Oreo Bark. It is visually stunning, incredibly flavorful, and perfectly balanced with sweet, cool, and crunchy elements. Whether you are whipping it up for a holiday party, a school bake sale, or just a Tuesday night treat, this recipe is sure to deliver joy in every single bite. Grab your apron, crush up some cookies, and enjoy the delicious simplicity of homemade candy bark!
4-Ingredient Mint Oreo Bark
Ingredients
Equipment
Method
- Line a large baking sheet with parchment paper or a silicone baking mat.
- Place Oreo cookies in a zip-top bag and crush them into rough chunks with a rolling pin. Set aside.
- Melt the white chocolate or candy melts in a microwave-safe bowl in 30-second increments at 50% power, stirring in between, until smooth.
- Stir in the peppermint extract and green gel food coloring until the color is vibrant and uniform.
- Fold 3/4 of the crushed Oreos into the melted green chocolate.
- Spread the mixture evenly onto the prepared baking sheet, about 1/4 inch thick.
- Sprinkle the remaining crushed Oreos over the top, pressing them in gently.
- Chill in the refrigerator for 30-45 minutes until completely set, then break into pieces and serve.