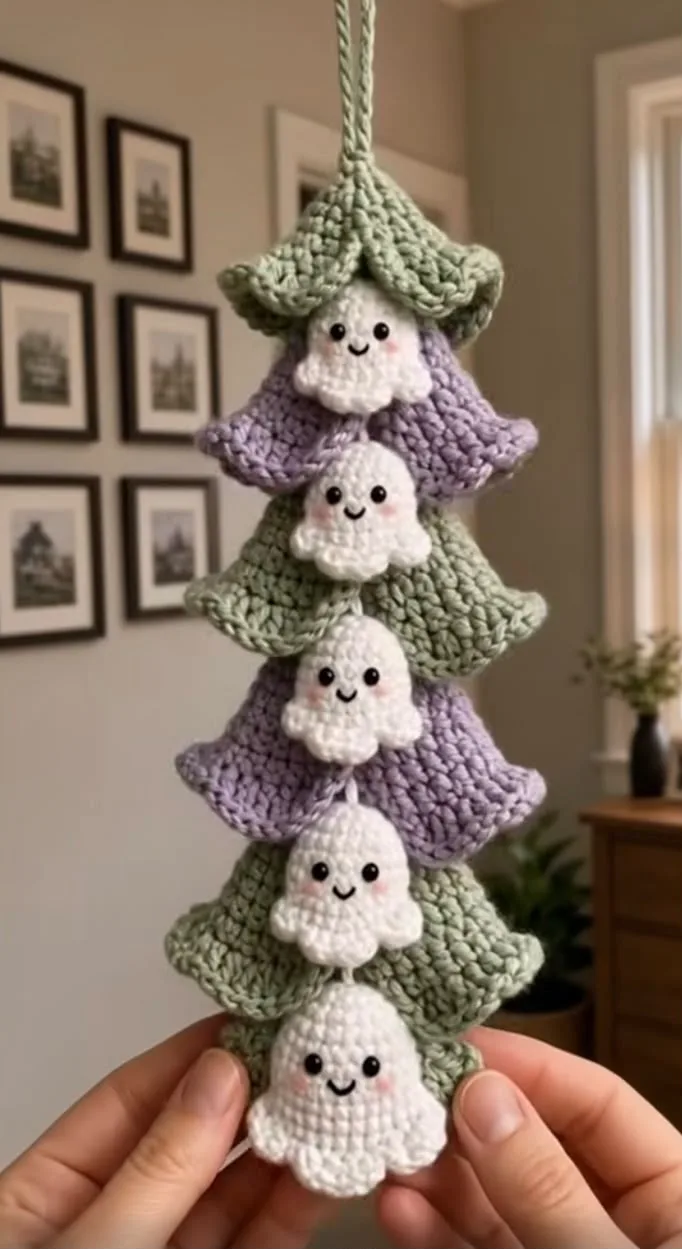
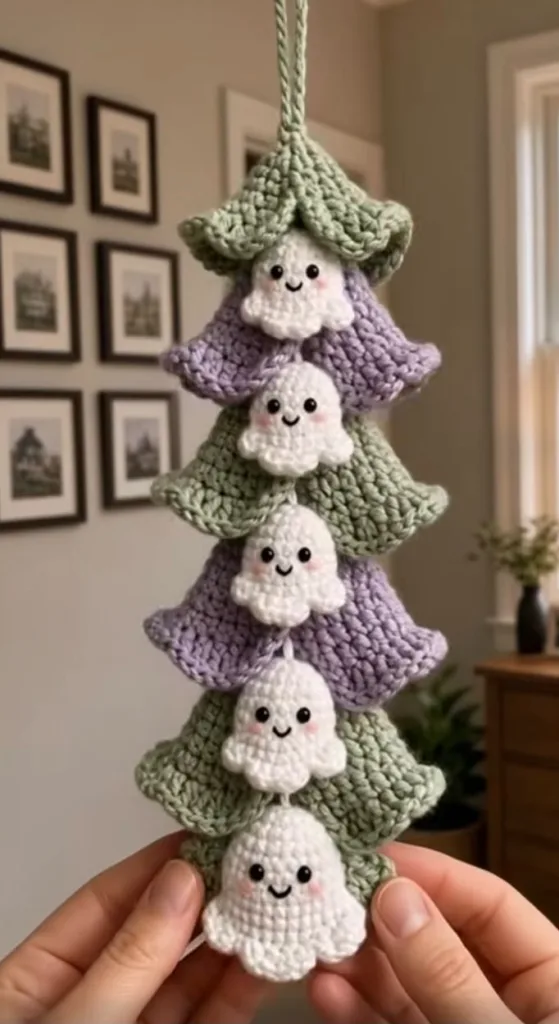
Pastel ghost crochet hanger
📖 B. INTRODUCTION
Bring a touch of whimsical, gentle spookiness to your space with this Pastel Ghost Crochet Hanger. Inspired by the natural elegance of lily of the valley flowers and the charming appeal of kawaii aesthetics, this vertical wall hanging features a delightful cascade of five cheerful amigurumi ghosts. Each little spirit is nestled safely under a textured, bell-shaped floral cap in alternating shades of pastel sage green and soft lavender. This project perfectly bridges the gap between cozy cottagecore home decor and playful seasonal crafting.
Creating this hanger is a wonderful weekend project that makes a beautiful handmade gift for lovers of pastel Halloween themes, nursery decorations, or year-round quirky home accents. Because the construction is completely modular, you can easily customize the length of the hanger, switch out the pastel colors to match your home’s palette, or even use the individual ghosts and floral caps as standalone keychains or garland elements.
The most recognizable visual details—the scalloped, flowing bases of the ghosts and the wavy, textured brims of the floral caps—are achieved using simple stitch repeats that are easy to memorize. With minimal sewing required (just attaching the string and embroidering the faces!), this pattern is designed for maximum joy and minimal frustration.
🔍 C. MAIN PATTERN OVERVIEW
This pattern is constructed in three main modular parts that are later assembled into one cohesive hanging piece.
- The Friendly Ghosts: You will crochet five identical small ghosts in white yarn. Each ghost is worked continuously in the round from the top down, finishing with a wavy ruffled skirt.
- The Floral Caps: You will crochet five bell-shaped caps (three in sage green, two in lavender). These act as little “roofs” for the ghosts and feature a fluted, textured edge that mimics a woodland flower.
- The Hanging Cord & Assembly: The entire piece is brought together by crocheting a long foundation chain (or I-cord), threading it through the center of all ten components, and tying hidden knots to suspend each piece at the perfect height.
🎯 D. SKILL LEVEL
Advanced Beginner
This pattern is highly accessible for crocheters who have mastered basic amigurumi techniques. There is minimal sewing, and the shapes are simple and repetitive.
Techniques Involved:
- Working in continuous rounds (spirals)
- Magic Ring (MR)
- Single crochet, half double crochet, and double crochet
- Increasing (inc) and invisible decreasing (inv dec)
- Basic facial embroidery (backstitch or satin stitch)
📏 E. FINISHED SIZE
Total Length (Including hanging loop): Approximately 18 inches (45.5 cm) Width (At the widest floral cap): Approximately 3.5 inches (9 cm) Individual Ghost Height: 2 inches (5 cm)
Note: Your exact finished size will depend heavily on your personal tension, yarn weight, and hook size. Using a thicker yarn like blanket yarn will result in a massive, statement piece, while using fingering weight yarn will create a tiny car-mirror hanger.
🧮 F. GAUGE
Gauge: 5 rounds of single crochet = 1.25 inches (3 cm) across.
While exact gauge is not strictly critical for this decorative item, consistent and tight tension is important. Your stitches should be dense enough that the fiberfill stuffing does not show through the white ghosts. If you see gaps between your stitches, drop down half a hook size.
🧶 G. REQUIRED YARN AMOUNTS
This project uses medium/worsted weight (Category 4) cotton or acrylic yarn. Cotton is highly recommended for its clean stitch definition and lack of halo, which keeps the pastel aesthetic looking crisp.
- Color A (White): Approx. 75 yards (68 m) — For the 5 ghosts.
- Color B (Sage Green): Approx. 45 yards (41 m) — For 3 floral caps and the hanging cord.
- Color C (Pastel Lavender): Approx. 30 yards (27 m) — For 2 floral caps.
- Tiny amounts: Black and soft pink embroidery thread (or fingering weight yarn) for the facial details.
🧰 H. MATERIALS
- Hook: 3.5 mm (US E/4) crochet hook (or size needed to obtain a tight fabric)
- Yarn: Worsted weight yarn in White, Sage Green, and Lavender (see amounts above)
- Eyes: 10 small black safety eyes (approx. 5mm or 6mm). Alternatively, black embroidery floss if making for a baby.
- Stuffing: High-quality polyester fiberfill
- Needles: Yarn needle (tapestry needle) and a sharp embroidery needle
- Tools: Stitch markers, small scissors, and straight pins for assembly
- Optional: A long doll-making needle (helpful for threading the hanging cord through the stuffed ghosts)
⚠️ Safety Note: If this item is intended to be handled by children under 3, do not use plastic safety eyes. Embroider the eyes securely using black thread to prevent choking hazards.
🔤 I. ABBREVIATIONS – US TERMS
- MR: Magic Ring (or Magic Circle)
- ch: chain
- st(s): stitch(es)
- sl st: slip stitch
- sc: single crochet
- hdc: half double crochet
- dc: double crochet
- inc: single crochet increase (2 sc in the same stitch)
- inv dec: invisible single crochet decrease (sc 2 together using front loops only)
- BLO: back loop only
- FLO: front loop only
- [ … ]: repeat instructions within brackets as directed
- ( … ): total number of stitches at the end of the round
📝 J. NOTES BEFORE YOU BEGIN
- Continuous Rounds: All components (except the ruffled edgings) are worked in continuous spirals. Do not slip stitch or chain 1 at the end of a round unless explicitly instructed.
- Stitch Markers: Use a stitch marker to mark the first stitch of every round. Move it up as you begin each new round.
- Stuffing: Stuff the ghosts firmly to maintain their round, chubby shape, but be careful not to overstuff the very bottom edge, as this can stretch out the ruffled skirt. The floral caps are not stuffed.
- Invisible Decrease: Always use the invisible decrease method (working through the front loops only) for amigurumi to prevent unsightly gaps.
- Yarn Tails: You will weave in almost all ends, as the pieces are strung together rather than sewn edge-to-edge.
🪡 K. COMPLETE PATTERN
👻 The Amigurumi Ghosts (Make 5)
What it is for: The main characters of the hanger. Yarn: Color A (White) Quantity to make: 5 identical pieces
R1: Make a MR, work 6 sc into the ring. (6) R2: [inc] in each st around. (12) R3: [1 sc, inc] 6 times. (18) R4: [2 sc, inc] 6 times. (24) R5-R8: sc in each st around. (24) — 4 rounds total. 🧵 Insert 5mm safety eyes between R6 and R7, placing them approximately 4 stitches apart. Embroider a tiny black “V” shaped smile between the eyes. Add small horizontal lines of pink for blush just outside and slightly below the eyes. R9: [2 sc, inv dec] 6 times. (18) R10: [1 sc, inv dec] 6 times. (12) 🧸 Stuff the head firmly with fiberfill. R11: Working in FLO, [1 sc, inc] 6 times. (18) R12: [2 sc, inc] 6 times. (24) R13: [3 sc, inc] 6 times. (30) R14 (The Skirt Ruffle): [sl st in the next st, work 3 dc in the next st, sl st in the next st]. Repeat this sequence 10 times around. (30)
Fasten off, weave in the yarn tail cleanly on the inside of the skirt. Ensure the base is flat so the ghost can sit neatly if placed on a table.
🪷 The Floral Caps (Make 5)
What it is for: The colorful “roofs” that shelter the ghosts. Yarn: Color B (Sage Green – Make 3), Color C (Lavender – Make 2) Quantity to make: 5 pieces total
R1: Make a MR, work 6 sc into the ring. (6) R2: [inc] in each st around. (12) R3-R4: sc in each st around. (12) — 2 rounds total. This creates the narrow “stem” top. R5: [1 sc, inc] 6 times. (18) R6: sc in each st around. (18) R7: [2 sc, inc] 6 times. (24) R8: sc in each st around. (24) R9: [3 sc, inc] 6 times. (30) R10: [4 sc, inc] 6 times. (36) R11: sc in each st around. (36) R12 (The Petal Ruffle): [sl st in the next st, skip 1 st, work 5 dc in the next st, skip 1 st, sl st in the next st]. Repeat this sequence 7 times around, then sl st into the very first st of the round. (7 large scallops)
Fasten off and weave in the ends. These caps should naturally cup inwards slightly before flaring out at the ruffled edge.
🧵 The Hanging Cord
What it is for: The central spine that holds all pieces together. Yarn: Color B (Sage Green) Quantity to make: 1
Leave a 6-inch (15 cm) starting tail. Row 1: Chain 120 tightly. Note: If you want a longer space between your ghosts or want to add more ghosts, increase this chain length. 120 chains gives you roughly 24 inches to work with. Fasten off, leaving another 6-inch tail.
(Alternative: If you want a thicker cord, you can slip stitch back down the entire chain, or crochet a 3-stitch I-cord. However, a simple chain slides through the amigurumi pieces much easier.)
🎨 L. STYLING / ASSEMBLY / STABILITY / FINAL SHAPING
The magic of this pattern comes from how it is strung together. Follow these steps carefully to ensure your hanger is perfectly balanced and visually striking, just like the reference image “WhatsApp Image 2026-09-14 at 01.08.13.jpeg”.
1. Preparing the Cord Thread one tail of your long green chain onto a long yarn needle (a doll needle is best).
2. The Bottom Ghost Starting from the top of the very last Ghost’s head (the center of the Magic Ring), push the needle straight down through the center of the body and out the bottom opening. Pull the cord through until there is about 3 inches of chain sticking out the bottom. Tie a thick knot in the chain under the ghost to prevent it from sliding off. Weave the excess chain tail into the inside of the ghost.
3. The First Floral Cap (Green) Take a Green Floral Cap. Thread your needle onto the top end of the chain. Run the needle up through the inside of the cap and out the top center (the Magic Ring). Slide the cap down until it rests perfectly on top of the bottom ghost, framing its face. Tie a firm knot in the chain directly above the cap so it cannot slide up.
4. Spacing and the Next Ghost Measure approximately 1 inch (2.5 cm) up the chain from the top of the green cap. Tie a large knot here. Take the next Ghost, run the needle up through the bottom opening and out the top of the head. Slide it down until it hits the knot you just tied.
5. The Second Floral Cap (Lavender) Take a Lavender Floral Cap. Run the needle up through the inside and out the top center. Slide it down to frame the ghost. Tie a knot directly above it.
6. Continue the Sequence Repeat Steps 4 and 5, alternating your Floral Cap colors:
- Ghost 3 + Green Cap
- Ghost 4 + Lavender Cap
- Ghost 5 (Top) + Green Cap
7. The Hanging Loop Once the top Green Cap is secured with a knot above it, take the remaining length of the chain and fold it over to create a loop (about 2-3 inches long). Tie a secure overhand knot at the base of the loop to finish the hanger. Clip any remaining yarn tails.
✅ Final Shaping Checklist:
- ✅ Are all five ghosts facing exactly the same direction? Gently twist them on the chain until the faces align perfectly.
- ✅ Do the floral caps sit low enough to look like little hoods, without covering the ghosts’ eyes?
- ✅ Are the ruffles of the ghosts sitting flat and flared out?
- ✅ Is the spacing between each ghost-and-cap unit even? (Adjusting the knots before weaving in ends is highly recommended).
💡 M. HELPFUL CROCHET TIPS
- 💡 Yarn Under (X-Stitch): For the ghosts, try using the “yarn under, yarn over” single crochet technique. This creates tighter, X-shaped stitches that look incredibly neat and prevent stuffing from showing.
- 💡 Embroidery First: Always complete the facial embroidery before stuffing and closing the head. It is much easier to tie off and hide your thread tails on the inside of the work.
- 💡 Symmetrical Blushing: When adding pink cheeks, loop the yarn over the same stitch 2-3 times to make it slightly raised and prominent.
- 💡 Knot Thickness: If your chain knots are slipping through the magic rings of the caps, tie a double or triple knot in the same spot on the chain to create a larger “stopper.”
- 💡 Ruffle Definition: To make the ruffles on the floral caps pop, gently pinch each scallop between your thumb and forefinger after the piece is completed to train the yarn into shape.
- 💡 Hook Size Matters: Even if the yarn label suggests a 5.0mm hook, stick to a 3.5mm or 3.0mm hook for this amigurumi project. A stiff fabric holds the bell shapes much better than a floppy one.
🧼 N. CARE INSTRUCTIONS
Because this piece is decorative and will likely hang on a wall, it will only require occasional dusting.
- Routine Care: Use a clean, dry makeup brush or a lint roller to gently remove surface dust from the floral caps and ghosts.
- Spot Cleaning: If a spot gets dirty, use a damp cloth with a tiny drop of mild detergent to dab the area. Do not rub, as this can cause the yarn to pill or fuzz.
- Washing: Machine washing is not recommended. If a deep clean is absolutely necessary, hand wash gently in cool water, press out the water with a towel (do not wring), and lay flat to dry, reshaping the ruffles while wet.
- Sunlight: Keep out of direct, harsh sunlight to prevent the pastel green and lavender yarn from fading over time.
❓ R. FAQ
❓ Can I use plush blanket yarn for this pattern? Absolutely! Using chunky chenille or blanket yarn will turn this delicate wall hanger into a massive, huggable room decoration. Just remember to use a much larger hook (like a 6.0mm or 7.0mm) and use a very thick ribbon or braided yarn for the hanging cord to support the extra weight.
❓ How do I make the faces look as cute as the photos? The secret to kawaii amigurumi faces is placement. Place the eyes relatively low on the head (Round 6-7), and place the mouth directly between them, not lower down. Keeping the facial features clustered closely together creates that innocent, adorable look.
❓ My floral caps are curling upwards instead of looking like bells. What did I do wrong? This usually happens if your tension is too tight during the increase rounds, or if you accidentally skipped an increase. You can fix minor curling by lightly steam blocking the caps (keep the iron an inch away from the yarn!) and stretching them gently into a bell shape.
❓ Can I make this as a car mirror charm? Yes! To make it fit a car mirror safely without blocking visibility, stop after one or two ghosts. A single ghost under a green cap makes a perfect, lightweight car accessory.
❓ Do I have to use a chain for the center? Can I use wire? A crochet chain or strong macrame cord is best for a fluid, natural hang. Wire can be used if you want the piece to be posable, but it might be difficult to secure the pieces from sliding down without gluing them to the wire.