Quick Homemade Garlic Aioli
The Ultimate Homemade Garlic Aioli Recipe: Creamy, Zesty, and Perfectly Spiced
There are few condiments in the culinary world as universally beloved and incredibly versatile as garlic aioli. Whether you are dipping crisp, golden French fries into it, slathering it on a juicy, towering burger, or using it as a sophisticated drizzle for roasted vegetables, garlic aioli elevates almost any dish it touches. While the name might sound fancy and intimidating to novice home cooks, this particular recipe is a delightful shortcut that delivers maximum flavor with minimal effort. By utilizing a high-quality mayonnaise base and infusing it with fresh, potent ingredients, you can whip up a restaurant-quality sauce in just five minutes.
In this comprehensive guide, we will explore everything you need to know about making the best quick garlic aioli. We will dive into the history of this iconic sauce, break down the science of why these specific ingredients work so well together, and provide you with expert tips, mouth-watering variations, and endless serving suggestions. Get ready to ditch the store-bought bottles forever, because once you realize how simple and delicious this homemade version is, there is no going back.
What Exactly is Aioli, Anyway?
Before we get into the mixing bowl, it is worth understanding what aioli actually is. If you order aioli at a modern American restaurant, you will almost always receive a flavored mayonnaise—most commonly, garlic mayonnaise. However, traditional purists will quickly point out that true, authentic Mediterranean aioli (originating from regions like Provence in France and Catalonia in Spain) is actually quite different from commercial mayonnaise.
The word “aioli” literally translates to “garlic and oil” in Catalan and Provençal. Traditionally, making aioli is a labor of love that involves vigorously pounding fresh cloves of garlic with a mortar and pestle while slowly, drop by drop, emulsifying extra virgin olive oil into the paste until it forms a thick, creamy sauce. Traditional aioli contains no egg at all—the garlic itself acts as the emulsifier. It is sharp, pungent, and profoundly garlicky.
Mayonnaise, on the other hand, is an emulsion of neutral oil, egg yolks, and an acid (like vinegar or lemon juice). Today, the culinary world has largely adopted the term “aioli” to describe any mayonnaise-based sauce that has been heavily seasoned with garlic and other aromatics. Our recipe falls into this modern, incredibly popular category. It uses the creamy, stable emulsion of mayonnaise as a canvas for the sharp bite of raw garlic, the bright zing of lemon, and the fruity richness of olive oil.
Why This 5-Minute Shortcut Method is Genius
While pounding garlic and oil in a mortar for thirty minutes is a beautiful culinary tradition, it is not always practical on a busy Tuesday night when you just want a delicious dip for your sweet potato fries. That is where this recipe shines.
By starting with a prepared mayonnaise (about 1/3 cup), you completely bypass the risk of your emulsion breaking. The hard work of binding oil and water has already been done for you. Adding 2 tablespoons of olive oil thins the mayonnaise slightly, giving it a silkier, more luxurious texture reminiscent of the traditional sauce, while imparting that distinct, fruity Mediterranean flavor. The fresh minced garlic (two full cloves, or about 2 teaspoons) provides the essential aromatic punch, while the lemon juice adds the necessary acidity to cut through the richness. Finally, a quarter teaspoon of ground black pepper adds a subtle, warm spice that rounds out the flavor profile.
Deep Dive into the Ingredients
Because this recipe only uses five ingredients, the quality of each component matters immensely. Let’s break down what goes into the bowl:
1. The Mayonnaise Base (1/3 Cup)
This is the foundation of your aioli. Since it makes up the bulk of the recipe, do not use a low-fat or sweet salad dressing substitute here. You want a high-quality, full-fat real mayonnaise. Brands like Duke’s or Hellmann’s (Best Foods) are excellent choices because they have a rich, savory profile and a thick texture that can hold up to the addition of extra liquid. If you are feeling adventurous, you can even use a homemade mayonnaise as your base.
2. Olive Oil (2 Tablespoons)
The olive oil serves two purposes: it alters the texture to make it silkier, and it adds an authentic flavor. Use Extra Virgin Olive Oil (EVOO) for the best results. The robust, slightly peppery notes of a good EVOO pair beautifully with the raw garlic. However, if you find strong olive oil too bitter, you can use a lighter olive oil or even half olive oil and half avocado oil.
3. Fresh Garlic (2 Cloves / 2 Teaspoons Minced)
Garlic is the star of the show. It is absolutely crucial that you use fresh garlic cloves, not pre-minced garlic from a jar. Jarred garlic often contains preservatives that give it a metallic or sour off-flavor, which will ruin the fresh taste of your aioli. For the best texture, mince the garlic as finely as possible. You can even use a microplane grater to turn the garlic into a paste; this ensures that the garlic flavor distributes perfectly and evenly throughout the sauce, preventing you from biting into a large, harsh chunk of raw garlic.
4. Lemon Juice (1 Teaspoon)
Fat needs acid for balance. The mayonnaise and olive oil are incredibly rich, and the garlic is pungent. Freshly squeezed lemon juice brightens the entire mixture, lifting the heavy flavors and making the sauce crave-able and refreshing. Always use fresh lemon juice rather than bottled concentrate.
5. Ground Black Pepper (1/4 Teaspoon)
Freshly cracked black pepper adds a slight textural element and a warm, woody spice that complements the sharp bite of the raw garlic. While standard pre-ground pepper works, freshly grinding peppercorns directly into the bowl will yield a much more vibrant flavor.
Ingredients
Gather the following simple ingredients to make your sauce:
- – 1/3 cup high-quality Mayonnaise
- – 2 Tbsp. Extra Virgin Olive Oil
- – 2 cloves fresh Garlic, finely minced (equivalent to about 2 tsp.)
- – 1 tsp. freshly squeezed Lemon juice
- – 1/4 tsp. Ground black pepper
Instructions
Follow these incredibly simple steps for the perfect sauce:
- Prepare the Garlic: Peel the garlic cloves. Using a sharp knife, mince the garlic as finely as possible. Alternatively, use a microplane grater or a garlic press to create a smooth paste. This is crucial for a smooth aioli.
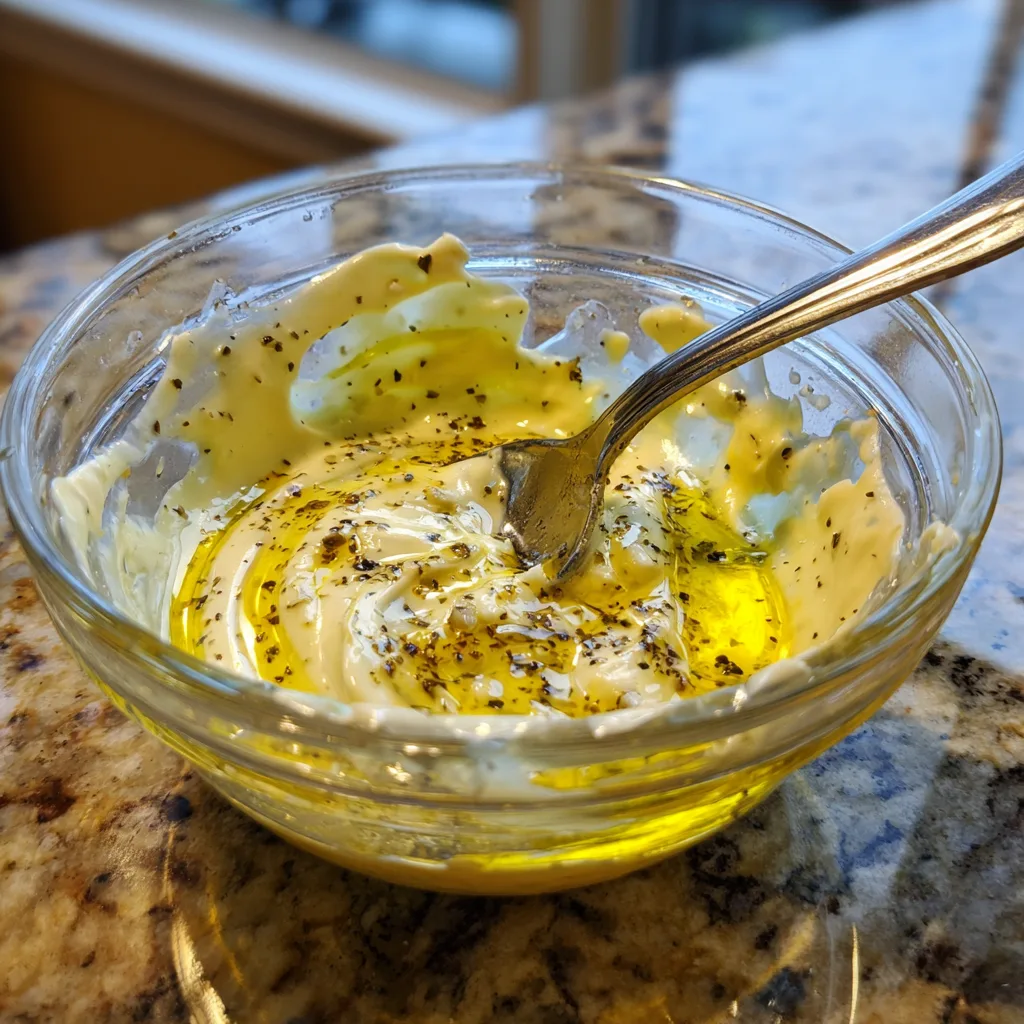
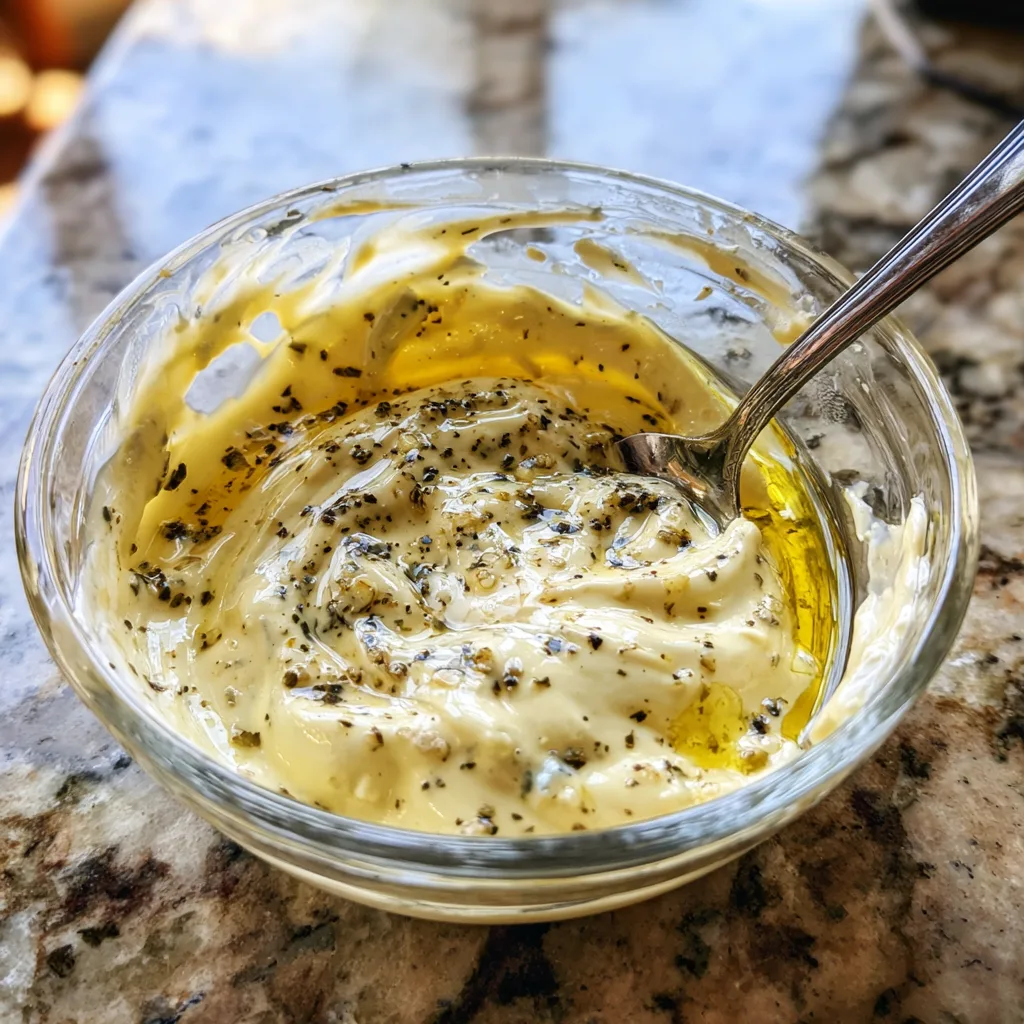
- Combine Ingredients: In a small mixing bowl or a food prep container, add the mayonnaise, extra virgin olive oil, minced garlic, lemon juice, and ground black pepper.
- Mix Thoroughly: Using a spoon or a small whisk, stir the ingredients together vigorously. Ensure that the olive oil fully incorporates into the mayonnaise base and that the garlic and pepper are evenly distributed throughout the mixture.
- Let it Rest (Optional but Recommended): While you can serve the aioli immediately, it is highly recommended to cover the bowl and place it in the refrigerator for at least 30 minutes before serving. This resting period allows the sharp bite of the raw garlic to mellow slightly and gives the flavors time to meld and marry together beautifully.
- Serve and Enjoy: Give the aioli one final stir before serving alongside your favorite dishes.
Expert Tips for the Best Results
Even with a recipe this simple, a few pro-tips can elevate your aioli from good to unforgettable:
Taming the Garlic: Raw garlic can be quite aggressive. If you love the flavor of garlic but hate the lingering raw bite, try this chef’s trick: after mincing your garlic, let it sit in the teaspoon of lemon juice for about 10 minutes before mixing it into the mayonnaise. The acid in the lemon juice essentially “cooks” the garlic slightly, neutralizing the alliinase enzyme responsible for its sharpest, most pungent flavors.
Texture Control: If you prefer a thicker dip (ideal for spreading on sandwiches so it doesn’t drip), reduce the olive oil to just 1 tablespoon. If you want a thinner sauce (ideal for drizzling over roasted Brussels sprouts or a salad), you can add an extra squeeze of lemon juice or a tiny splash of water.
Salt to Taste: You might notice there is no added salt in this recipe. That is because commercial mayonnaise is usually heavily salted already. However, depending on the brand you use, you might find you need a pinch of sea salt or kosher salt to really make the flavors pop. Taste your final mixture and adjust accordingly.
Delicious Variations and Flavor Twists
Once you master this base recipe, consider it a blank canvas. Here are some fantastic ways to customize your aioli:
Roasted Garlic Aioli: For a sweeter, deeper, and more mellow garlic flavor, swap the raw minced garlic for a whole head of roasted garlic. To roast garlic, cut the top off a whole bulb, drizzle with olive oil, wrap in foil, and bake at 400°F (200°C) for 40 minutes until caramelized and soft. Squeeze the soft cloves right into the mayo mixture.
Spicy Sriracha Aioli: Add 1 to 2 tablespoons of Sriracha or your favorite hot sauce, along with a tiny squeeze of lime juice instead of lemon. This makes an incredible sauce for sushi or crispy fried chicken.
Herb and Lemon Aioli: Double the lemon juice, add half a teaspoon of lemon zest, and stir in a tablespoon of finely chopped fresh herbs like dill, parsley, or chives. This variation pairs beautifully with grilled fish or crab cakes.
Truffle Aioli: Swap one tablespoon of the olive oil for a high-quality truffle oil. Serve this with thick-cut steak fries or on a gourmet mushroom and Swiss burger for an intensely decadent experience.
Serving Suggestions and Pairings
The beauty of this quick garlic aioli is its versatility. It is not just a dip; it is a flavor enhancer for practically every meal. Here are some of the best ways to utilize your fresh batch of aioli:
- The Ultimate Fry Dip: This is the classic application. Whether you are serving standard French fries, sweet potato fries, or even crispy baked zucchini sticks, aioli is the superior dipping sauce compared to standard ketchup.
- Burger and Sandwich Spread: Replace standard mayo or mustard on your next burger, turkey club, or BLT. The garlic adds a massive punch of savory flavor that complements grilled meats perfectly.
- Roasted Vegetables: Vegetables like asparagus, broccoli, Brussels sprouts, and cauliflower transform into an indulgent side dish when dipped in or drizzled with garlic aioli.
- Seafood Accoutrement: Serve alongside crispy calamari, fried shrimp, crab cakes, or even a simple piece of grilled salmon.
- Artichoke Companion: Steamed whole artichokes served with a side bowl of garlic aioli for dipping the leaves is an elegant, classic appetizer.
Storage Guidelines
Because this recipe utilizes fresh, raw garlic, proper storage is important. Transfer any leftover aioli to an airtight container or a small jar with a tight-fitting lid. Store it in the refrigerator.
When stored correctly, this quick garlic aioli will keep well for 4 to 5 days. You may notice that the garlic flavor actually intensifies on the second and third day as it continues to infuse into the oils. It is not recommended to freeze this sauce, as mayonnaise-based emulsions tend to separate and become grainy and watery when frozen and thawed.
Cultural Context and Fun Facts
While our shortcut recipe uses mayonnaise, traditional aioli is deeply ingrained in Mediterranean culture. In Provence, France, there is a traditional dish called “Le Grand Aïoli.” It is a festive, communal meal typically served in the summer or on Christmas Eve. The centerpiece is a massive bowl of heavily garlicked traditional aioli, surrounded by platters of boiled vegetables (like carrots, potatoes, and green beans), hard-boiled eggs, salt cod, and sometimes snails. It is a celebration of local produce and the mighty garlic bulb.
Garlic itself has been revered throughout history not just for its culinary properties, but for its medicinal ones. Ancient Greeks and Romans fed it to soldiers and athletes to boost strength, and it has long been celebrated for its antibacterial and immune-boosting properties. So, when you are enjoying a generous dollop of this garlic aioli on your sandwich, you can feel good knowing you are consuming an ingredient with a rich, powerful history.
Conclusion
Creating incredible, flavor-packed condiments at home does not have to be a complicated or time-consuming process. With just five simple ingredients—mayonnaise, olive oil, fresh garlic, lemon juice, and black pepper—you can create a rich, zesty, and versatile garlic aioli in the time it takes to toast a bun or pull a tray of fries out of the oven. By taking care to use fresh garlic and quality olive oil, you elevate a simple shortcut into a gourmet experience. Whip up a batch tonight, and watch how it transforms your meal!
Quick Homemade Garlic Aioli
Ingredients
Equipment
Method
- Peel and finely mince the garlic cloves (or use a microplane to create a paste).
- In a small mixing bowl, combine the mayonnaise, olive oil, minced garlic, lemon juice, and ground pepper.
- Stir vigorously until all ingredients are completely incorporated and smooth.
- For best flavor, cover and refrigerate for 30 minutes before serving to let flavors meld. Serve immediately or store in an airtight container in the fridge for up to 5 days.