Snowcone Cupcakes
The Ultimate Guide to Making Snowcone Cupcakes
When the heat of summer arrives, nothing brings a smile to a child’s face quite like the sight of a brightly colored, icy snowcone. But what if you could capture that exact same vibrant, nostalgic joy in a baked good? Enter the Snowcone Cupcake. This brilliant dessert takes the visual appeal of a classic summer staple and transforms it into a delicious, mess-free (mostly!) handheld cake. Featuring a soft vanilla base, a perfect dome of sweet buttercream, and a glittering crust of brightly colored sanding sugar, these cupcakes are the ultimate trompe l’œil dessert. In this comprehensive guide, we will walk you through exactly how to create these show-stopping treats for your next summer barbecue, birthday party, or afternoon baking session.
Why These Summer Cupcakes Are a Guaranteed Hit
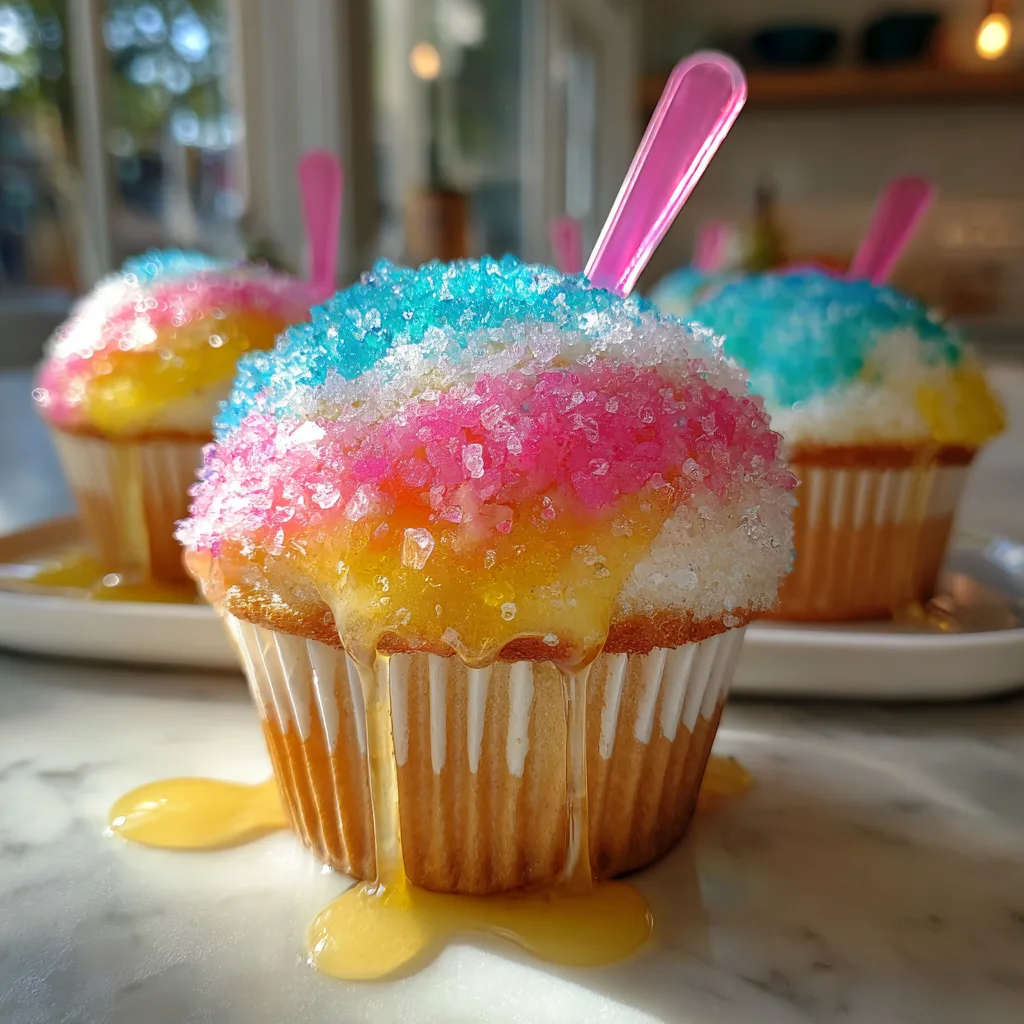
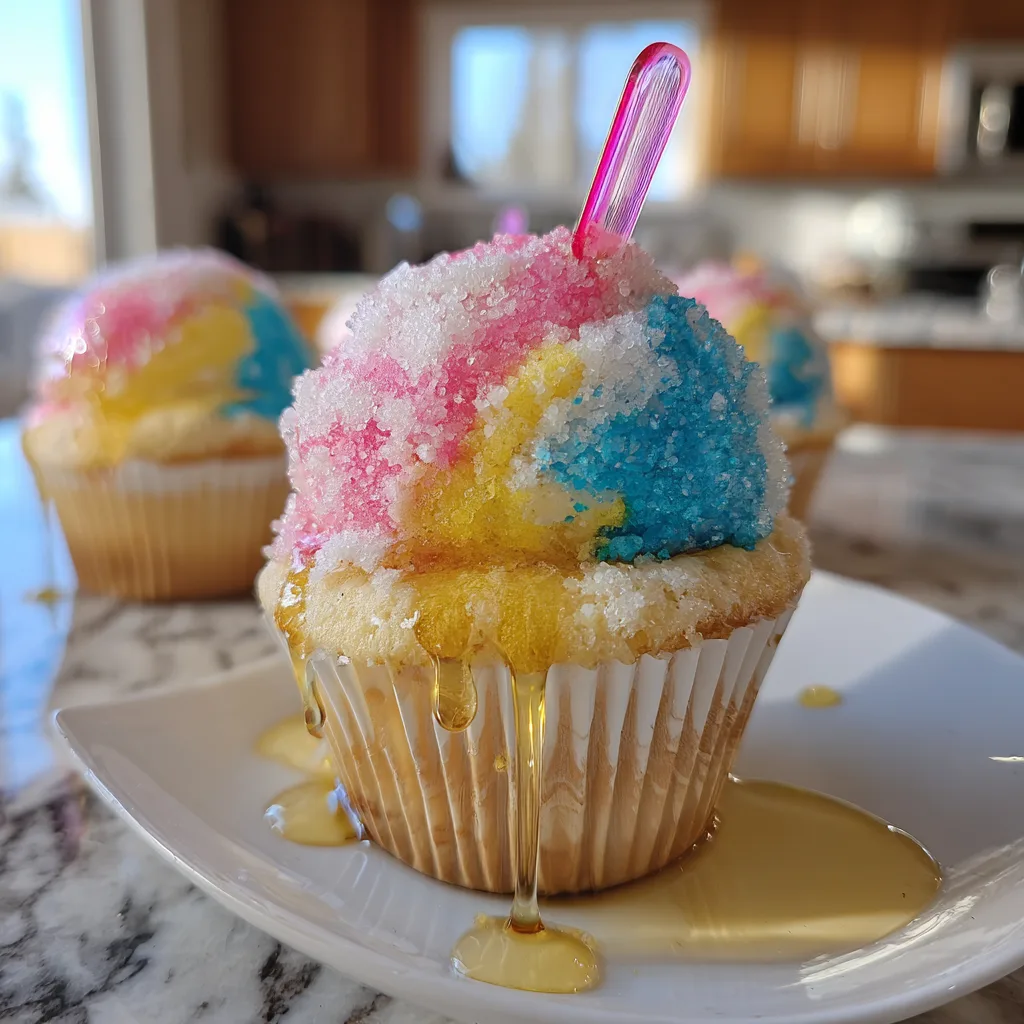
The brilliance of the Snowcone Cupcake lies in its visual deception. The human brain expects cold, crunchy ice, but the palate is met with soft, sweet cake and creamy frosting. This playful contrast makes them incredibly fun to eat. For children, the bright, neon colors—typically a classic trio of cherry pink, blue raspberry, and lemon yellow—are an instant draw. Adding a real miniature plastic spoon into the top of the cupcake solidifies the illusion and provides a fun, interactive way to eat the frosting.
From a baker’s perspective, these cupcakes are a dream because they are visually impressive without requiring advanced piping skills. You do not need to master the art of the perfect buttercream rose to make these look professional. The entire aesthetic relies on shaping a smooth dome of frosting and applying colored sugar, making it an excellent, low-stress project for bakers of all experience levels.
The Anatomy of a Perfect Snowcone Cupcake
To achieve the perfect shaved-ice illusion, each component of the cupcake must be executed with the final visual in mind.
The Cupcake Base: Keeping it Simple
While you can use any flavor you desire, a standard white or yellow vanilla cake is highly recommended. The neutral color of the cake prevents it from clashing with the bright colors of the “snow” on top. Furthermore, baking them in a simple white paper liner, or a white and brown striped liner reminiscent of classic paper snowcone cups, helps to sell the aesthetic. You want the eye drawn entirely to the colorful, sugary dome.
The Frosting Dome: The Crucial Shape
The frosting on a standard cupcake is usually piped in a swirling peak. For a Snowcone Cupcake, that shape will ruin the illusion. You need a perfect, smooth half-sphere. A standard American buttercream works best here because it is stiff enough to hold a shape but sticky enough to grab the sugar. You will use a cookie scoop to apply the frosting, and then smooth it out to create that classic packed-ice look.
The “Shaved Ice”: Coarse Sanding Sugar
This is the most important element of the recipe. You cannot use standard granulated baking sugar, nor can you use powdered sugar. You must use coarse sanding sugar or decorating sugar. The large, translucent crystals catch the light perfectly, mimicking the look of crushed ice saturated with thick, glossy syrup. You will need three distinct colors—typically pink, blue, and yellow—to create that iconic multi-flavored look.
The Spoon: The Final Touch
While entirely optional, inserting a small, colorful plastic tasting spoon (the kind you get at gelato or frozen yogurt shops) right into the top of the cupcake takes the presentation from a 9 to a 10. It is a cheap, simple prop that completely anchors the theme.
Ingredients List
Gather the following ingredients and supplies to create your frosty-looking masterpieces:
– 1 box (15.25 oz) white or yellow cake mix (plus the water, oil, and egg whites called for on the box)
– 1 batch of stiff vanilla buttercream (or 2-3 tubs of store-bought vanilla frosting, chilled slightly to firm up)
– 1/2 cup coarse pink sanding sugar
– 1/2 cup coarse blue sanding sugar
– 1/2 cup coarse yellow sanding sugar
– 24 white or striped paper cupcake liners
– 24 miniature plastic tasting spoons (neon colors preferred)
Step-by-Step Instructions
Follow these detailed steps to bake, shape, and decorate your cupcakes.
1. Bake the Cupcakes: Preheat your oven according to the directions on the cake mix box. Line two standard muffin tins with your paper liners. Prepare the cake batter exactly as instructed. Fill each liner about two-thirds full. Bake for 15-20 minutes, or until a toothpick inserted into the center comes out clean. Remove from the oven and allow the cupcakes to cool completely on a wire rack. They must be entirely cool, or your frosting domes will melt and slide off.
2. Prepare the Sugar Stations: While the cupcakes cool, set up your decorating station. Pour the pink, blue, and yellow sanding sugars into three separate, shallow bowls. You will also need a clean, dry, small spoon for each bowl.
3. Create the Frosting Dome: Once the cupcakes are cool, it is time to build the dome. Using a large cookie scoop or an ice cream scoop, place a generous, round mound of vanilla buttercream directly onto the center of a cupcake. Use a small offset spatula or the back of a butter knife to carefully smooth the frosting into a perfect half-sphere, ensuring it reaches the edges of the paper liner. Repeat this for all the cupcakes. Pro-tip: If your frosting is too soft, place the frosted cupcakes in the refrigerator for 15 minutes to firm up before the next step.
4. Apply the “Syrup”: Hold a frosted cupcake over a plate or a baking sheet to catch the excess sugar. Taking a small spoon, carefully sprinkle the pink sanding sugar over one-third of the frosting dome, pressing very gently so it adheres. Next, sprinkle the yellow sugar over the middle third. Finally, cover the remaining third with the blue sugar. Ensure the entire surface of the buttercream is completely covered in sugar crystals with no white showing through.
5. The Finishing Touch: Once the cupcake is fully encrusted in the colored sugar, gently press one miniature plastic spoon into the top of the dome, inserting it at a slight angle. Repeat the sugaring and spoon-inserting process for the remaining cupcakes.
Expert Tips for Flawless Decorating
To ensure your cupcakes look exactly like a professional bakery window display, keep these expert tips in mind.
The “Dip” Method vs. The “Sprinkle” Method: If you are struggling to get clean lines with a spoon, you can try the dip method. Pour your three sugars in thick stripes right next to each other on a small, flat plate. Take your perfectly domed (and slightly chilled) cupcake, turn it upside down, and gently press the frosting directly into the striped sugar. Roll it slightly to coat the edges. This can create beautifully straight lines, but requires a very firm buttercream so it doesn’t squish flat.
Dyeing Your Own Sugar: If you cannot find coarse sanding sugar in the exact neon colors you want, you can make it yourself! Buy plain, clear coarse sanding sugar. Put half a cup into a zip-top bag, add ONE drop of gel food coloring, seal the bag, and massage it vigorously with your hands until the color is evenly distributed. Leave the bag open for an hour to let the sugar dry out before using.
Creative Variations and Customizations
The beauty of this recipe is that it is highly customizable to fit different flavor profiles and party themes.
Flavor Matching: Instead of plain vanilla buttercream, try flavoring your frosting to match the “syrup” colors! Use a few drops of cherry extract, blue raspberry flavoring, and lemon extract in the buttercream, dividing it into three batches before piping the dome and sugaring. This gives the eater a true snowcone flavor experience.
The “Tiger’s Blood” Snowcone: For a different look, use just bright red sanding sugar and drizzle a tiny bit of sweetened condensed milk over the top of the sugar just before serving, mimicking the famous “Tiger’s Blood” snowcone flavor topped with cream.
Make-Ahead and Storage Guidelines
Because these cupcakes rely heavily on the texture of the sugar, proper storage is vital.
Room Temperature Storage: These cupcakes are best stored at room temperature in a cardboard bakery box. Avoid using airtight plastic containers if possible, as the trapped moisture from the cake will eventually cause the sanding sugar to melt and “weep,” ruining the crisp, icy look.
Decorating Timeline: For the absolute best results, bake the cupcakes and apply the frosting domes the night before, storing them in the fridge. Apply the colored sanding sugar just a few hours before the party to ensure the crystals remain sharp, crunchy, and brilliantly sparkly.
Conclusion
Creating Snowcone Cupcakes is a delightful way to capture the magic of summer in a baked good. They are proof that with a little bit of creativity and some coarse sugar, you can transform a basic vanilla cupcake into a work of art that will be the talk of the dessert table. By focusing on the shape of your frosting and ensuring complete coverage with vibrant, crunchy sugar, you will easily execute this brilliant culinary illusion. So, gather your supplies, pick your favorite neon colors, and get ready to serve up a batch of summer fun.
Snowcone Cupcakes
Ingredients
Equipment
Method
- Preheat oven and prepare cake batter according to the box directions. Line a muffin tin with paper liners.
- Fill liners 2/3 full and bake according to package directions. Let cool completely on a wire rack.
- Pour the pink, blue, and yellow sanding sugars into three separate small bowls.
- Using a cookie scoop, place a mound of frosting on each cooled cupcake. Smooth it into a perfect half-sphere dome.
- Sprinkle the pink, yellow, and blue sanding sugars in sections over the frosting dome until completely covered.
- Insert a miniature plastic spoon into the top of each cupcake. Serve and enjoy!