The Best Red Velvet Brookies Recipe
The Best Red Velvet Brookies: Where Brownies Meet Cookies
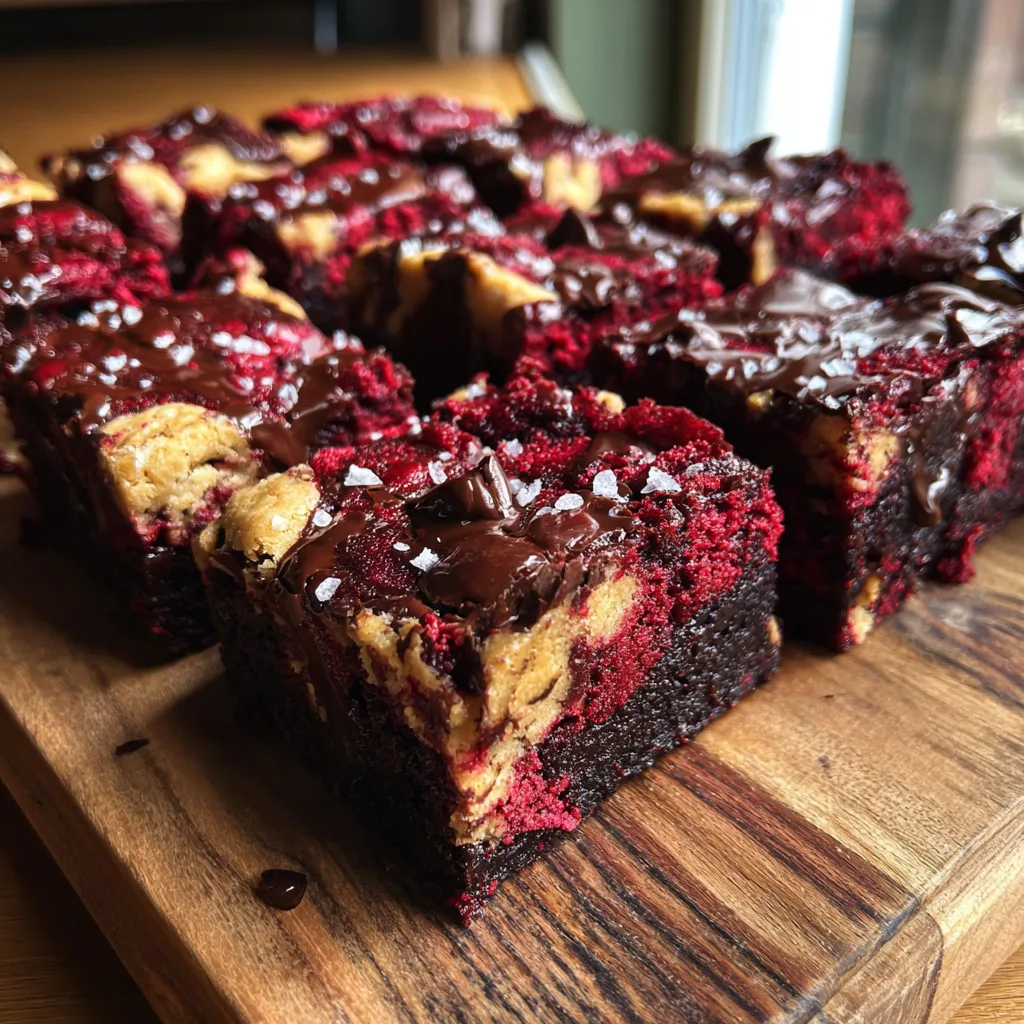
Deciding between a chewy chocolate chip cookie and a fudgy brownie is one of the hardest choices a dessert lover has to make. But what if you never had to choose again? Enter the Red Velvet Brookie. This stunning, vibrant, and utterly decadent dessert combines the rich, cocoa-infused tang of red velvet brownies with the buttery, golden nostalgia of a classic chocolate chip cookie. Swirled together in a mesmerizing patchwork of red and gold, topped with melting chocolate chips and a crunch of sea salt, these bars are the ultimate showstopper.
Whether you are looking for a romantic Valentine’s Day treat, a festive Christmas dessert, or just a way to elevate your Tuesday night baking, this recipe delivers on all fronts. It is a texture lover’s dream: the brownie portions are dense, moist, and fudgy, while the cookie sections offer that perfect chewy bite with crisp edges. In this comprehensive guide, we are going to break down the science of the perfect brookie, how to achieve that vivid red color without sacrificing flavor, and the secrets to getting that glossy, crinkly top that professional bakeries achieve.
Why This Recipe Is a Game Changer
You might have seen “brookies” before, but the Red Velvet variation brings something special to the table. Here is why this specific recipe is about to become your signature bake:
- Visual Impact: The contrast between the deep crimson red velvet and the golden cookie dough is visually striking. It looks incredibly professional but is surprisingly easy to achieve at home.
- Flavor Complexity: Red velvet isn’t just “red chocolate.” It has a subtle acidity from vinegar and buttermilk that cuts through the sweetness. When paired with the brown-sugar sweetness of the cookie dough, it creates a balanced bite that isn’t cloyingly sweet.
- The Salty-Sweet Balance: The addition of flaky sea salt on top is non-negotiable. It heightens the chocolate flavor and provides a crunch that contrasts with the soft interior.
- Customizable: You can easily swap out semi-sweet chips for white chocolate to enhance the “red velvet cake” vibe, or add nuts for texture.
- Foolproof Method: We use a “checkerboard” scooping method rather than layering, ensuring every single square gets a perfect ratio of brownie to cookie.
The Ingredients: Two Batters, One Pan
To make these brookies, you will essentially be making two half-batches of batter: one for the red velvet brownie and one for the cookie dough.
For the Red Velvet Brownie Layer:
- Unsalted Butter: Melted and cooled. This creates a fudgier, denser brownie compared to creamed butter which creates a cakey texture.
- Granulated Sugar: Provides the structure and the classic shiny crust.
- Cocoa Powder: Use regular unsweetened cocoa powder. Dutch-process can be used, but regular cocoa powder reacts better with the acidity to enhance the red color.
- Red Food Coloring: Gel food coloring is highly recommended over liquid. It is more concentrated, meaning you need less liquid to achieve a vibrant hue, which prevents the batter from becoming too runny.
- White Vinegar: A small splash is the secret to authentic red velvet flavor. It activates the baking soda and brightens the red color.
- Vanilla Extract: Essential for depth of flavor.
- Eggs: Room temperature eggs incorporate better into the batter.
- All-Purpose Flour: The structural backbone. Do not overmeasure, or your brownies will be dry.
For the Chocolate Chip Cookie Layer:
- Butter: Softened to room temperature. This allows it to cream properly with the sugars for a chewy texture.
- Brown Sugar & Granulated Sugar: A mix is crucial. Brown sugar adds moisture and chewiness (thanks to molasses), while white sugar creates crisp edges.
- Egg: Acts as the binder.
- All-Purpose Flour: Again, measure correctly using the spoon-and-level method.
- Baking Soda: This gives the cookie portion its rise and browning.
- Chocolate Chips: Semi-sweet is the standard, but dark chocolate works beautifully to offset the sweetness.
The Finishing Touch:
- Flaky Sea Salt: Maldon salt or fleur de sel. Do not use table salt for finishing! You want large, crunchy pyramids of salt.
Step-by-Step Instructions
While it seems like extra work to make two batters, each one comes together very quickly. You don’t even need a mixer for the brownie part!
1. Prep the Oven and Pan
Preheat your oven to 350°F (175°C). Line a 9×13 inch baking pan with parchment paper, leaving an overhang on the sides. This “sling” will make it easy to lift the brookies out once they are cooled. Spray the parchment lightly with non-stick spray.
2. Make the Red Velvet Brownie Batter
In a large microwave-safe bowl, melt the butter. Whisk in the sugar vigorously while the butter is still warm; this helps dissolve the sugar and creates that shiny crust. Stir in the cocoa powder, vanilla, red food coloring, and vinegar. Add the eggs one at a time, whisking well after each addition. Finally, fold in the flour and salt gently with a spatula until just combined. Do not overmix. Set aside.
3. Make the Cookie Dough
In a separate medium bowl (or using a stand mixer), cream together the softened butter, brown sugar, and granulated sugar until light and fluffy (about 2 minutes). Beat in the egg and vanilla. Add the flour, baking soda, and salt, mixing until a soft dough forms. Fold in the chocolate chips by hand.
4. Assemble the Brookies
This is the fun part! Using a cookie scoop or a large spoon, drop dollops of the red velvet batter into the prepared pan. Leave spaces between them. Next, take scoops of the cookie dough and fill in the empty spaces. You should have a checkerboard-like pattern. You can add the remaining batter/dough on top of the gaps.
5. Swirl (Optional) and Top
If you want a more marbled look, gently run a knife or chopstick through the batters once or twice. Don’t overdo it, or the colors will muddy together. Scatter extra chocolate chips over the top for a bakery-style finish.
6. Bake and Cool
Bake for 22 to 28 minutes. The top should look set, and the edges should be slightly golden. A toothpick inserted into the center should come out with a few moist crumbs, but not raw batter. Important: Do not overbake! They will continue to firm up as they cool.
7. Garnish and Slice
Immediately upon removing from the oven, sprinkle generously with flaky sea salt while the chocolate is still molten. Let the brookies cool completely in the pan on a wire rack (at least 2 hours) before lifting them out using the parchment sling and cutting into squares.
Tips for the Perfect Fudgy Texture
Temperature Matters: Ensure your butter for the cookie layer is soft, but not melted. If it’s melted, your cookies will spread too much and become greasy. Conversely, the butter for the brownie layer should be melted to ensure density.
The “Spoon and Level” Method: The number one reason for dry brownies or cakey cookies is too much flour. Do not scoop the flour directly with the measuring cup. Instead, fluff the flour with a spoon, scoop it into the cup, and level it off with a flat edge.
Invest in Gel Coloring: To get that deep, blood-red color shown in the photos without altering the consistency of the batter, use “Super Red” or “Red Velvet” gel paste color found at craft stores or baking supply shops. Liquid grocery store coloring often turns out pinkish-brown.
Variations to Try
The “Inside Out” Red Velvet: Use white chocolate chips in the red velvet batter and semi-sweet chips in the cookie dough for a fun visual reversal.
Cream Cheese Swirl: If you are a red velvet purist, beat 4oz of cream cheese with an egg yolk and 2 tablespoons of sugar. Dollop this in alongside the brownie and cookie batters for a cheesecake element.
Nutty Crunch: Add chopped pecans or walnuts to the brownie batter. The buttery crunch of pecans pairs exceptionally well with the cocoa flavor.
Serving Suggestions
These Red Velvet Brookies are rich, so small squares go a long way.
The À La Mode Experience: Serve a warm square with a scoop of vanilla bean ice cream. The cold cream melting into the warm, gooey chocolate is pure heaven.
Coffee Companion: The salty-sweet profile makes these the perfect accompaniment to a strong espresso or a latte.
Gift Giving: Because they are sturdy bars, they stack beautifully in cookie tins. Wrap them in clear cellophane bags with a red ribbon for the ultimate homemade Valentine’s gift.
Storage and Freezing
Room Temperature: Store in an airtight container for up to 4 days. If you add a slice of white bread to the container, it will help keep the cookies soft.
Freezing: These freeze exceptionally well. Cut them into squares and wrap each one individually in plastic wrap, then place in a freezer bag. They will keep for up to 3 months. Thaw on the counter for an hour before eating, or zap in the microwave for 15 seconds.

Final Thoughts
The Red Velvet Brookie is more than just a dessert; it is a celebration of indecision. It proves that you don’t have to choose between your favorites—you can have it all. With its striking red and gold appearance and its complex interplay of textures and flavors, it is a recipe that looks intimidating but is actually wonderfully simple. It is the kind of treat that brings people to the kitchen table, forks in hand, ready to dive into that gooey, chocolatey goodness.
So preheat that oven, grab your red food coloring, and get ready to bake the most photogenic and delicious dessert of the year!
Red Velvet Brookies
Ingredients
Equipment
Method
- Preheat oven to 350°F (175°C). Line a 9×13 inch baking pan with parchment paper and spray with non-stick spray.
- For Brownie Layer: Whisk melted butter and sugar in a bowl. Add cocoa, vanilla, food coloring, and vinegar. Whisk in eggs. Fold in flour and salt. Set aside.
- For Cookie Layer: Cream softened butter and sugars until fluffy. Beat in egg and vanilla. Stir in flour, baking soda, and salt. Fold in chocolate chips.
- Drop alternate scoops of brownie batter and cookie dough into the pan in a checkerboard pattern.
- Bake for 22-28 minutes until the top is set. A toothpick should come out with moist crumbs.
- Sprinkle immediately with flaky sea salt.
- Cool completely in the pan before lifting out and slicing.