The Ultimate Gooey S’mores Cookies Recipe: No Campfire Required
There is something universally nostalgic about a s’more. The combination of crunchy, honey-sweetened graham crackers, perfectly toasted marshmallow that is somehow charred on the outside yet molten on the inside, and milk chocolate melting from the residual heat is pure magic. It evokes memories of summer nights, crackling campfires, and sticky fingers. But what if you could capture that entire sensory experience without needing kindling, a fire pit, or roasting sticks?
Enter the ultimate S’mores Cookie. This is not just a chocolate chip cookie with a few mini marshmallows thrown into the batter that inevitably dissolve into sad, caramelized puddles on the baking sheet. No, this is a feat of cookie engineering designed to deliver the exact texture and flavor profile of a real s’more in every single bite.
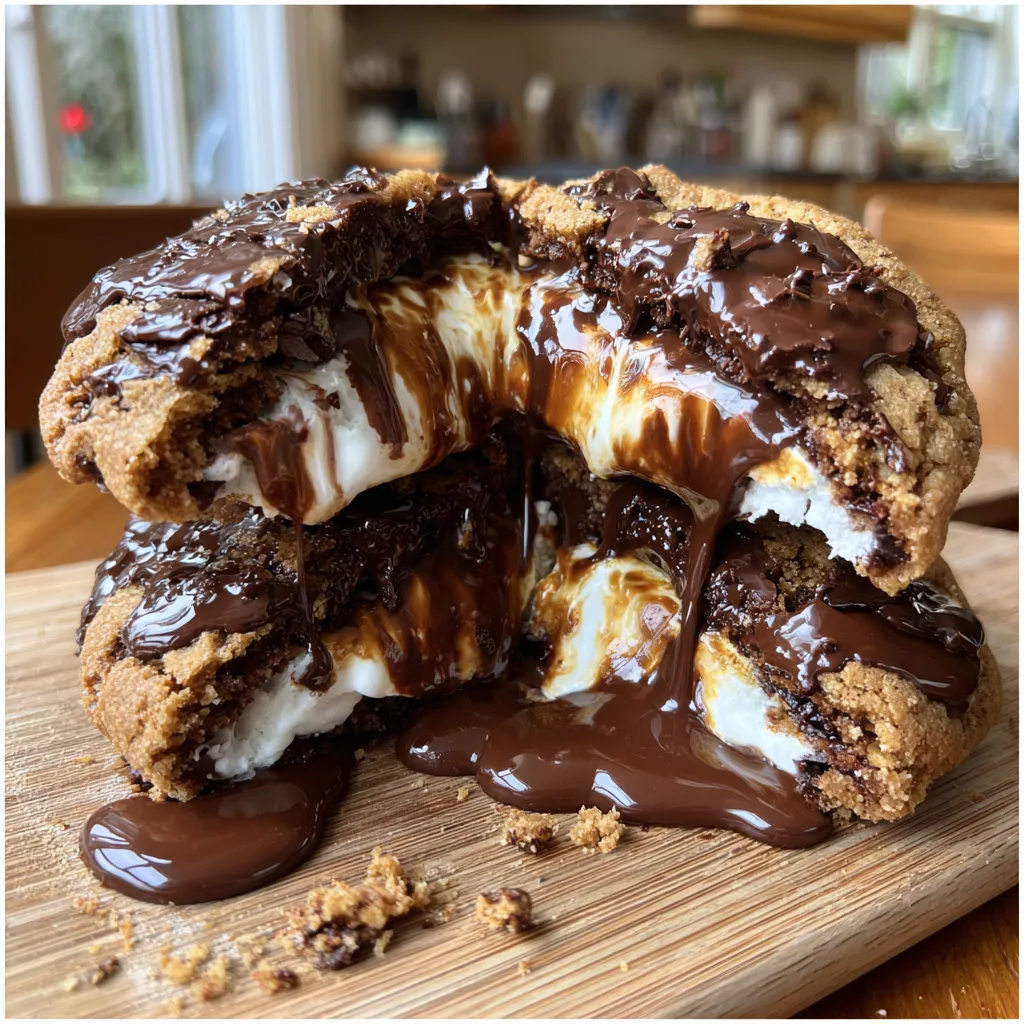
We are talking about a thick, chewy cookie base loaded with actual graham cracker crumbs for that authentic flavor foundation. It’s packed with pools of melted chocolate and, most importantly, stuffed generously with a large marshmallow that stays intact, creating a gooey, stretchy center that pulls apart just like the real thing.
This recipe is designed for the home baker who wants a show-stopping dessert that looks as incredible as it tastes. Whether it’s the middle of winter and you are craving a taste of summer, or you simply want the best cookie at the bake sale, these S’mores Cookies are guaranteed to impress.
Why This Is The Best S’mores Cookie Recipe You’ll Ever Bake
We tested countless variations to arrive at this recipe, addressing the common pitfalls of baking with marshmallows. Here is why this version stands head and shoulders above the rest:
- The Graham Cracker Base: Many recipes just use standard cookie dough. We incorporate finely crushed graham crackers right into the flour mixture. This provides that essential, slightly nutty, honey flavor and a unique, hearty texture that mimics the cracker crunch.
- The Marshmallow Strategy: The biggest challenge with s’mores cookies is the “marshmallow blowout.” Marshmallows are mostly air and sugar; when heated, they expand rapidly and then melt into a sticky mess. We use large marshmallows (cut in half) stuffed inside the dough ball, rather than mixed in. Furthermore, chilling the dough is non-negotiable. It ensures the cookie sets around the marshmallow before the marshmallow fully liquefies.
- Texture Contrast: A great s’more is about contrast: crunchy cracker, gooey marshmallow, melting chocolate. This cookie achieves that. The edges are crisp and buttery, the interior dough is soft and chewy, the chocolate is molten, and the marshmallow center is unbelievably stretchy.
- No Fancy Equipment: While a stand mixer makes things easier, you can absolutely make these with a hand mixer and some standard bowls. It’s an accessible recipe for bakers of all skill levels.

The Anatomy of a Perfect S’mores Cookie
Understanding your ingredients is key to baking success. Here is a breakdown of what goes into these cookies and why.
The “Graham” Dough:
The dough is the vessel. We use a mix of all-purpose flour and graham cracker crumbs. The butter provides richness and that essential cookie spread. We use a higher ratio of brown sugar to white sugar in this recipe. Brown sugar contains molasses, which adds moisture, chewiness, and a depth of flavor that complements the graham crackers perfectly. An extra egg yolk is added for increased richness and tenderness.
The Chocolate:
While semi-sweet chocolate is usually the go-to for baking, authentic s’mores are made with milk chocolate. The creaminess and higher sugar content of milk chocolate melt beautifully and offer that classic, nostalgic flavor profile. We recommend using high-quality milk chocolate bars chopped into chunks rather than chips. Chopped chocolate creates uneven pools of melted goodness rather than uniform morsels, contributing to a more rustic and delicious final product. However, if you prefer the intensity of dark chocolate to balance the sweetness of the marshmallow, feel free to substitute it.
The Marshmallow:
As mentioned, the marshmallow is the star and the troublemaker. Do not use mini marshmallows for the stuffing; they will disappear. Use standard, full-sized marshmallows. You will cut them in half horizontally to create a puck shape that sits perfectly inside the dough ball.
Ingredients Needed
For the Cookie Dough:
- Unsalted Butter – 1 cup (2 sticks), softened to cool room temperature.
- Light Brown Sugar – 3/4 cup, packed tightly.
- Granulated Sugar – 1/2 cup.
- Large Eggs – 1 whole egg plus 1 additional egg yolk, at room temperature.
- Vanilla Extract – 2 teaspoons of high-quality extract.
- All-Purpose Flour – 2 and 1/4 cups. (Measure by spooning into the cup and leveling off, don’t scoop directly).
- Graham Cracker Crumbs – 1 and 1/4 cups, finely ground. (About 9-10 full cracker sheets).
- Cornstarch – 1 teaspoon. (This helps keep the cookies thick and soft).
- Baking Soda – 1 teaspoon.
- Salt – 3/4 teaspoon.
For the Mix-ins and Stuffing:
- Milk Chocolate – 10-12 ounces, chopped into chunks. (Alternatively, use high-quality milk chocolate chips).
- Large Marshmallows – about 12-15, cut in half horizontally.
- Extra Graham Cracker Pieces – optional, for topping.
- Flaky Sea Salt – optional, for sprinkling on top after baking to balance the sweetness.
Equipment Used
- Stand mixer or large mixing bowl with a handheld electric mixer.
- Medium bowl for dry ingredients.
- Whisk and rubber spatula.
- Food processor (or a zip-top bag and rolling pin) for crushing graham crackers.
- Baking sheets (at least two).
- Parchment paper or silicone baking mats.
- A large cookie scoop (about 3 tablespoons size).
- Wire cooling rack.
Step-by-Step Instructions
Step 1: Prepare the Dry Ingredients
First, if you haven’t already, crush your graham crackers into fine crumbs. In a medium-sized bowl, whisk together the all-purpose flour, graham cracker crumbs, cornstarch, baking soda, and salt. Ensure everything is evenly distributed. Set this aside.
Step 2: Cream the Wet Ingredients
In the bowl of your stand mixer fitted with the paddle attachment (or a large bowl using a hand mixer), beat the softened unsalted butter, packed light brown sugar, and granulated sugar on medium-high speed. You want to cream them together until the mixture is light in color and fluffy in texture. This usually takes about 2-3 minutes. Scrape down the sides of the bowl as needed.
Step 3: Add Eggs and Vanilla
Reduce the mixer speed to low. Add the whole egg, the extra egg yolk, and the vanilla extract. Mix until just combined. Do not overmix at this stage, as incorporating too much air after adding the eggs can lead to cakey cookies.
Step 4: Combine Wet and Dry
With the mixer on low speed, slowly add the dry ingredient mixture to the wet ingredients in two or three separate additions. Mix until a soft dough forms and there are no streaks of flour remaining. Again, be careful not to overmix the dough, which can develop the gluten too much and lead to tough cookies.
Step 5: Fold in the Chocolate
Remove the bowl from the mixer. Using a sturdy rubber spatula, manually fold in about 3/4 of your chopped milk chocolate chunks. Save the remaining 1/4 of the chocolate for topping the cookies later.
Step 6: Scoop and Stuff the Cookies
Line a baking sheet with parchment paper (this is just for chilling, not baking yet). Using your large cookie scoop, portion out rounds of dough. You should get about 24-28 balls of dough.
Take one dough ball and flatten it into a thick disk in the palm of your hand. Place one marshmallow half (sticky side down) in the center of the dough disk. Carefully fold the dough up and around the marshmallow, pinching the seams together to seal it completely.
Crucial Step: You must ensure the marshmallow is entirely enclosed by the dough, with no gaps. If you can see the marshmallow, it will leak out during baking. Roll the stuffed dough ball between your palms gently to make it round. Repeat with the remaining dough and marshmallows.
Step 7: The Mandatory Chill
Place the stuffed dough balls on the prepared baking sheet. They can be close together for this step. Cover loosely with plastic wrap and place the baking sheet in the refrigerator. Chill for at least 1 hour, preferably 2 hours. This solidifies the butter and ensures the cookies don’t spread too quickly in the oven before the marshmallow is set.
Step 8: Bake to Perfection
Preheat your oven to 350°F (175°C). Line two large baking sheets with fresh parchment paper or silicone mats.
Remove the dough balls from the fridge. Place them on the baking sheets, leaving plenty of space between them (at least 3 inches), as they will spread. You will likely need to bake in batches.
Take the reserved chopped chocolate chunks and gently press a few into the top of each dough ball. If desired, press a small piece of graham cracker into the top as well for visual appeal.
Bake for 11-13 minutes. The cookies are done when the edges are golden brown and set, but the centers still look slightly underbaked and soft. You might see a little marshmallow peeking out or caramelizing on the edges—that is totally fine and delicious.
Step 9: Cool and Serve
Remove the baking sheet from the oven. Immediately sprinkle with a little flaky sea salt if desired. Allow the cookies to cool on the hot baking sheet for at least 5-10 minutes. They are very fragile and molten right out of the oven and need this time to set up.
After 10 minutes, carefully transfer them to a wire rack to cool completely. However, these are best enjoyed warm while the center is still gooey!
Expert Tips for S’mores Cookie Success
- Don’t Skip the Chill: We cannot emphasize this enough. If you bake these room-temperature dough balls, you will end up with flat cookies and a mess of melted marshmallow all over your pan. The chill time is essential for structural integrity.
- Seal Well: Take the time to pinch the dough securely around the marshmallow. Any small opening is an escape route for the gooey center.
- Use Parchment Paper: Marshmallow leaks happen to the best of us. Melted sugar is incredibly sticky and hard to clean off baking sheets. Parchment paper is your best friend here for easy cleanup.
- Room Temperature Ingredients: Make sure your butter and eggs are at room temperature before starting. This ensures they emulsify properly with the sugars, creating a uniform dough.
- Measure Flour Correctly: Using too much flour will result in dry, crumbly cookies that don’t taste like graham crackers. Use the “spoon and level” method: fluff your flour with a spoon, sprinkle it into your measuring cup, and level it off with a straight edge.
Variations and Customizations
While the classic milk chocolate is traditional, feel free to get creative with your s’mores cookies:
- Dark Chocolate Lovers: Swap the milk chocolate for semi-sweet or dark chocolate chunks (60-70% cocoa) for a richer, less sweet cookie.
- Peanut Butter Twist: Add peanut butter chips along with the chocolate chunks, or smear a tiny bit of peanut butter on the marshmallow half before stuffing it inside the dough.
- Nutty Crunch: Add 1/2 cup of chopped toasted pecans or walnuts to the dough when you add the chocolate chunks for added texture.
- The “Inside-Out” S’more: Instead of graham crumbs in the dough, use a standard chocolate chip cookie dough, stuff it with marshmallow, and press a square of graham cracker onto the top of the dough ball before baking.
Storage and Reheating Suggestions
These cookies are undeniably best served warm, shortly after baking, when the marshmallow is at its stretchiest.
- Storing at Room Temperature: Store completely cooled cookies in an airtight container at room temperature for up to 3 days. The marshmallow center will firm up as it cools.
- Freezing Baked Cookies: You can freeze baked cookies for up to 2 months. Thaw at room temperature.
- Freezing Dough Balls: This is a great option for having fresh cookies on demand. Prepare the recipe up to the point of stuffing the dough balls. Freeze the stuffed balls solid on a baking sheet, then transfer them to a freezer-safe zip-top bag. You can bake them directly from frozen; just add an extra 2-3 minutes to the baking time.
- Reheating: To revive that “fresh from the oven” gooeyness, place a cookie on a microwave-safe plate and microwave for 10-15 seconds, or pop them in a 300°F toaster oven for a few minutes until warm.
Enjoy the process of making these, and enjoy the incredible results even more. They are a sticky, sweet, nostalgic masterpiece!
Ultimate Gooey S’mores Cookies
Ingredients
Equipment
Method
- Whisk together flour, graham cracker crumbs, cornstarch, baking soda, and salt in a medium bowl.
- Cream butter, brown sugar, and granulated sugar until light and fluffy (about 2-3 minutes).
- Beat in egg, egg yolk, and vanilla extract until just combined.
- Gradually mix dry ingredients into wet ingredients on low speed until a soft dough forms.
- Fold in about 3/4 of the chopped milk chocolate chunks.
- Scoop dough using a large scoop (approx 3 tbsp). Flatten each ball, place a marshmallow half in the center, and seal the dough completely around it.
- Chill stuffed dough balls on a baking sheet for at least 1 hour (mandatory).
- Preheat oven to 350°F (175°C). Line baking sheets with parchment paper.
- Place chilled balls 3 inches apart on sheets. Press remaining chocolate chunks onto tops.
- Bake for 11-13 minutes until edges are golden. Centers will look soft.
- Cool on baking sheet for 10 minutes before transferring to a wire rack.