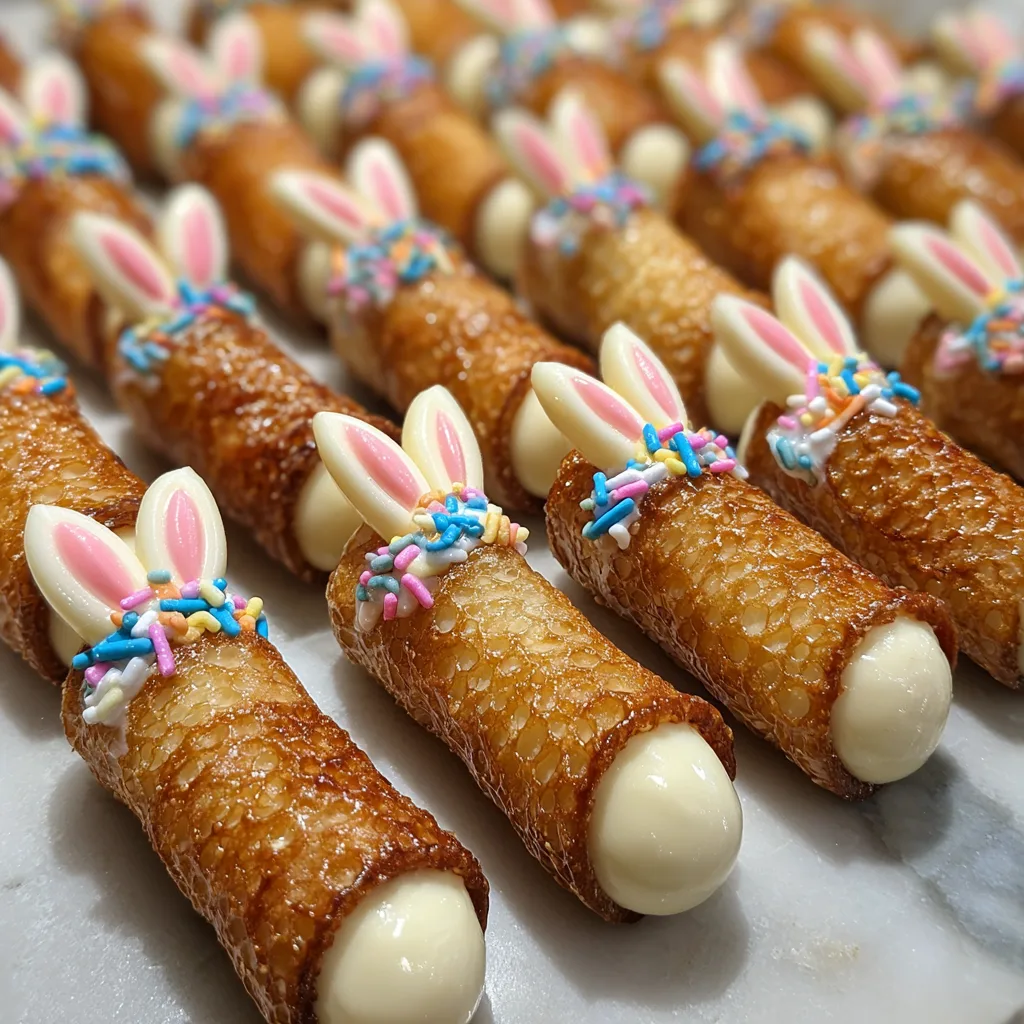
Easter Bunny Cannoli
The Ultimate Easter Bunny Cannoli: A Festive Spring Dessert Masterpiece
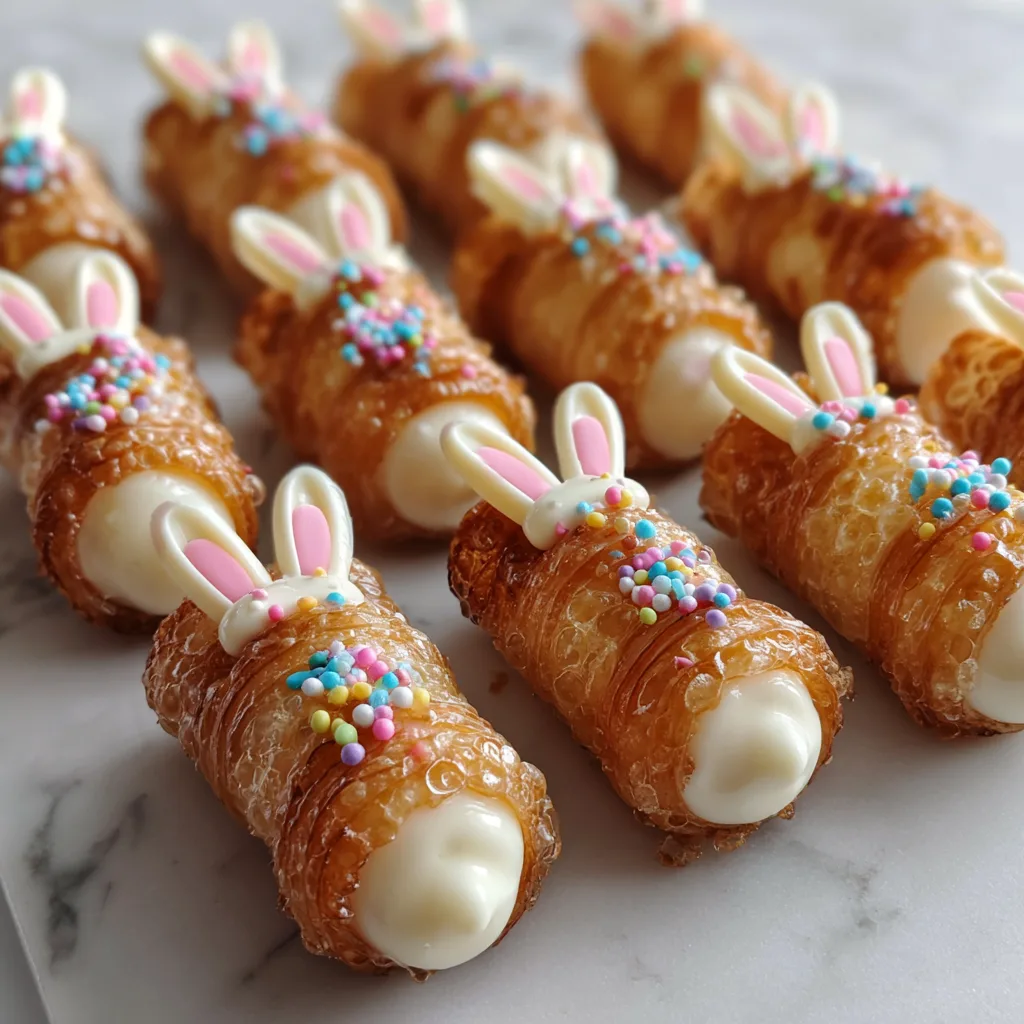
When spring arrives and the holiday season approaches, baking enthusiasts everywhere begin searching for the perfect centerpiece for their dessert tables. Enter the Easter Bunny Cannoli. This delightful, whimsical twist on a traditional Sicilian classic is guaranteed to steal the show at any gathering. Combining the iconic crunch of a perfectly blistered, golden-brown fried pastry shell with the rich, velvety smoothness of sweetened ricotta cream, this recipe elevates the standard cannoli to new festive heights. Decorated with adorable white chocolate bunny ears and vibrant pastel sprinkles, these treats are not just a dessert; they are an edible springtime celebration.
Creating homemade cannoli might seem like a daunting task reserved only for professional pastry chefs in Italian bakeries, but with the right techniques, a little patience, and a touch of holiday spirit, anyone can master this craft in their own kitchen. In this comprehensive guide, we will walk you through every single step of the process, from mixing the perfect wine-infused dough to achieving that signature bubbly crust, and finally, assembling these charming bunny-themed delights. Whether you are hosting a grand family brunch, attending a festive potluck, or simply treating your loved ones to a spectacular homemade sweet, these Easter Bunny Cannoli will undoubtedly become a highly requested seasonal tradition.
The Fascinating History and Cultural Significance of the Cannoli
Before we dive into the flour and sugar, it is essential to appreciate the rich history behind the dessert we are adapting. The cannolo (singular for cannoli) originates from the sun-drenched island of Sicily. Historically, these decadent pastries were prepared specifically for the Carnival season—a festive period of indulgence and celebration leading up to the austere season of Lent. The tube-like shape of the shell, historically formed by wrapping the dough around hollowed-out sugar cane stalks before frying, is a testament to the ingenuity of early Sicilian bakers.
Over the centuries, the cannoli evolved from a seasonal Carnival treat to a year-round staple of Italian-American bakeries. The traditional filling relies heavily on fresh sheep’s milk ricotta, sweetened lightly and often studded with candied orange peel or miniature chocolate chips. By adapting this historic pastry into an Easter-themed dessert, we are actually returning it to its roots as a celebratory, holiday-specific indulgence. The addition of bunny ears and spring colors pays homage to modern Easter iconography while preserving the beloved textural contrast that has made the cannoli a global sensation for generations.
Why This Specific Recipe Works So Perfectly
The magic of an exceptional cannoli lies entirely in the contrast of textures and the balance of flavors. This recipe is meticulously formulated to guarantee success on all fronts. First, the dough includes a splash of Marsala wine or white vinegar. This is not just for flavor; the acidity in the liquid tenderizes the gluten in the flour and creates the crucial steam pockets during frying that result in the iconic, shatteringly crisp blisters on the shell.
Second, the filling utilizes whole milk ricotta that must be thoroughly drained. Excess moisture is the sworn enemy of a crisp cannoli shell. By straining the cheese overnight, we ensure a thick, luscious cream that will not make the pastry soggy upon contact. Finally, the whimsical decorations—the white chocolate ears and the pastel sprinkles—provide additional layers of texture. The snap of the chocolate and the slight crunch of the sprinkles perfectly complement the creamy interior and the flaky exterior.
Essential Equipment for Cannoli Making
To set yourself up for absolute success, gather these essential tools before beginning:
- Cannoli tubes or molds (stainless steel is highly recommended)
- A heavy-bottomed Dutch oven or deep fryer for maintaining consistent oil temperature
- A deep-fry thermometer (crucial for ensuring the oil stays at exactly 350°F to 360°F)
- A rolling pin or a pasta machine for rolling the dough paper-thin
- A round biscuit cutter (about 3.5 to 4 inches in diameter)
- A large piping bag with a wide round tip for the filling
- Fine mesh strainer or cheesecloth for draining the ricotta
- Wire cooling racks
- Parchment paper
Ingredients
For the Cannoli Shells
- – 2 cups all-purpose flour
- – 2 tablespoons granulated sugar
- – 1/4 teaspoon kosher salt
- – 3 tablespoons unsalted butter, cold and cubed
- – 1 large egg, separated (yolk for the dough, white for sealing the shells)
- – 1/2 cup dry Marsala wine or dry white wine
- – 1 tablespoon white vinegar
- – 4 to 6 cups vegetable oil or canola oil, for deep frying
For the Sweet Ricotta Cream Filling
- – 32 ounces whole milk ricotta cheese (drained overnight)
- – 1 1/4 cups powdered sugar, sifted
- – 1 teaspoon pure vanilla extract
- – 1/4 teaspoon ground cinnamon (optional)
- – 1/2 cup heavy whipping cream (whipped to stiff peaks)
For the Easter Bunny Decorations
- – 1 cup white chocolate melting wafers or high-quality white chocolate chips
- – Pink candy melts or pink food coloring (oil-based only) for the inner ears
- – 1/2 cup pastel-colored spring sprinkles
Step-by-Step Instructions
- Drain the Ricotta: The night before baking, line a fine-mesh sieve with cheesecloth and place it over a bowl. Spoon the ricotta into the sieve, cover with plastic wrap, and place a heavy plate or can on top to press the moisture out. Refrigerate overnight. This step is absolutely non-negotiable for a thick, stable cream.
- Mix the Dough: In a large mixing bowl or food processor, combine the all-purpose flour, granulated sugar, and kosher salt. Add the cold, cubed butter and pulse or cut it into the flour using a pastry blender until the mixture resembles coarse crumbs.
- Form the Dough: Add the egg yolk, Marsala wine, and white vinegar to the flour mixture. Mix until a shaggy dough forms. Turn the dough out onto a lightly floured surface and knead for about 5 to 8 minutes until it becomes smooth and elastic. Wrap the dough tightly in plastic wrap and let it rest at room temperature for at least 1 hour. This resting period relaxes the gluten, making it easier to roll out.
- Roll and Cut: Divide the rested dough in half. Keep one half wrapped. On a lightly floured surface, roll the dough out until it is paper-thin (about 1/16th of an inch thick). You can also use a pasta machine, passing it through the settings until it is thin enough to slightly see your hand through it. Using a 3.5-inch or 4-inch round cutter, cut out circles of dough.
- Wrap the Tubes: Lightly oil your stainless steel cannoli tubes. Wrap a dough circle around the tube. Brush a tiny amount of the reserved, lightly beaten egg white on one edge of the dough where it overlaps to seal it. Press down firmly to ensure it does not pop open during frying. Do not get egg white on the metal tube, or the shell will stick.
- Fry the Shells: Heat the vegetable oil in a heavy-bottomed pot to 360°F (182°C). Using metal tongs, carefully lower the wrapped tubes into the hot oil. Fry for 2 to 3 minutes, turning occasionally, until they are deeply golden brown and blistered. Remove from the oil and drain on a wire rack set over paper towels. Let them cool for 1 minute before carefully sliding the metal tubes out using a kitchen towel. Let the shells cool completely.
- Prepare the Bunny Ears: Melt the white chocolate wafers in a microwave-safe bowl in 30-second increments, stirring until smooth. Transfer to a piping bag with a small hole. On a parchment-lined baking sheet, pipe the white chocolate into small bunny ear shapes (about 1.5 inches tall). Melt the pink candy melts and pipe a smaller pink inner ear onto the white chocolate. Place the baking sheet in the refrigerator for 15 minutes to set.
- Whip the Filling: In a large bowl, whisk the drained ricotta, sifted powdered sugar, vanilla extract, and cinnamon until smooth and creamy. In a separate bowl, whip the heavy cream to stiff peaks. Gently fold the whipped cream into the ricotta mixture to lighten the texture. Transfer the filling to a large piping bag fitted with a wide round or star tip.
- Assemble the Cannoli: When you are ready to serve, pipe the ricotta cream into both ends of the cooled cannoli shells, ensuring the filling reaches the middle. Smooth the ends slightly.
- Decorate: Carefully press a cluster of pastel spring sprinkles into the exposed cream on both ends of the cannoli. Finally, take two of the chilled white chocolate bunny ears and gently press them into the top of the cream on one end of the cannoli. Serve immediately to enjoy the ultimate crunchy texture.
Pro Tips for Perfect Cannoli Every Time
Achieving bakery-level perfection at home requires attention to detail. The most common pitfall when making cannoli is a dough that is too thick. If the dough is thick, it will puff up like bread in the fryer and will lack the delicate, shattering crunch that defines the pastry. Take your time rolling it out; a pasta roller is an excellent investment for this exact reason.
Temperature control during frying is another critical factor. If the oil drops below 350°F, the dough will absorb the oil and become greasy and heavy. If it rises above 375°F, the outside will burn before the inside layers of the overlap have time to cook. Keep a close eye on your deep-fry thermometer and adjust the heat between batches.
When it comes to the filling, over-mixing the ricotta can cause it to break down and become runny. Mix it just enough to incorporate the sugar. Folding in stabilized whipped cream is a baker’s secret to adding volume and a cloud-like texture without compromising the structural integrity of the cheese.
Creative Variations to Customize Your Dessert
While this recipe features a classic vanilla ricotta filling to contrast with the colorful Easter decorations, you can easily customize the flavor profile to suit your family’s tastes. Consider folding a quarter cup of miniature semi-sweet chocolate chips into the ricotta mixture for a traditional twist. For a bright, citrusy spring flavor, fold in two tablespoons of freshly grated lemon or orange zest.
If you want to alter the appearance of the shells themselves, you can dip the ends of the cooled, unfilled shells into melted dark chocolate or white chocolate and let them set before filling. This not only looks spectacular but also creates a moisture barrier that helps keep the pastry crisp for a slightly longer period.
Serving Suggestions and Pairings
These Easter Bunny Cannoli demand to be the star of the show. Arrange them in neat, military-style rows on a beautiful marble slab or a large ceramic platter to mimic the visual appeal of a high-end Italian pasticceria. Because the dessert is quite rich, it pairs beautifully with beverages that offer a slightly bitter or acidic contrast. Serve these cannoli alongside freshly brewed hot espresso, a strong dark roast coffee, or a delicate Earl Grey tea.
If you are serving them as part of an elaborate Easter brunch or dinner, they follow perfectly after a main course of roasted lamb, glazed ham, or a savory spring vegetable quiche. The light, creamy sweetness is the ideal palate cleanser to end a heavy, celebratory meal.
Storage and Make-Ahead Instructions
The cardinal rule of cannoli is that they must be filled as close to serving time as possible. Once the wet ricotta cream touches the dry, fried shell, the clock starts ticking on its crispness. Within a few hours, the shell will begin to soften. Therefore, assembling them right before dessert is served is highly recommended.
However, you can prepare all the components well in advance to make your holiday hosting stress-free. The unfilled, fried cannoli shells can be stored in an airtight container at room temperature for up to two days. The drained and sweetened ricotta filling can be stored in an airtight container in the refrigerator for up to three days. The white chocolate bunny ears can be made a week in advance and kept in a cool, dry place. When it’s time for dessert, simply fill, decorate, and serve!
Fun Facts About Spring Desserts
Did you know that the use of lamb and bunny motifs in spring baking dates back centuries? In many European cultures, shaping breads, cakes, and chocolates into animal figures was a way to celebrate the renewal of life that comes with spring. The introduction of pastel colors—pinks, light blues, mint greens, and soft yellows—became popular in the 19th century as food coloring techniques improved, symbolizing the blooming of spring flowers. By combining the ancient, rustic tradition of Sicilian cannoli with the bright, playful aesthetics of modern spring holidays, you are creating a dessert that bridges the gap between old-world culinary craftsmanship and contemporary celebration.
Conclusion
Baking these Easter Bunny Cannoli is an experience that goes beyond just following a recipe; it is about creating joy, embracing culinary traditions, and crafting edible art for the people you love. The effort put into draining the ricotta, rolling the dough thin, and piping those delicate chocolate ears results in a dessert that looks magnificent and tastes extraordinary. Put on your apron, heat up that oil, and get ready to impress everyone at your spring gatherings with a treat they will never forget.
Easter Bunny Cannoli
Ingredients
Equipment
Method
- Drain the ricotta cheese overnight in a cheesecloth-lined sieve in the refrigerator to remove excess moisture.
- For the dough, pulse flour, sugar, salt, and cold butter until crumbly. Add egg yolk, wine, and vinegar; mix until a shaggy dough forms.
- Knead dough on a floured surface for 5-8 minutes until smooth. Wrap in plastic and rest for 1 hour.
- Roll dough paper-thin using a rolling pin or pasta machine. Cut into 3.5-inch circles.
- Wrap circles around oiled cannoli tubes, sealing the overlapping edges with a dab of egg white.
- Fry in 360°F oil for 2-3 minutes until golden and blistered. Cool slightly, remove tubes, and cool completely.
- Melt white and pink chocolate. Pipe onto parchment paper to form bunny ears and chill until set.
- Whisk drained ricotta, powdered sugar, and vanilla. Gently fold in the stiffly whipped heavy cream.
- Transfer filling to a piping bag. Pipe into both ends of the cooled cannoli shells.
- Decorate the ends with pastel sprinkles and insert the chocolate bunny ears into the top. Serve immediately.