Crochet Snowflake Ornament with a Hidden Blue Star
📖 ## INTRODUCTION
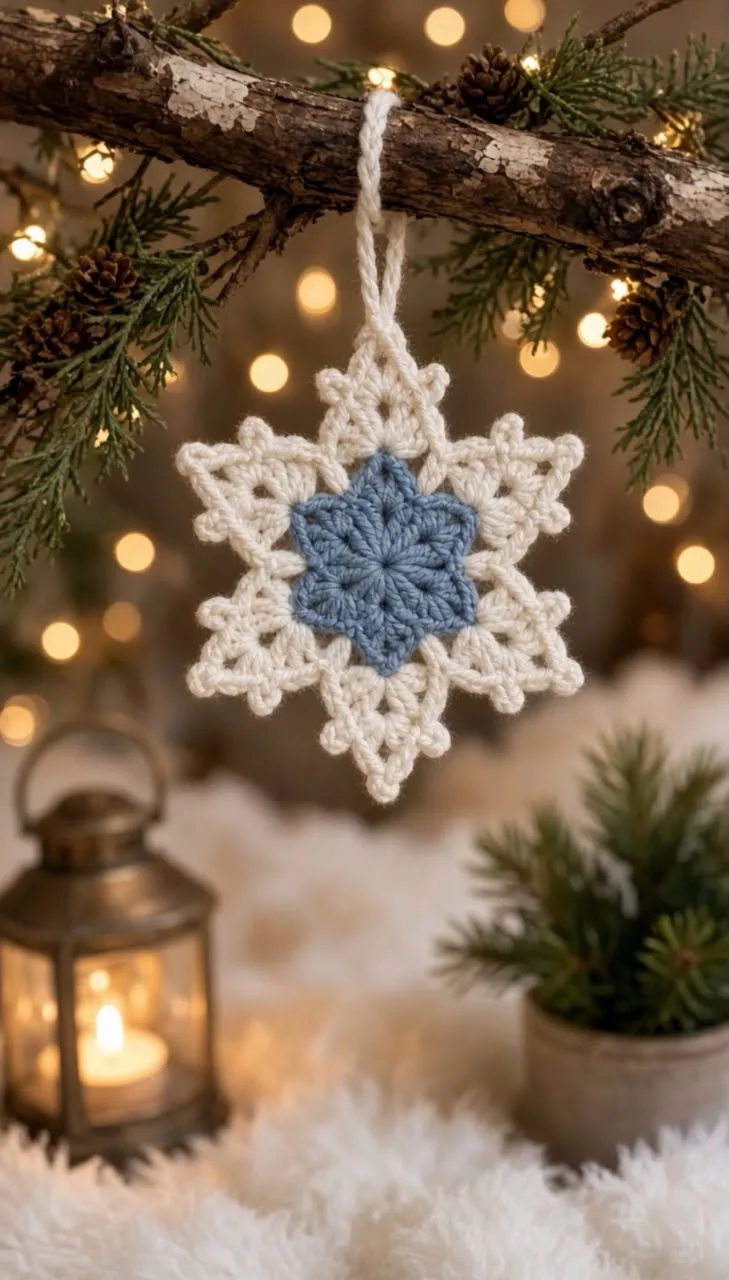
Nothing adds a touch of handmade magic to the holiday season quite like a crocheted ornament. This beautiful project features a classic six-pointed cream snowflake adorned with a contrasting five-pointed light blue star in the center. The gentle contrast between the rustic, natural-toned background and the soft pastel center creates a nostalgic, cozy aesthetic that elevates any winter display.
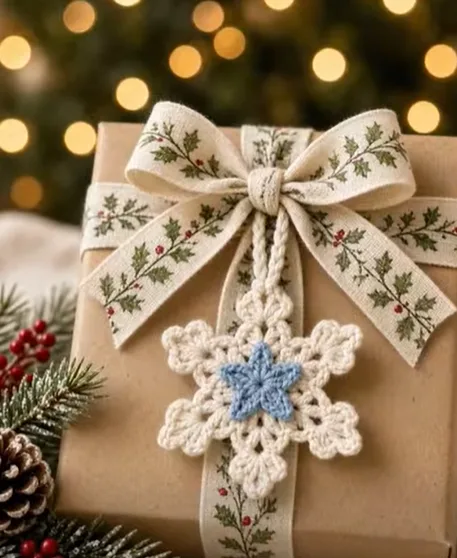
This design is incredibly versatile. While it makes a stunning traditional tree ornament, it truly shines as a reusable, heirloom-quality gift tag. When tied onto a simple kraft paper package with a festive holly ribbon, as seen in the inspiration image, it transforms a basic gift into something deeply personal and breathtaking.
Because it requires only small amounts of yarn, it is the perfect stash-busting project for your leftover cottons. You can easily personalize this pattern by swapping the center star’s color to match a specific wrapping paper theme, or crochet a batch of them in icy blues, snowy whites, and silver to create a coordinated winter wonderland.
🔍 ## MAIN PATTERN OVERVIEW
This project is constructed in three simple, distinct phases to achieve its layered, multidimensional look:
- The Snowflake Base: A quick, four-round motif worked in the round, featuring six distinct points topped with decorative picot clusters.
- The Blue Star Applique: A separate, two-round, five-pointed star crocheted in a contrasting light blue yarn.
- Assembly & Loop: The blue star is sewn directly onto the center of the six-pointed snowflake, and a sturdy, chained hanging loop is attached to the top point for easy hanging or tying.
🎯 ## SKILL LEVEL
Easy / Advanced Beginner
This pattern is highly accessible for crocheters who have mastered the basic stitches and are comfortable working in the round. The intricate look is achieved through simple stitch combinations rather than complex techniques.
- Working in a magic ring (MR)
- Basic stitches: single crochet, half double crochet, double crochet
- Creating chain-loop spaces and picots
- Basic sewing/applique attachment
📏 ## FINISHED SIZE
When made with worsted weight (Category 4) yarn and a 4.0mm (G) hook, the finished ornament measures:
- Width (Point to Point): Approximately 4 inches (10 cm).
- Hanging Loop: Adds approximately 2.5 inches (6.5 cm) to the total height.
Note: The size can easily be modified. Using a lighter fingering weight yarn and a 2.5mm hook will yield a dainty, miniature snowflake, while a chunky yarn will create a bold, oversized wall hanging.
🧮 ## GAUGE
Gauge is not strictly critical for this project.
However, for structural integrity, you want your stitches to be relatively tight so the snowflake holds its shape without curling.
- If your snowflake feels floppy, drop down half a hook size.
- If your snowflake is puckering and won’t lay flat, go up half a hook size.
🧶 ## REQUIRED YARN AMOUNTS
This is a phenomenal scrap-buster. You will need very small amounts of worsted weight (Category 4) cotton or acrylic yarn:
- Color A (Snowflake Base): Cream / Off-White – Approx. 15-20 yards.
- Color B (Star Applique): Light Blue – Approx. 5-8 yards.
🧰 ## MATERIALS
- Hook: 4.0mm (US G-6) crochet hook.
- Yarn: Worsted weight (Medium 4) cotton yarn. Cotton is highly recommended as it blocks beautifully and holds crisp points.
- Tapestry Needle: For sewing the star to the snowflake and weaving in ends.
- Scissors: A sharp pair for clean cuts.
- Stitch Marker: (Optional) To mark the first stitch of the round.
- Blocking Supplies: Rust-proof T-pins and a blocking mat (crucial for flat snowflakes).
- Fabric Stiffener: (Optional but recommended) Spray starch or commercial fabric stiffener to give the ornament a crisp, lasting finish.
🔤 ## ABBREVIATIONS – US TERMS
- MR: Magic Ring (or Magic Circle)
- ch: chain
- sc: single crochet
- hdc: half double crochet
- dc: double crochet
- sl st: slip stitch
- st(s): stitch(es)
- sp(s): space(s)
- sk: skip
📝 ## NOTES BEFORE YOU BEGIN
- Joined Rounds: Both the snowflake and the star are worked in joined rounds. You will slip stitch to the first stitch of the round to close it.
- Starting Chains: The initial ch-2 at the beginning of the snowflake rounds does not count as a stitch.
- Blocking is Magic: Do not be dismayed if your snowflake looks slightly crumpled straight off the hook. Snowflakes rely heavily on wet blocking to open up the chain spaces and sharpen the picot points.
- Color Placement: The design relies on the subtle contrast of a blue center on a cream background, mirroring the provided inspiration. Keep your sewing neat so the thread does not show on the back of the white snowflake.
🪡 ## COMPLETE PATTERN
❄️ The Cream Snowflake Base
What it is for: The main six-pointed body of the ornament.
Yarn: Color A (Cream/Off-White)
Round 1: Make a MR. ch 2 (does not count as a st here and throughout). Work 12 dc into the ring. Pull the ring tightly closed. sl st to the top of the first dc to join. (12 dc)
Round 2:ch 4, sk the next st, sl st in the next st. Repeat from * to * a total of 6 times. (6 ch-4 loops created)
Round 3: sl st into the first ch-4 sp. ch 2. In the same ch-4 sp, work (2 dc, ch 3, 2 dc). Move to the next ch-4 sp and work (2 dc, ch 3, 2 dc). Repeat from * to * in each of the 6 loops around. sl st to the top of the first dc to join. (24 dc, 6 ch-3 sps)
Round 4 (The Points): sl st into the next dc, then sl st into the ch-3 sp.
In the ch-3 sp, work the picot cluster: (sc, ch 3, sc, ch 5, sc, ch 3, sc).
ch 2. sc in the space between the two 2-dc groups of the previous round. ch 2.
In the next ch-3 sp, work (sc, ch 3, sc, ch 5, sc, ch 3, sc). ch 2, sc in the space between the dc groups, ch 2.
Repeat from * to * around. sl st to the first sc to join.
Fasten off and weave in the ends securely.
⭐ The Light Blue Star
What it is for: The decorative five-pointed applique in the center.
Yarn: Color B (Light Blue)
Round 1: Make a MR. ch 1. Work 10 sc into the ring. Pull the ring tightly closed. sl st to the first sc to join. (10 sc)
Round 2:ch 4. Working back down the chain: sc in the 2nd ch from the hook, hdc in the next ch, dc in the last ch. sk 1 st on the MR base, sl st into the next st.
Repeat from * to * a total of 5 times to create 5 points.
Fasten off, leaving a long 12-inch tail for sewing.
🔗 The Hanging Loop
What it is for: To hang the ornament or tie it to a gift package.
Yarn: Color A (Cream/Off-White)
Step 1: With the right side of the snowflake facing you, join Color A with a sl st to the tip of any ch-5 picot (the longest point of the snowflake).
Step 2: ch 20 (or chain to your desired loop length).
Step 3: sl st back into the exact same ch-5 picot space to secure the loop.
Step 4: Fasten off and weave in the loop ends invisibly into the back of the snowflake point.
🎨 ## STYLING / ASSEMBLY / STABILITY / FINAL SHAPING
The magic of this design lies in its neat, centered assembly. Since the snowflake has six points and the star has five, they will not align point-to-point. This offset geometric look is intentional and adds charm.
- Block the Snowflake: Before sewing, thoroughly wet block the cream snowflake. Pin down each of the six outer points (the ch-5 loops) and the smaller side picots (the ch-3 loops) on a blocking board. Spray with fabric stiffener if desired. Let it dry completely.
- Position the Star: Place the blue star perfectly in the center of the right side of the snowflake. Ensure the star covers the center magic ring of the snowflake entirely.
- Pin in Place: Use sewing pins to hold the star securely so it does not shift while you stitch.
- Sewing: Thread the long blue tail onto your tapestry needle. Carefully whip stitch around the perimeter of the star, tacking down the center and the base of the star’s points to the snowflake.
- Clean Finish: Be careful to only catch the top loops of the snowflake’s stitches so the blue yarn does not show through to the back side of the ornament. Fasten off and weave the end neatly behind the star.
- Presentation: To replicate the elegant gift-wrapping look, slide a patterned ribbon (like the holly ribbon shown) through the crocheted hanging loop before tying your bow.
✅ Final Finishing Checklist:
- ✅ Snowflake is blocked flat with crisp points.
- ✅ Blue star is centered over the snowflake’s magic ring.
- ✅ Hanging loop is secured tightly to one of the six main points.
- ✅ All yarn tails are trimmed and woven in.
💡 ## HELPFUL CROCHET TIPS
- 💡 Use Cotton Yarn: Mercerized or standard worsted cotton yields the best stitch definition and responds beautifully to wet blocking and starching. Acrylic can be used, but it will be softer and harder to stiffen.
- 💡 Invisible Join: For an extra polished look on the star’s final round, use an invisible join instead of a slip stitch when fastening off.
- 💡 Ironing: If you are in a rush and cannot wait for wet blocking to dry, you can heavily steam the cotton motif with an iron. Do not touch the iron directly to the yarn if using acrylic, or it will melt (kill the yarn).
- 💡 Symmetrical Sewing: When sewing the star, stitch opposite points in a star-pattern (like tightening lug nuts on a tire) to keep it perfectly centered without warping.
- 💡 Stiffening Alternatives: If you don’t have commercial fabric stiffener, a mixture of equal parts white school glue and water brushed onto the back of the snowflake works wonders!
- 💡 Sparkle: Hold a strand of metallic embroidery thread together with your yarn to give the snowflake a frosty, shimmering finish.
🧼 ## CARE INSTRUCTIONS
Because this item will likely be packed away with seasonal decorations, proper care ensures it lasts for generations.
- Storage: Store the ornaments perfectly flat in a rigid box or layered between sheets of acid-free tissue paper to prevent the points from crumpling or bending out of shape over the year.
- Cleaning: Spot clean only with a damp cloth and mild detergent. Do not machine wash, as agitation will ruin the stiffened shape and cause the points to curl.
- Restiffening: Over the years, the ornament may lose its crispness. Simply re-block it using pins and a fresh spritz of fabric stiffener or spray starch.
❓ ## FAQ
❓ Can I make the star and the snowflake with the same number of points? Yes, you can alter the pattern. However, the contrast between the 5-pointed star and the 6-pointed snowflake adds wonderful geometric interest. If you want a 6-pointed star, simply repeat the star’s point instructions 6 times instead of 5 in Round 2, but be aware it may crowd the center.
❓ My snowflake looks like a bowl. What did I do wrong?
This usually means your tension is a bit too tight, pulling the stitches inward, or you missed a chain space. Double-check your stitch counts in Round 3. Blocking aggressively will usually fix slight cupping.
❓ Can I use a different yarn weight?
Absolutely! This pattern scales wonderfully. Using chunky yarn and a 6.0mm hook will make a fabulous large wall hanging. Using size 10 crochet thread and a 1.5mm hook will create delicate earrings or a tiny tree ornament. Just ensure the star and snowflake yarns are the same weight so the proportions remain correct.
❓ Is this safe for pets or babies?
This ornament is made entirely of yarn with no hard plastic pieces (like safety eyes). However, the hanging loop and the small size of the star applique could pose a choking/strangulation hazard if left unattended with an infant. Keep it out of reach on the tree.
❓ How do I make the hanging loop thicker? If a simple chain feels too flimsy, you can chain the desired length, then slip stitch back down the entire length of the chain before joining it back to the snowflake point. This creates a sturdy, cord-like loop.