Luxe Shell Stitch Blanket & Pillow Set – Chunky Stripe Crochet Pattern
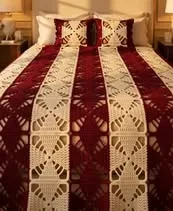
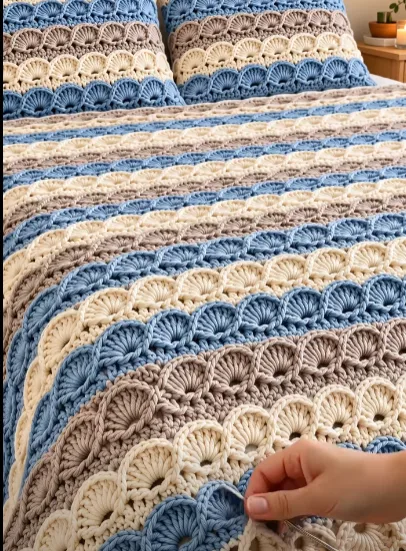
If you’re searching for a sophisticated yet approachable project, this shell stitch blanket and pillow set is the perfect place to start. This gorgeous crochet design features bold, textural stripes in alternating colors—soft blue, oatmeal beige, and creamy ivory—creating a high-relief blanket and matching pillows that look both modern and classic. The captivating rows of rounded shells give the surface a dimensional, scalloped effect, while the chunky yarn ensures maximum coziness and visual drama. Ideal for draping over a bed, couch, or armchair, this set can transform any room with inviting charm and tactile comfort. The project is just as much a pleasure to make, with rhythmic rows, neat color changes, and a surprisingly quick pace due to thick, plush yarn. Whether you craft the blanket, matching pillow covers, or both, you’ll enjoy the satisfaction of watching each beautiful row bloom beneath your fingers.
Project Overview
This pattern is worked entirely in rows, building up the blanket and pillow panels from a foundation chain. The design alternates simple single crochet lines with deeply textured shell stitch rows that give the signature scalloped appearance. Each striping color is worked for one shell section, then changed smoothly for the next. All pieces are joined at the end, with optional pillow back panels finished with simple seaming. There is no need for separate motifs or assembly until the final joining steps.
Skill Level
Advanced Beginner to Intermediate. This pattern uses basic single crochet stitches and a modified shell (fan) stitch that combines double, treble, and chain elements. Color changes are involved, and consistent tension is important for the best results, but no advanced shaping or techniques are necessary. Clear instructions mean any adventurous crocheter with some experience can succeed.
Materials
- Chunky/bulky weight yarn (category 5); suggested fiber: soft acrylic or wool blend for coziness and easy care
- Sample color amounts for a throw-sized blanket (48×60 in / 122×152 cm) and two pillow covers (18×18 in / 46×46 cm):
- Blue: approx. 550 g (20 oz)
- Beige/taupe: approx. 550 g (20 oz)
- Cream/ivory: approx. 550 g (20 oz)
- 8.0 mm (L-11) crochet hook or size needed for gauge
- Tapestry needle for weaving ends
- Scissors
- Stitch markers (optional, for marking row ends or color changes)
- Pillow forms (optional, 18×18 in / 46×46 cm size if making pillow covers)
Finished Size
- Blanket: Approx. 122 cm x 152 cm (48 in x 60 in)
- Pillow cover: Approx. 46 cm x 46 cm (18 in x 18 in) each
To adjust the width, begin with a starting chain in multiples of 8 + 3 extra chains. Increase or decrease the number of shell repeats per row for desired width. For length, add or subtract row repeats as preferred.
Gauge
Gauge (after blocking): 2 shell motifs and 5 single crochet rows = 10 cm (4 in) square. Because of the textural shell stitch, blocking may expand the finished dimensions slightly. Small differences in gauge will impact your finished size and yarn usage.
Stitches and Abbreviations
- ch – chain
- sl st – slip stitch
- sc – single crochet
- dc – double crochet
- tr – treble crochet
- st/sts – stitch/stitches
- rep – repeat
Important Pattern Notes
- The turning chain at the start of rows does not count as a stitch unless noted.
- Always join new yarn colors at the start of a row for neat color changes. Carry yarn loosely up the side if you prefer (for fewer ends), or cut and weave in tails for best finish.
- Shell rows are worked into skipped stitches below the single crochet row, not into the single crochets themselves.
- Use stitch markers to help identify row counts and color changes, especially in longer blankets.
- Work with the right side facing for all rows for consistent texture.
Detailed Crochet Pattern
Part 1: Foundation and First Single Crochet Row
Blanket —
- With Color A (blue), ch 163 (for a throw; multiple of 8 + 3, e.g. 8×20=160, +3=163).
- Row 1 (RS): Sc in 2nd ch from hook and in each ch across. (162 sc)
Part 2: First Shell Stitch Row
- Change to Color B (beige/taupe), turn.
- Row 2: Ch 1. Sc in first st. *[Skip 3 sts, in next st: (9 tr, ch 1, 9 tr)] – forms a large shell. Skip next 3 sts, sc in next st.* Rep across, ending with sc in last st. (20 shells, 21 sc)
- Tip: Place a stitch marker in the center tr (the ch-1) of each shell for counting if desired.
Part 3: Single Crochet Anchor Row
- Switch to Color C (cream), turn.
- Row 3: Ch 1. Sc in first st. *Sc in next 3 tr; sc in ch-1 sp of shell; sc in next 3 tr; sc in next sc between shells.* Rep across, ending with sc in last st. (162 sc)
Part 4: Repeat Rows for Striped Effect
Now that the foundation is set, you will repeat alternating shell rows and single crochet rows, changing colors as you wish (typically every shell row creates a wide band of color for a bold stripe effect).
- Row 4 (shell row): Switch to Color A (next blue stripe), turn. Ch 1, sc in first st. *Skip 3 sts, 9 tr in next st, ch 1, 9 tr in same st (shell). Skip 3 sts, sc in next st.* Repeat across, ending with sc in last st. (20 shells, 21 sc)
- Row 5 (sc row): With Color B, turn. Ch 1, sc in first st. *Sc in next 3 tr, sc in ch-1 sp, sc in next 3 tr, sc in next sc between shells.* Rep across, ending with sc in last st. (162 sc)
Continue alternating in this fashion, switching colors every shell row to maintain the striped pattern pictured: blue – beige – cream, repeating as needed. For a bed-sized blanket, aim for about 54–60 rows total (27–30 shell bands and 27–30 sc anchor rows), or more for extra drape.
Part 5: Finishing Border (Optional)
For a neat finished look, you can add a border of sc all around the blanket in cream or any color you prefer.
- Attach border color yarn to any corner. Work single crochet evenly around all four edges, making 3 sc in each corner. Work about 1 sc per row or stitch along the sides for an even edge. Fasten off and weave in ends neatly.
Part 6: Pillow Cover Panels
The pillow cover is worked in the same way but for a square shape. For an 18 in (46 cm) panel, use a starting ch of 43 (8×5=40+3=43) and work 20–24 rows or until you reach desired size. Make two identical panels (or one shell side and one sc-only back if preferred). Sew together on three sides, insert pillow form, and close fourth side.
Assembly and Finishing
- Weave in tails from all color changes and borders thoroughly on the wrong side with a tapestry needle. Avoid pulling too tight to preserve texture.
- Block the blanket and pillow covers gently to even out stitches and open up shells. Lay flat on a clean towel, spray with water, and shape to finished dimensions, allowing to dry fully.
- To keep shells visible, lightly tug each shell edge outward while blocking.
- For pillow covers, align the motifs carefully before seaming for a crisp, centered design. Use whipstitch, mattress stitch, or slip stitch seam for invisible joins.
Customization Ideas
- Use other cozy colorways: charcoal & white, ombre blues, sage green & sand, or neon brights for a playful look.
- Try lighter-weight yarns for a more delicate throw, or super-bulky for an oversized afghan.
- Resize for crib blankets, accent squares, table runners, or even wall hangings by adjusting base chains and row counts.
- Turn the shell motif into decorative coasters, placemats, or a matching scarf by altering width and length.
- Add tassels or fringe along the blanket’s short ends for extra visual flair.
Troubleshooting Tips
- If your piece curls at the edges, double-check stitch counts at the start of each shell row. Block the blanket to relax tight edges.
- Maintain even tension especially in the shell stitches—too tight and shells will pull; too loose and gaps may appear.
- If your motif seems too large or small after a few rows, check your gauge and adjust hook size accordingly.
- For neat color changes, always introduce new yarn at the last yarn-over of the row before you switch. Weave in all ends securely.
- Place a stitch marker at the start and end of each row to keep your work straight and to help count repeats for large pieces.
Care Instructions
Hand wash or gentle machine wash on cold (using a mesh laundry bag if possible), then lay flat to dry to maintain the texture and shape. If using wool, avoid hot water and agitation. Do not bleach. Block again if needed after washing to restore stitch definition.
Final Notes
Before beginning, always count your stitches carefully at the end of each row to maintain the beautiful scalloped effect and uniformity across the blanket or cushion. Adjust your hook size if your shells appear too tight or too loose. Use the image for visual reference as you crochet and feel free to experiment with color order and width for a truly personalized piece. Enjoy each satisfying row as your stunning shell stitch set comes to life!