Adorable Crochet Snowman Doll with Festive Hat and Scarf – Step-by-Step Pattern
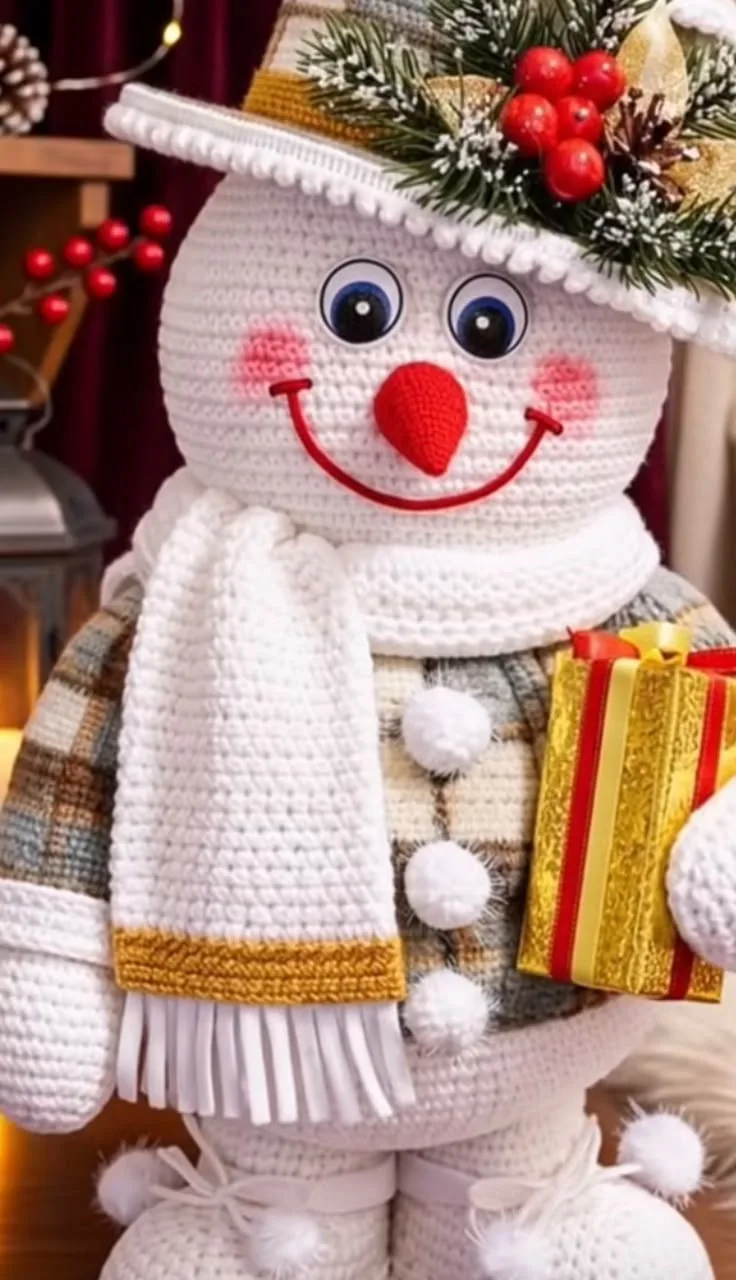
Bring heartwarming winter cheer to your home with this delightful crochet snowman doll! Featuring an expressive face with big eyes, a sweet carrot nose, and pink cheeks, this charming fellow is dressed in a cozy plaid vest, classic white buttons, a dapper white-and-gold scarf, and a wide-brimmed hat adorned with festive foliage and berries. He’s even holding a present, making him a perfect decorative friend for the holidays or a joyful year-round companion. With his inviting smile, textured form, and playful details, this snowman is as much fun to make as he is to display.
The combination of classic snowman elements—white rounded body, carrot nose, and playful scarf—blend beautifully with thoughtfully constructed accessories. The piece stands upright, making it wonderful as a centerpiece, mantle decoration, or a huggable soft toy. The textured stitches of his body and accessories give a hand-crafted, loveable appeal. Whether you want to add a handmade touch to your winter décor or make a special gift, this project is sure to inspire joy.
Project Overview
This snowman is constructed using several distinct pieces: the body and head are worked in continuous rounds (amigurumi technique), while the hat, arms, buttons, nose, scarf, and present are created separately and sewn on. The hat band and scarf feature colorwork for the gold accent, and the hat is topped with festive faux-foliage. The snowman is adorned after assembly for neat finishing.
Skill Level
Intermediate
This project suits those comfortable with amigurumi (crocheting in the round), color changes, basic sewing techniques, and minor surface embroidery. While individual elements are not difficult, the assembly and variety of components require some patience and confidence with three-dimensional crochet.
Materials
- Yarn:
- Worsted weight (Category 4) acrylic or cotton blend recommended for ease of care and stitch definition.
- White – Approx. 150 g (body, head, arms, scarf, hat base, pom-poms, buttons)
- Plaid or mixed tan/gray yarn – Approx. 30 g (vest body), or substitute with single color and faux plaid via surface slip stitch or embroidery if plaid yarn is unavailable.
- Gold/yellow – Approx. 15 g (scarf and hat band)
- Red – Small amount (nose, mouth, gift wrap)
- Black – Small amount (mouth and facial embroidery)
- Green (optional) – For hat foliage or surface details
- Crochet hook:
- US size G/6 (4.0 mm) for main pieces
- US size F/5 (3.75 mm) for smaller details, if tighter tension is needed
- Stuffing fiber (polyester or preferred stuffing)
- Sewing/tapestry needle
- Scissors
- Stitch markers
- Safety eyes (18-22 mm for expressive look), or crochet/embroider eyes
- Fabric glue (optional for securing embellishments)
- Faux foliage/holiday picks, gold ribbon, or craft berries for hat decoration
- Cardboard or foam board (to shape and stiffen hat brim and gift, optional)
Finished Size
Approximate finished height: 40 cm (16 in) tall, including hat. The width across the hat brim is about 25 cm (10 in).
To adjust size: Change yarn weight and hook size, keeping the proportions consistent. Using thinner yarn and a smaller hook will yield a smaller doll; thicker yarn and larger hook will create a bigger, cuddlier snowman.
Gauge
Approximate gauge: 18 sc x 20 rows = 4″ (10 cm) square in tight amigurumi-style single crochet (worked in the round).
Small differences in gauge do not matter for toys, but will affect size and amount of yarn needed.
Stitches and Abbreviations
- ch – chain
- sl st – slip stitch
- sc – single crochet
- inc – increase (2 sc in next stitch)
- dec – decrease (sc 2 stitches together)
- hdc – half double crochet
- dc – double crochet
- MR – magic ring
- FLO – front loop only
- BLO – back loop only
- st(s) – stitch(es)
Important Pattern Notes
- Body, head, arms, and most pieces are worked in a continuous spiral unless specified.
- Use a stitch marker to keep track of start of rounds.
- Ch 1 at the beginning of rounds does not count as a stitch, unless specifically noted.
- Color changes: On the stitch before a color change, complete the last yarn-over with the new color for smoother transitions.
- When sewing separate pieces, pin in place before attaching and use same-color yarn for invisibility.
- Keep right side of stitches facing outward for a uniform surface.
- Safety eyes or securely sewn eyes are safer for children.
Detailed Crochet Pattern
Part 1: The Snowman Head
- With white yarn and 4.0 mm hook:
- Round 1: MR, 6 sc in ring (6)
- Round 2: inc in each st around (12)
- Round 3: (sc in next st, inc) around (18)
- Round 4: (sc in next 2 sts, inc) around (24)
- Round 5: (sc in next 3 sts, inc) around (30)
- Round 6: (sc in next 4 sts, inc) around (36)
- Round 7: (sc in next 5 sts, inc) around (42)
- Round 8: (sc in next 6 sts, inc) around (48)
- Rounds 9-23: sc in each st around (48), for 15 rounds
- Insert safety eyes between Rounds 13-14 about 16 stitches apart or to your desired spacing. Embroider eye whites if not using safety eyes.
- Round 24: (sc in next 6 sts, dec) around (42)
- Round 25: (sc in next 5 sts, dec) around (36)
- Round 26: (sc in next 4 sts, dec) around (30)
- Round 27: (sc in next 3 sts, dec) around (24)
- Begin stuffing head firmly, shape as you go.
- Round 28: (sc in next 2 sts, dec) around (18)
- Round 29: (sc in next 1 st, dec) around (12)
- Round 30: dec around (6). Fasten off, weave tail through remaining sts and pull to close, sew securely.
Part 2: The Body
- With white yarn and 4.0 mm hook:
- Round 1: MR, 6 sc in ring (6)
- Round 2: inc in each st around (12)
- Round 3: (sc in next st, inc) around (18)
- Round 4: (sc in next 2 sts, inc) around (24)
- Round 5: (sc in next 3 sts, inc) around (30)
- Round 6: (sc in next 4 sts, inc) around (36)
- Round 7: (sc in next 5 sts, inc) around (42)
- Round 8: (sc in next 6 sts, inc) around (48)
- Round 9: (sc in next 7 sts, inc) around (54)
- Round 10: (sc in next 8 sts, inc) around (60)
- Rounds 11-27: sc in each st around (60) for 17 rounds
- Round 28: (sc in next 8 sts, dec) around (54)
- Round 29: (sc in next 7 sts, dec) around (48)
- Round 30: (sc in next 6 sts, dec) around (42)
- Round 31: (sc in next 5 sts, dec) around (36)
- Round 32: (sc in next 4 sts, dec) around (30)
- Start stuffing body as you decrease, shaping the base rounded and flat at bottom.
- Round 33: (sc in next 3 sts, dec) around (24)
- Round 34: (sc in next 2 sts, dec) around (18)
- Round 35: (sc in next st, dec) around (12)
- Round 36: dec around (6). Fasten off, weave yarn tail through last stitches and secure.
Part 3: Arms (make 2)
- With white yarn:
- Round 1: MR, 5 sc in ring (5)
- Round 2: inc in each st around (10)
- Rounds 3-18: sc in each st around (10) for 16 rounds
- Stuff lightly as you go for a soft arm.
- Round 19: sc in next st, dec, repeat around (7)
- Round 20: dec until closed. Fasten off, leaving a long tail for sewing.
Part 4: Feet/Boots (make 2)
- With white yarn:
- Round 1: MR, 6 sc in ring (6)
- Round 2: inc in each st around (12)
- Round 3: (sc in next, inc) around (18)
- Rounds 4-10: sc in each st around (18) for 7 rounds
- Round 11: (sc in next 7 sts, dec) around (16)
- Round 12: (sc in next 6 sts, dec) around (14)
- Round 13: (sc in next 5 sts, dec) around (12)
- Stuff firmly. Flatten the opening and sc across both edges to close, leaving a flat base. Sew to body’s underside in appropriate position for standing or sitting.
Part 5: The Plaid Vest
- You may use plaid yarn, or crochet a base fabric and add stripes with surface slip stitch or embroidery. Here is a simple way:
- With tan or gray:
- Ch 36 (or enough to cover front half of body from one arm to the opposite side, or adjust for desired width)
- Row 1: sc in 2nd ch from hook and each ch across (35)
- Rows 2-18: ch 1, sc across each st (35)
- Fasten off, weave in ends.
- Embroider vertical and horizontal lines in dark brown and gold to suggest plaid, or use surface slip stitch for added effect. Sew vest panel to front of body only, from under chin to above legs. Insert buttons where desired.
Part 6: Buttons (make 3-4)
- With white yarn:
- Round 1: MR, 6 sc in ring (6)
- Round 2: inc in each st around (12)
- Round 3: sc in each st around (12)
- Round 4: (sc in next st, dec) around (8)
- Stuff lightly, sew opening closed. Attach to vest front as shown.
Part 7: Scarf
- With white yarn:
- Ch 90 (for approx. 38 cm/15 inches), or adjust for desired scarf length.
- Row 1: sc in 2nd ch from hook and in each ch across (89)
- Rows 2-8: ch 1, sc across (89)
- Switch to gold/yellow for Rows 9-10: ch 1, sc across (89)
- Optional: add simple fringe using strips of yarn folded through stitch spaces at the ends.
- Wrap scarf naturally around the neck after assembly; sew in place if desired.
Part 8: Hat (wide-brimmed, with gold band and foliage)
- Crown:
- With white yarn:
- Round 1: MR, 6 sc in ring (6)
- Round 2: inc in each st around (12)
- Round 3: (sc in next, inc) around (18)
- Round 4: (sc in next 2 sts, inc) around (24)
- Round 5: (sc in next 3 sts, inc) around (30)
- Rounds 6-12: sc in each st around (30)
- Switch to gold for 2 rounds: sc in each st around (30), working over white tail to secure
- Switch back to white:
- Rounds 15-18: sc in each st around (30)
- Brim:
- Round 19: FLO, (sc in next 4 sts, inc) around (36)
- Round 20: (sc in next 5 sts, inc) around (42)
- Round 21: (sc in next 6 sts, inc) around (48)
- Round 22: (sc in next 7 sts, inc) around (54)
- Fasten off, weave in ends.
- Optionally, cut a circle of stiff felt or cardboard (covered in white felt or fabric) and place inside brim to give shape. Decorate with small faux pine branches, berries, gold ribbon, and glue or sew in place on the side of brim.
Part 9: Nose (crochet carrot)
- With red or orange yarn and smaller hook if possible:
- Round 1: MR, 4 sc in ring (4)
- Rounds 2-3: sc in each st around (4)
- Round 4: (sc in next st, inc) around (6)
- Rounds 5-6: sc in each st around (6)
- Stuff lightly. Fold tip in for extra carrot shape.
- Fasten off, leave long tail for sewing. Attach centrally below eyes.
Part 10: Present (optional accessory)
- For a flat gift box:
- With gold or yellow yarn, ch 11.
- Row 1: sc in 2nd ch from hook and each ch across (10)
- Rows 2-12: ch 1, sc across (10)
- Fasten off, make two identical panels, sew three sides, stuff slightly, finish sewing edge.
- Add two red and yellow crocheted or ribbon stripes and a small bow. Sew to snowman’s hand as desired.
Part 11: Facial Features
- Embroider mouth using red yarn (or surface slip stitch): create a wide, high-arched smile.
- Blush cheeks: Lightly brush on pink fabric powder or embroider circles if desired.
- Add white circle accents with felt or embroidery for eye sparkle if not using safety eyes.
Part 12: Pom-Poms (shoes & buttons)
- Wrap white yarn around two fingers ~50 times. Slide bundle off, tie tightly in the middle, and cut loops to create a pom-pom. Trim evenly. Make 3-4 for boots and buttons.
- Sew carefully onto boots and down the body as shown in the image.
Assembly and Finishing
- Sew head firmly onto the body, aligning necks closely for stability.
- Pin and sew arms to the upper body sides just below the neck.
- Sew feet to the body base; stuff if needed for stability.
- Attach vest panel – pin carefully before sewing in place; arrange snug over the chest.
- Sew scarf around the neck; tack ends as needed.
- Sew or glue hat onto the head at a jaunty angle. Decorate with your chosen foliage and berries.
- Attach nose firmly in center between eyes, then embroider mouth and add cheek blush.
- Sew white buttons down the vest, and attach pom-poms as required.
- Sew or glue present to one hand. Optional: tie ribbons around feet with small bows.
- Weave in all loose yarn ends, and trim for neatness.
- Shape and lightly steam block if needed, but do not saturate stuffing.
Customization Ideas
- Change vest color or style for a unique look—try reds, blues, or festive prints.
- Adjust the scarf length, fringe, and colorway for personality.
- Replace present with a crocheted mitten, bell, or mini ornament.
- Use different weights of yarn for smaller ornaments or oversized statement pieces.
- Adapt body pattern for use as a pillow, wall hanging, or holiday centerpiece.
- Sew a fabric or crocheted backing to create a blanket square or festive cushion.
Troubleshooting Tips
- Piece curling: Block gently or ensure you’re not crocheting too tightly.
- Uneven edges: Count stitches every few rounds; use stitch markers.
- Motif too large/small: Adjust hook size and check gauge.
- Loose color changes: Always secure and weave in ends snugly; overlap yarn for smooth transitions.
- Uneven tension: Practice slow, steady stitches; consider a smaller hook.
- Assembly crooked: Pin and adjust pieces before sewing for best results.
Care Instructions
- Hand-wash or gentle machine wash in cold water; place item inside a pillow case for protection.
- Air dry flat, reshape while damp.
- Avoid heat drying or ironing.
- If using fabric glue or decorative picks, spot clean around those areas only.
Final Notes
Take your time to check all stitch counts—amigurumi works best when stuffed firmly and stitched evenly. Adjust tension to ensure a smooth, plush finish. Let the photo guide your placement and proportions, but don’t be afraid to make the project your own. Enjoy the adventure of bringing this cheerful snowman to life and creating a winter keepsake to treasure for years!