Double-Helix Spiral Tree & Gold Star Ornament 🎄✨
📖 B. INTRODUCTION
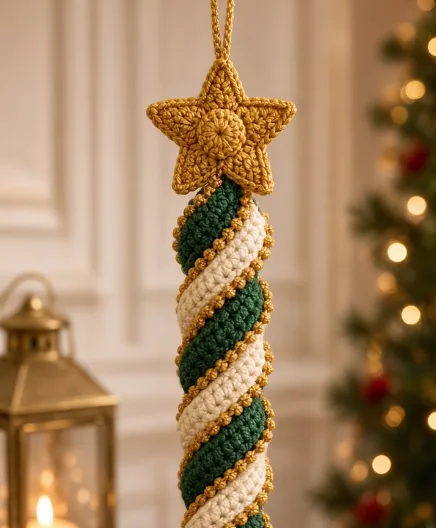
Welcome to the Double-Helix Spiral Tree & Gold Star Ornament pattern! If you are looking to elevate your holiday decor with something deeply traditional yet visually mesmerizing, this stunning two-toned ornament is exactly what you need. Featuring rich forest green and classic cream intertwined in a perfect double helix, this piece brings a sophisticated, boutique-quality charm to your Christmas tree.
The true showstopper of this design is the rich texture. Rather than a flat applique, this ornament uses a mathematical increase technique to create thick, 3D corkscrews that naturally wrap around one another. Trimmed with a delicate, beaded-look metallic gold edge and topped with a gorgeous layered star, it feels like a heavy, luxurious heirloom.
Personalizing this design is a joy. While the forest green and cream evoke a nostalgic Victorian Christmas, you could easily swap the colors to crimson and white for a peppermint twist, or icy blue and silver for a winter wonderland theme. Gather your hooks, and let’s create some holiday magic!
🔍 C. MAIN PATTERN OVERVIEW
This ornament is surprisingly simple to construct, utilizing a clever assembly technique to achieve its complex look. It is broken down into three main phases:
- The Layered Star Topper: Crocheted in metallic gold, this star features a flat, five-pointed base and a small, raised 3D center button sewn to the front for extra dimension.
- The Twin Spirals: You will crochet two separate, identical thick curly-q strips—one in green and one in cream. By placing multiple stitches into each chain, the fabric is forced to coil tightly.
- The Gold Edging & Assembly: A textured metallic edge is applied to both spirals. Then, the two spirals are intertwined like a double helix and stitched securely down the center axis so they hold their perfect shape year after year.
🎯 D. SKILL LEVEL
Easy to Intermediate This pattern uses foundational stitches but requires some patience during the assembly and edging phases to keep the coils neat.
Techniques Involved:
- Working in a magic ring
- Placing multiple stitches in one space (heavy increases)
- Working with metallic thread/yarn
- The Reverse Single Crochet (Crab Stitch) for the edging
- Intertwining and sewing 3D components
📏 E. FINISHED SIZE
Measurements:
- Total Height: Approximately 7.5 inches (19 cm) from the bottom of the spiral to the tip of the star (excluding the hanging loop).
- Width: Approximately 2 inches (5 cm) across the thickest part of the intertwined double helix.
- Star Width: 2.5 inches (6.5 cm) point to point.
Note: Your finished size will vary based on your yarn weight and tension. A tighter tension will result in a shorter, stiffer ornament.
🧮 F. GAUGE
- Gauge is not critical for this ornamental project.
- It is highly recommended to use firm, tight tension. The spirals need to be dense to look plush and hold their intertwined shape without sagging. If your fabric feels floppy, drop down a hook size.
🧶 G. REQUIRED YARN AMOUNTS
For this project, a Worsted weight (Size 4), 100% cotton or sturdy acrylic yarn is recommended for the main body. Cotton provides the excellent stitch definition seen in the reference photo.
- 🌲 Color A (CA) – Forest Green: Approximately 20g / 35 yards.
- 🤍 Color B (CB) – Cream/White: Approximately 20g / 35 yards.
- ✨ Color C (CC) – Metallic Gold: Approximately 15g / 30 yards. (A medium or DK weight metallic yarn, or two strands of fine metallic thread held together).
🧰 H. MATERIALS
- Hooks: 4.0 mm (US G/6) for the main body, and a 3.5 mm (US E/4) for the gold star and edging.
- Yarn: See amounts above.
- Needles: A standard tapestry/yarn needle.
- Scissors: Sharp craft scissors.
- Optional: A small amount of fiberfill stuffing (if you wish to lightly stuff the center of the star).
🔤 I. ABBREVIATIONS – US TERMS
- MR = Magic Ring
- ch = chain
- st(s) = stitch(es)
- sl st = slip stitch
- sc = single crochet
- hdc = half double crochet
- dc = double crochet
- tr = treble crochet
- inc = increase (2 sc in same st)
- rsc = reverse single crochet (crab stitch)
- ( … ) x = repeat instructions within parentheses the indicated number of times
📝 J. NOTES BEFORE YOU BEGIN
- ⚠️ The Messy Middle: When crocheting the green and cream spirals, they will twist wildly, curl up on themselves, and look like a chaotic ruffle. Do not panic! This extreme curling is mathematically necessary to create the tight spring shape.
- 🧵 Crab Stitch: The gold edging uses the reverse single crochet (rsc). If you are unfamiliar with this stitch, you can substitute it by working a simple
(sl st, ch 1)in each stitch across to create a similar beaded texture. - 🧵 Assembly is Key: The beautiful structure comes entirely from how neatly you wind the two spirals together. Take your time during the final assembly step!
🪡 K. COMPLETE PATTERN
🌟 The Layered Gold Star
Yarn: Gold (CC) Hook: 3.5 mm
Part 1: The Star Base R1: Make a MR. Ch 1, work 10 hdc into the ring. Join with a sl st to the first hdc. Pull ring tight. (10 hdc) R2 (Making the Points): *[Ch 5. Working back down the chain: sc in the 2nd ch from hook, hdc in the next ch, dc in the next, tr in the last ch. Skip 1 st on the R1 base, sl st into the next st]. Repeat from * 4 more times to create 5 points. Fasten off, leaving a long tail for sewing.
Part 2: The Center Button R1: Make a MR. Ch 1, work 6 sc into the ring. Join with a sl st. (6 sc) R2: Ch 1, inc in each st around. Join with a sl st. (12 sc) Fasten off, leaving a long tail. Sew this small circle directly to the front center of the Star Base to create that raised, 3D detail.
🟢 The Forest Green Spiral
Yarn: Forest Green (CA) Hook: 4.0 mm
Row 1 (Foundation): Ch 46. Row 2: Working in the 2nd ch from the hook, place 2 hdc in each chain across. (90 hdc) Row 3: Ch 2, turn. Place 2 hdc in each stitch across. (180 hdc) Fasten off CA and weave in ends. The piece will be tightly coiled.
Gold Edging: Yarn: Gold (CC) Hook: 3.5 mm Join CC to the very first stitch of Row 3. Work 1 rsc (reverse single crochet / crab stitch) into every stitch all the way along the outer edge of the spiral. Fasten off and weave in ends.
⚪ The Cream Spiral
Yarn: Cream (CB) Hook: 4.0 mm
Work exactly as you did for the Forest Green Spiral, including the Gold Edging. Fasten off and weave in ends.
🎨 L. STYLING / ASSEMBLY / STABILITY / FINAL SHAPING
This is where your chaotic crochet ruffles transform into an elegant double helix!
1. Intertwining the Spirals
✅ Hold the narrow starting ends (the tips) of both the Green and Cream spirals together in your hand. ✅ Gently begin to twist them around each other. Because they are coiled in the same direction, they will naturally slide into each other’s grooves. ✅ Twist them all the way down to the bottom until you have a perfect, two-toned candy cane stripe effect.
2. Securing the Core
✅ Right now, if you let go, the spirals might stretch apart. To make the ornament solid, thread your tapestry needle with a long strand of Forest Green yarn. ✅ Run the needle straight down the hollow center axis of your intertwined spirals, catching the inner edges of both the green and cream pieces. Tack them together securely from top to bottom. Pull the yarn slightly taut to compress the tree into a neat, dense column, then knot and hide the ends.
3. Attaching the Star
✅ Using the long gold tail left on your Star Topper, sew the bottom point (or the valley between two points, depending on your preference) securely to the top of your intertwined spirals. Make sure the 3D button side is facing forward!
4. Adding the Hanger
✅ Attach Gold (CC) yarn to the top point of the star. Ch 25 (or until your loop is the desired length). ✅ Sl st back into the same point to form a loop. Fasten off and weave the tail deep inside the star to secure it.
💡 M. HELPFUL CROCHET TIPS
- 💡 Edging Shortcut: If you hate weaving in ends, you can crochet over your starting and finishing tails when applying the gold crab stitch edge.
- 💡 Hiding the Seam: When securing the two spirals together down the center, always push your needle through the inside loops of the spirals. This ensures your joining thread is completely invisible from the outside.
- 💡 Stiffer Stars: If your star topper is flopping backward, you can brush the back of it with a little bit of fabric stiffener or diluted white glue. Let it dry completely flat before attaching it to the heavy spiral base.
- 💡 Creating a Tapered Look: The reference “stra.jpg” shows a beautifully straight, uniform column. However, if you want a more traditional “pine tree” taper (wider at the bottom), you can alter Row 3 of your spirals: do 2 hdc in the first half of the stitches, and 3 dc in the second half of the stitches.
🧼 N. CARE INSTRUCTIONS
- Storage: Store this ornament laying flat in a box, or hang it on a designated ornament rod in a closet. Do not crush it under heavier items, as the cotton will crease and the 3D spirals could flatten out over the years.
- Cleaning: Spot clean only with a damp cloth. Do not machine wash, as agitation will permanently distort the double helix structure and cause the metallic threads to fray.
❓ R. FAQ
❓ My spirals are curling in different directions and won’t fit together! Make sure you didn’t accidentally turn your work and crochet down the wrong side for one of them. Both spirals must be worked exactly the same way so they coil in the identical direction (like a right-handed screw).
❓ Can I add beads to this ornament? Yes! A beautiful modification is to sew small red pearl beads along the green spiral to look like berries, or string a few gold star beads onto the bottom of the ornament for a dangling finish.
❓ I don’t know how to do the Crab Stitch (rsc), what else can I do? No problem! Join your gold yarn, and work [sl st in next st, ch 1] all the way across. It gives a very similar, beautifully textured, braided look that perfectly mimics the reference photo.
❓ Can I make this larger? Absolutely. You can increase the starting chain to 60 or 70 for a much longer ornament. You can also use Super Bulky (Size 6) yarn and a larger hook to create a massive, plush version of this design for a mantle display!
Thank you for making the Double-Helix Spiral Tree! This pattern combines simple math with stunning visual results, and I hope it brings a touch of handmade luxury to your tree this year. Be sure to share your beautiful finished ornaments and tag me! Happy holiday crocheting! 🎄✨