Mint Oreo Bark Recipe
The Ultimate 4-Ingredient Mint Oreo Bark: A Quick, Easy, and Delicious No-Bake Dessert
When it comes to homemade treats that are as visually stunning as they are incredibly delicious, few things can beat the magic of a sweet, crunchy, and refreshing chocolate bark. If you are a fan of the classic combination of cool mint and rich chocolate, then this vibrant 4-Ingredient Mint Oreo Bark is about to become your new obsession. Whether you are preparing a festive treat for St. Patrick’s Day, looking for a cheerful green addition to your Christmas holiday cookie tins, or simply craving a quick weeknight dessert that does not require turning on the oven, this recipe is the ultimate solution. It is shockingly simple, remarkably fast, and yields a gourmet-looking sweet treat that will have your friends and family begging for the recipe.
The beauty of this specific mint Oreo bark lies not just in its bold, beautiful green color, but in its absolute simplicity. In today’s fast-paced world, finding a dessert that requires only four common ingredients and less than fifteen minutes of active preparation time is like striking culinary gold. There is no need for complicated baking techniques, candy thermometers, or hours of chilling. With just a microwave or a simple double boiler, you can transform basic pantry staples into a drool-worthy, bakery-quality confection. The creamy, mint-infused white chocolate perfectly coats the dark, slightly bitter, and deeply chocolatey crushed sandwich cookies, creating a textural masterpiece in every single bite. Read on to discover everything you need to know about mastering this incredibly easy, fail-proof recipe.
Why You Will Absolutely Love This Recipe
There are countless reasons why this 4-Ingredient Mint Oreo Bark deserves a permanent spot in your recipe collection. First and foremost is the incredibly low barrier to entry. You do not need to be a seasoned pastry chef to execute this dessert flawlessly. It is an incredibly forgiving recipe that welcomes beginners and is entirely kid-friendly. In fact, getting children involved in crushing the cookies and snapping the finished bark into jagged pieces is a wonderful way to spend time together in the kitchen.
Furthermore, this recipe is an absolute lifesaver when you need a last-minute dessert for a potluck, bake sale, or holiday gathering. Because it sets up quickly in the refrigerator, you can literally start making it an hour before you need to leave the house. Despite its minimal effort, the visual payoff is immense. The striking contrast between the bright, cheerful mint green chocolate and the dark, nearly black cookie crumbles makes for a dramatic and appetizing presentation. Finally, it is incredibly budget-friendly. Gourmet chocolate shops charge a premium for chocolate barks, but you can create a massive batch at home for a fraction of the cost.
Deep Dive: The 4 Simple Ingredients
To achieve the perfect texture, flavor, and appearance, it is important to understand the role of each of the four ingredients used in this recipe. While they are simple, choosing the right quality can elevate your bark from good to phenomenal.
1. White Chocolate or Vanilla Candy Melts
The foundation of this bark is the sweet, creamy base. You have two main options here. High-quality white chocolate chips or white chocolate baking bars offer the best, most authentic flavor. Look for white chocolate that contains real cocoa butter. Alternatively, you can use vanilla-flavored candy melts or almond bark. While these do not contain cocoa butter (they use vegetable oils instead), they melt incredibly smoothly, are highly resistant to seizing, and set up very firmly at room temperature, making them a fantastic and easy choice for beginners.
2. Mint Extract
This is where the magic happens. A little goes a long way when it comes to mint extract. It is crucial to note the difference between peppermint extract and spearmint extract. Peppermint has a sharper, more traditional “candy cane” or “mint chocolate chip ice cream” flavor, which pairs perfectly with the dark chocolate cookies. Spearmint tastes a bit more like chewing gum. Make sure you use an oil-based extract if you are using real white chocolate, as water-based extracts can sometimes cause the chocolate to seize.
3. Green Food Coloring
To get that iconic, vibrant mint green hue, you will need a touch of food coloring. Gel food coloring is highly recommended over traditional liquid drops. Gel colors are highly concentrated, meaning you only need a tiny drop to achieve a brilliant color without adding excess liquid to your melted chocolate, which again, helps prevent seizing. If you only have liquid drops, add them very carefully, one drop at a time, mixing thoroughly between additions.
4. Chocolate Sandwich Cookies (Oreos)
The undisputed star of the textural show is the classic chocolate sandwich cookie. The cream filling of the cookies blends into the melted chocolate, adding extra sweetness and a smooth mouthfeel, while the crisp chocolate wafers provide a deeply satisfying crunch that cuts through the richness of the white chocolate base. You can use standard Oreos, Double Stuf, or even store-brand equivalents. The key is to crush them irregularly so you have a pleasant mix of fine crumbs and large, bite-sized chunks.
Ingredients List
- – 16 ounces (about 3 cups) high-quality white chocolate chips, white baking chocolate, or vanilla candy melts
- – 1 teaspoon peppermint or mint extract (adjust to taste, depending on the strength of your brand)
- – 2 to 4 drops green gel food coloring (adjust until you reach your desired shade of mint green)
- – 15 classic chocolate sandwich cookies (like Oreos), roughly crushed
Step-by-Step Instructions
Creating this stunning dessert is a breeze. Follow these carefully detailed steps to ensure your bark turns out perfectly glossy, wonderfully crunchy, and intensely flavorful every single time.
- Prepare your workspace: Line a large rimmed baking sheet (like a half-sheet pan) with a sheet of parchment paper or a silicone baking mat. This step is absolutely crucial, as it prevents the sweet melted chocolate from adhering to the metal pan, ensuring easy removal once the bark has completely set.
- Crush the cookies: Place the 15 chocolate sandwich cookies into a large, heavy-duty zip-top plastic bag. Seal the bag tightly, pressing out as much excess air as possible. Using a rolling pin, a meat mallet, or even the bottom of a heavy saucepan, gently bash the cookies. You are aiming for a rustic mix: leave some large, recognizable chunks for visual appeal and bite, while allowing some cookies to break down into a fine, sandy crumb that will speckle the green chocolate beautifully. Set the bag aside.
- Melt the white chocolate: Place your white chocolate chips or candy melts into a large, microwave-safe bowl. Microwave on 50% power (medium heat) in 30-second intervals. After every 30 seconds, remove the bowl and stir vigorously with a rubber spatula. Even if the chips do not look melted at first, they hold their shape until stirred. Continue this process until the chocolate is completely smooth, glossy, and free of any lumps. Alternatively, you can melt the chocolate over a double boiler on the stove over gently simmering water.
- Flavor and color the chocolate: Once the white chocolate is perfectly smooth and melted, add the mint extract and the green gel food coloring. Stir briskly but gently until the color is completely uniform and no streaks of white remain. Start with just two drops of coloring; you can always add more to reach that vibrant, bright mint shade, but you cannot take it out once it is in.
- Fold in the cookies: Reserve about 1/4 cup of the crushed cookie pieces to sprinkle on top of the bark later. Pour the rest of the crushed cookies directly into the bowl of warm, green, mint-flavored chocolate. Gently fold the mixture together with your rubber spatula until all the cookie pieces are evenly coated in the green chocolate.
- Spread the bark: Pour the entire green chocolate and cookie mixture onto the center of your prepared baking sheet. Using your rubber spatula or an offset icing spatula, spread the mixture out into an even layer. You want it to be about 1/4-inch to 3/8-inch thick. It does not need to reach the edges of the pan, and the shape does not need to be a perfect rectangle; organic, rustic edges are part of the charm of chocolate bark.
- Add the topping: Immediately take the reserved 1/4 cup of crushed cookies and sprinkle them evenly over the top of the wet bark. Gently press them down very lightly with your fingertips or the back of a spoon just to ensure they adhere to the chocolate as it sets.
- Chill and break: Place the entire baking sheet into the refrigerator for 30 to 45 minutes, or until the chocolate is completely firm to the touch and has lost its wet sheen. Once hardened, remove the pan from the fridge. Lift the parchment paper off the pan, and use your hands to carefully snap and break the massive sheet of bark into irregular, jagged, bite-sized pieces. Serve immediately or store for later!
Expert Tips for Perfect Chocolate Bark
While this recipe is incredibly straightforward, working with melted chocolate can sometimes present minor challenges. Keep these expert tips in mind to ensure your mint Oreo bark is an absolute triumph.
Avoid Water at All Costs: When melting white chocolate, water is your biggest enemy. Even a single drop of water from a wet bowl or a stray splash from a double boiler can cause the entire batch of chocolate to seize, turning it into a grainy, clumpy mess. Ensure your bowls, spatulas, and hands are bone dry before beginning.
Do Not Overheat the Chocolate: White chocolate is particularly delicate and burns much faster than milk or dark chocolate. This is why microwaving at 50% power is highly recommended. If the chocolate overheats, it will scorch, seize, and taste bitter. Patience is key during the melting phase.
Work Quickly: Once the chocolate is melted and you have added the cool ingredients (the extract and the cookies), the temperature of the mixture will drop rapidly, causing the chocolate to begin setting. Have your prepared baking sheet and crushed cookies ready to go so you can mix, spread, and garnish before the chocolate hardens in the bowl.
Exciting Variations and Customizations
This 4-Ingredient Mint Oreo Bark is a fantastic blank canvas. Once you master the basic recipe, you can easily customize it to suit different holidays, flavor preferences, and aesthetics.
Layered Chocolate Bark: For an impressive, bakery-style look, try making a layered bark. Melt an 8-ounce layer of semi-sweet or dark chocolate and spread it thin on your parchment paper. Let it set in the fridge for 15 minutes. Then, spread your green mint Oreo layer directly over the dark chocolate layer. When you break it apart, you will have beautiful two-toned pieces.
Different Cookies: While classic Oreos are wonderful, you can easily swap them out. Try using Mint Oreos for a double-punch of mint flavor. Golden Oreos create a visually softer, all-green-and-white aesthetic that is perfect for spring time. You could even crush up Thin Mints or grasshopper cookies.
Add-ins and Toppings: Elevate the texture by adding 1/2 cup of mini dark chocolate chips or Andes mint baking chips into the mix along with the crushed cookies. For festive occasions, top the wet bark with holiday-themed sprinkles, green sanding sugar, or edible glitter before chilling.
Serving Suggestions
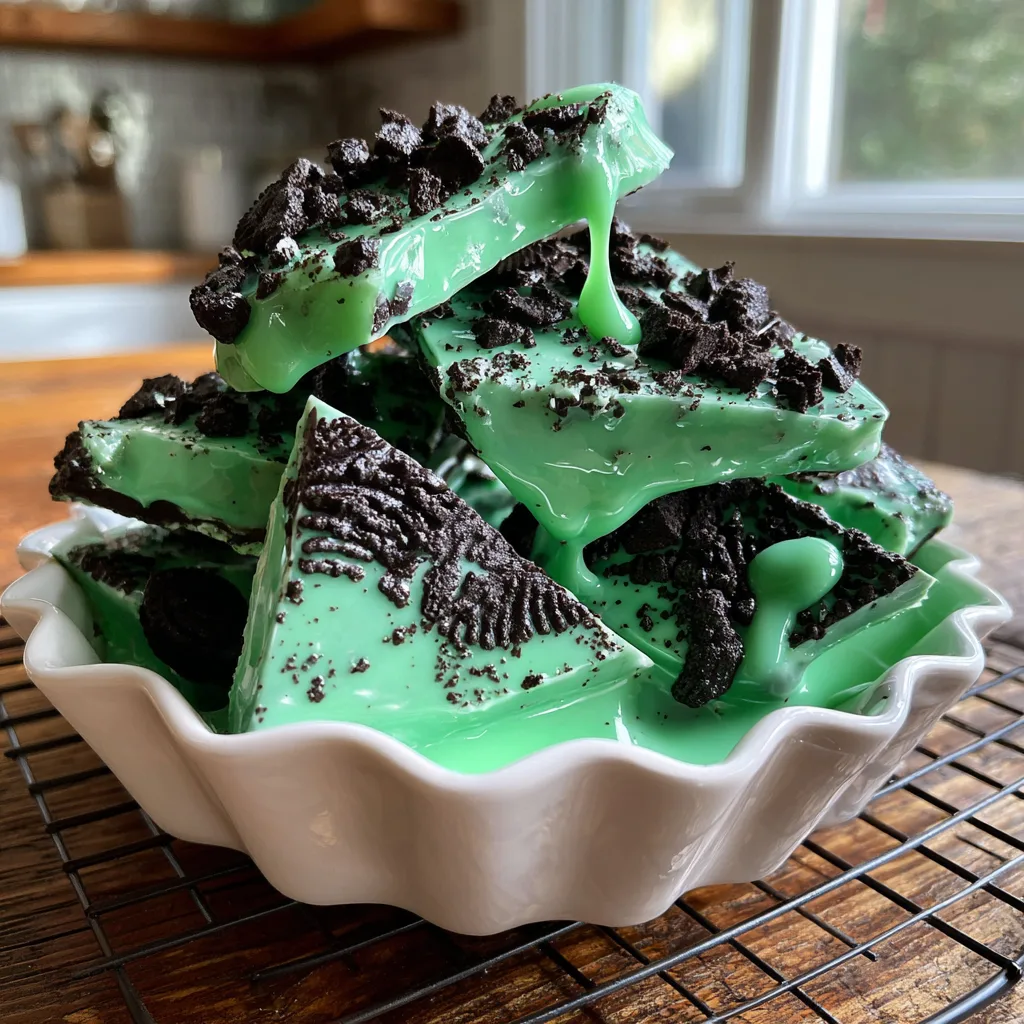
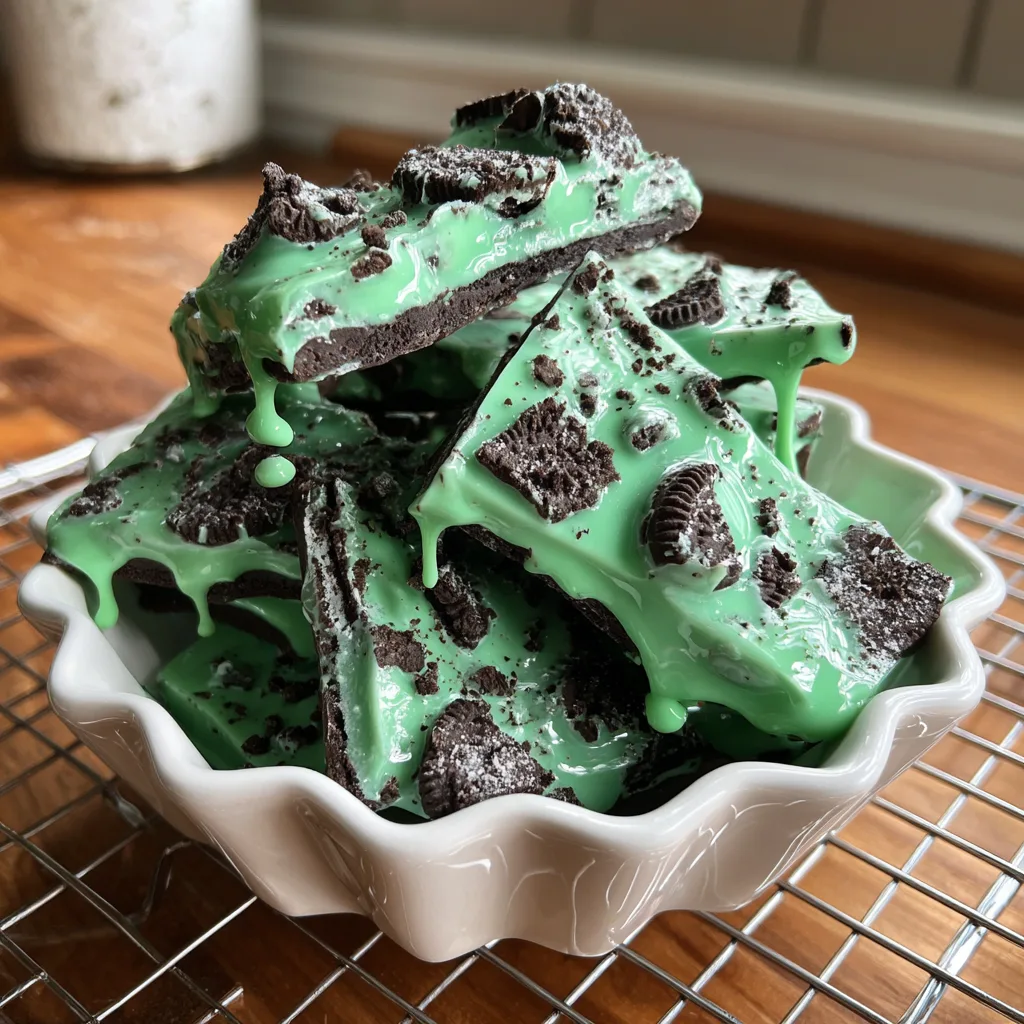
How you serve this beautiful dessert is entirely up to you. Because it is visually striking, it looks fantastic piled high in a decorative bowl or arranged on a wooden serving board alongside other homemade candies, fudge, and cookies. It is an excellent addition to a festive dessert charcuterie board.
For a cozy winter treat, serve a couple of large shards of mint Oreo bark alongside a piping hot mug of rich hot chocolate or a warm mocha latte. The heat of the drink will slightly soften the bark as you eat it. You can also chop the finished bark into tiny, uniform cubes and use it as an incredible, decadent topping for vanilla bean or mint chocolate chip ice cream.
Storage and Freezing Instructions
One of the best things about chocolate bark is its impressive shelf life, making it the perfect make-ahead dessert for busy holiday seasons.
Room Temperature: If your home is relatively cool (below 70°F), you can store the broken bark pieces in an airtight container on the kitchen counter for up to two weeks. Keep it away from direct sunlight or heat sources, like the stove or sunny windows, to prevent melting.
Refrigerator: If you live in a warmer climate, or if you simply prefer a colder, snappier texture, store the bark in an airtight container or a large zip-top bag in the refrigerator. It will stay fresh and delicious for up to three weeks.
Freezer: For long-term storage, mint Oreo bark freezes exceptionally well. Place the pieces in a freezer-safe bag, squeeze out all the air, and freeze for up to three months. You can eat it straight from the freezer for a super crunchy treat, or let it sit at room temperature for 10 minutes before serving.
Fun Facts and Cultural Context
The concept of “bark” as a confection actually dates back decades, traditionally referring to large, thin sheets of chocolate studded with nuts (like almond bark) that visually resembled the rugged, uneven texture of tree bark. Over time, bakers realized that this simple, rustic method was the perfect vehicle for endless flavor combinations.
The pairing of mint and chocolate is a beloved culinary tradition, particularly in American and British sweets. The coolness of the mint serves to cut through the heavy richness of the cocoa butter, cleansing the palate and making the dessert surprisingly refreshing. Mint chocolate treats surge in popularity twice a year: during the winter holidays (driven by peppermint candies) and in March for St. Patrick’s Day, where bright green, mint-flavored treats are the star of the show.
By making this 4-Ingredient Mint Oreo Bark, you are participating in a rich tradition of homemade confectionery, proving that you do not need complex techniques or endless hours to create a dessert that is beautiful, memorable, and absolutely irresistible.
4-Ingredient Mint Oreo Bark
Ingredients
Equipment
Method
- Line a large rimmed baking sheet with parchment paper or a silicone baking mat.
- Place the chocolate sandwich cookies in a zip-top bag and gently crush them with a rolling pin. Leave some large chunks. Reserve 1/4 cup of the crushed cookies for topping.
- In a microwave-safe bowl, melt the white chocolate in 30-second intervals at 50% power, stirring between each interval until completely smooth.
- Stir the mint extract and green gel food coloring into the melted white chocolate until the color is uniform and vibrant.
- Gently fold the remaining crushed cookies into the green chocolate mixture until well coated.
- Pour the mixture onto the prepared baking sheet and spread it into an even layer, about 1/4-inch to 3/8-inch thick.
- Sprinkle the reserved 1/4 cup of crushed cookies over the top, pressing them in lightly.
- Refrigerate for 30-45 minutes until completely set and firm. Break into jagged pieces and serve.