S’mores Sushi Recipe
S’mores Sushi: The Ultimate No-Bake Campfire Dessert Roll
There is a universal, undeniable magic to the classic s’more. It is a dessert that transcends generations, instantly evoking memories of crackling campfires, starry summer nights, and the sticky, sweet satisfaction of toasted marshmallows squeezed between crisp graham crackers and melting chocolate. But what if you could capture that exact flavor profile—the nostalgic triad of marshmallow, chocolate, and crunch—without ever needing to build a fire or step foot outside? What if you could transform this rustic camping staple into a visually stunning, incredibly fun, and totally bite-sized treat? Enter the revolutionary, internet-breaking sensation: S’mores Sushi.
This comprehensive, ultimate guide will take you on a deep dive into the creation of this whimsical no-bake dessert. We will explore the fascinating evolution of s’mores, dissect why this unique “sushi” format works so brilliantly, and provide you with a foolproof, step-by-step masterclass on how to roll, slice, and serve these delightful morsels. Whether you are hosting a children’s birthday party, looking for a unique potluck contribution, or simply craving a late-night chocolate fix, S’mores Sushi is guaranteed to be a massive hit.
The Nostalgic Magic of S’mores and Campfire Memories
To truly appreciate the genius of S’mores Sushi, one must first respect its culinary ancestor. The traditional s’more has a rich history, with the first official recipe appearing in a 1927 Girl Scouts guidebook, credited to a troop leader named Loretta Scott Crew. The name itself is a contraction of “some more,” perfectly capturing the addictive nature of the treat. For nearly a century, the formula remained largely unchanged because it is structurally and scientifically sound: the heat of the toasted marshmallow melts the chocolate just enough, while the crackers provide a sturdy, crunchy vessel to contain the gooey mess.
However, traditional s’mores have limitations. They are incredibly messy, highly weather-dependent, and frankly, a bit difficult to serve to a large crowd indoors. This is where modern culinary ingenuity steps in. By deconstructing the core components—marshmallow, chocolate, and graham-flavored crunch—and reassembling them into a tightly wound, sliceable roll, we solve the logistical problems of the campfire classic while elevating its presentation.
What is S’mores Sushi? A Modern Culinary Mashup
Do not let the word “sushi” intimidate or confuse you; there is absolutely no raw fish, seaweed, or rice vinegar involved here! The term is purely aesthetic, describing the preparation and presentation method. S’mores Sushi is a sweet, no-bake dessert roll designed to mimic the visual appeal of a maki roll.
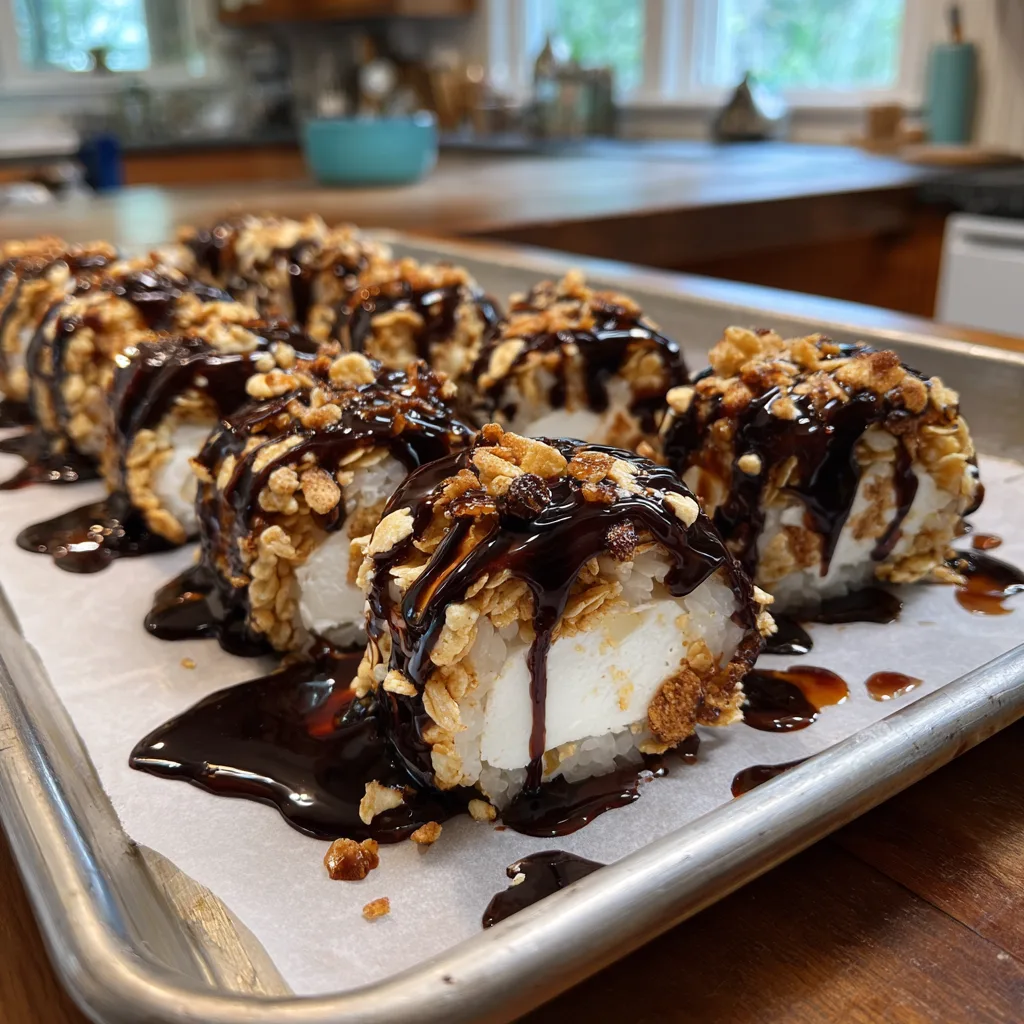
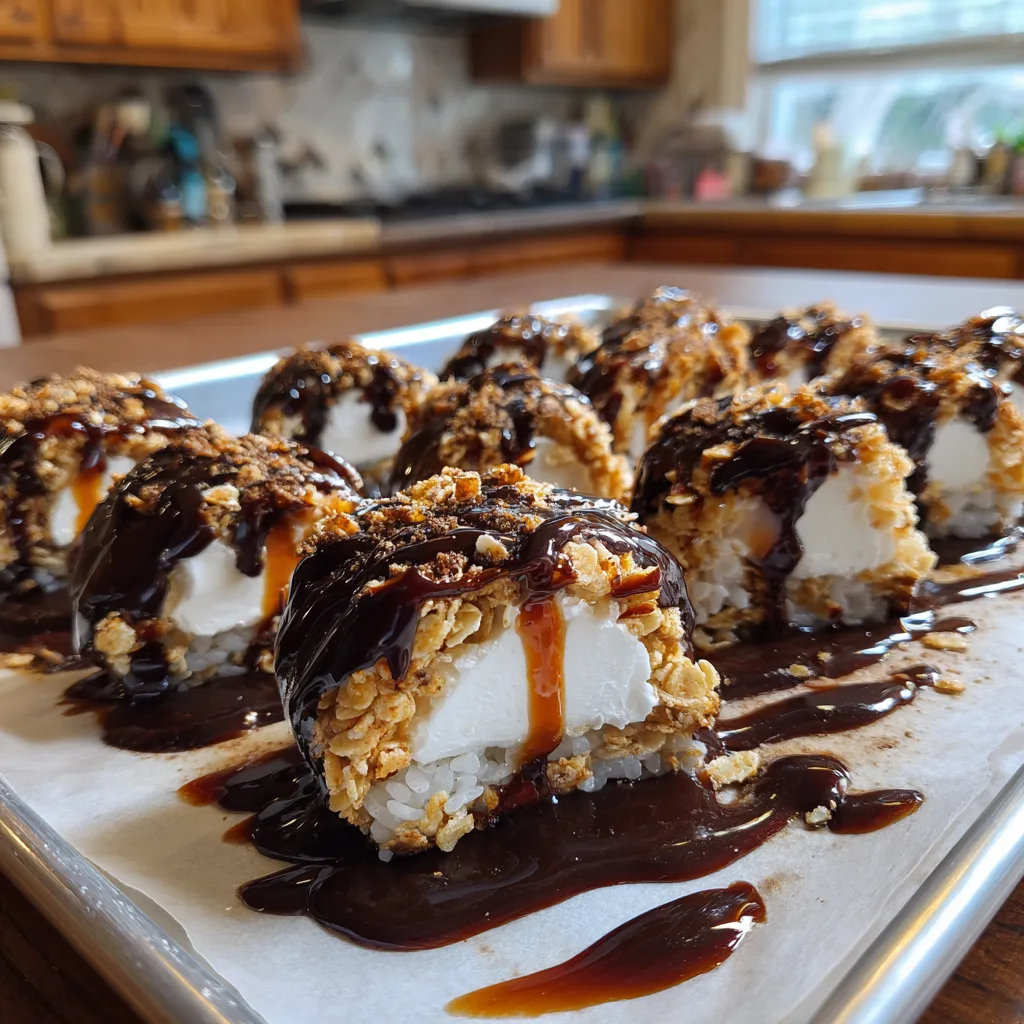
Instead of sticky rice, the “rice” layer is created using a classic crispy cereal treat mixture—specifically, Rice Krispies (or a similar toasted rice cereal) bound together with melted butter and mini marshmallows. Instead of nori (seaweed), the outer coating relies on the texture of the cereal. The “filling” consists of a thick, luxurious layer of marshmallow fluff and a solid core of rich, dark or semi-sweet chocolate. Once assembled flat, the entire concoction is rolled up tightly into a log, chilled until firm, and then sliced into perfect, bite-sized “sushi” rounds. The final touch? A heavy, glossy drizzle of melted chocolate syrup over the top, mimicking soy sauce or eel sauce, adding that final punch of cocoa flavor and visual decadence.
The Science of the Perfect Sticky Binder
The success of S’mores Sushi hinges entirely on the structural integrity of the cereal layer. If the mixture is too dry, it will crumble and crack when you attempt to roll it. If it is too wet, it will ooze and fail to hold its cylindrical shape. The secret lies in the precise ratio of butter to marshmallows, and the temperature at which they are melted.
When you melt mini marshmallows with butter, you are essentially creating a pliable sugar glass. The gelatin in the marshmallows breaks down and combines with the fat from the butter to create a sticky, stretchy binder. It is crucial to melt this mixture gently over low heat. If you boil the marshmallows, the sugar will harden too much as it cools, resulting in a rock-hard cereal layer that is impossible to slice gracefully. Gentle heat ensures the mixture remains malleable, allowing you to press it thin and roll it easily.
Deconstructing the Recipe: Essential Ingredients
This recipe requires only a handful of ingredients, making it incredibly accessible for bakers of all skill levels. Here is a breakdown of what you need and why it matters:
The Butter: Always use real, unsalted butter. It provides a rich, dairy flavor that balances the extreme sweetness of the marshmallows. Margarine contains too much water and can negatively affect the setting of the cereal layer.
The Marshmallows: You will need two types of marshmallow products for this recipe. Mini marshmallows are melted down to create the binder for the cereal. Marshmallow Fluff (or marshmallow creme) is used for the center filling. Fluff is perfect here because it remains soft and creamy even when chilled, providing a stark textural contrast to the crispy cereal exterior.
The Cereal: Standard toasted rice cereal (like Rice Krispies) is the traditional choice, providing a neutral, crispy base. However, to truly capture the s’mores flavor profile, many home cooks substitute half of the rice cereal with crushed graham crackers or graham-flavored cereal (like Golden Grahams) to emulate the classic cracker exterior.
The Chocolate: High-quality semi-sweet chocolate chips or a chopped chocolate bar work best for the center core and the top drizzle. Semi-sweet chocolate provides a necessary touch of bitterness that cuts through the intense sweetness of the marshmallow components.
Equipment Needed for Your Dessert Sushi Kitchen
You do not need an array of fancy gadgets to make this dessert, but a few specific tools will make the rolling process significantly easier:
- A Large Saucepan: For melting the butter and marshmallows evenly without burning.
- A Silicone Spatula: This is essential for stirring the sticky marshmallow mixture. Spraying the spatula with a little non-stick cooking spray will prevent sticking.
- Parchment Paper or a Silicone Baking Mat: This is your “sushi rolling mat.” You will press the cereal mixture onto this surface to prevent it from sticking to your counter, and you will use it to lift and guide the roll.
- A Rolling Pin: To flatten the cereal mixture into an even, thin rectangle.
- A Sharp, Serrated Knife: The most important tool for the final step. A serrated knife will saw through the crispy cereal without squishing the soft marshmallow and chocolate center.
Mastering the Art of the Roll: Pro Tips
Rolling the S’mores Sushi is the most intimidating part for beginners, but with a few professional tricks, you will execute it flawlessly.
Grease Everything: Marshmallow is notoriously sticky. Lightly grease your hands, your spatula, and your rolling pin with butter or non-stick cooking spray before you begin working with the warm cereal mixture. This will save you an immense amount of frustration.
Work Quickly but Gently: The cereal mixture needs to be rolled while it is still warm and pliable. If you wait too long, it will set and crack when bent. Once you spread the fluff and chocolate, begin rolling immediately. Use the parchment paper to lift the edge of the cereal rectangle, folding it tightly over the filling. Squeeze gently to compress the roll as you move forward, ensuring there are no air pockets.
The Chilling Phase is Mandatory: Do not attempt to slice the roll immediately after assembling. The marshmallow fluff and melted chocolate center will be too soft, and the pressure of the knife will cause the filling to erupt out the sides. Wrap the completed log tightly in plastic wrap and chill it in the refrigerator for at least one hour. This solidifies the chocolate core and firms up the cereal exterior, allowing for pristine, bakery-quality slices.
Creative Variations on a Classic Theme
Once you have mastered the base recipe, the possibilities for customization are endless. Here are a few creative twists to try:
Peanut Butter Cup Sushi: Spread a thin layer of creamy peanut butter over the cereal base before adding the marshmallow fluff. Use chopped peanut butter cups in the center instead of plain chocolate.
Cookies and Cream Sushi: Use chocolate-flavored rice cereal for the base, mix crushed Oreo cookies into the marshmallow fluff filling, and use white chocolate for the center and top drizzle.
Fruity Pebble Sushi: For a vibrant, colorful, kid-friendly option, swap the rice cereal for fruity sweetened cereal, omit the chocolate center, and fill simply with marshmallow fluff and perhaps a ribbon of strawberry jam.
How to Serve and Store Your Dessert Rolls
Presentation is half the fun of this recipe. Arrange your sliced S’mores Sushi neatly on a long rectangular platter to mimic a traditional sushi board. Drizzle the entire board generously with slightly warmed chocolate syrup just before serving so it looks wet, glossy, and incredibly appetizing. You can even provide chopsticks for guests who want to fully embrace the theme!
Store any leftover S’mores Sushi in an airtight container at room temperature for up to 3 days. Do not store it in the refrigerator after slicing, as the humidity can cause the cereal to become soggy and lose its signature crunch. If the chocolate drizzle hardens too much, a quick 5-second zap in the microwave will soften it right back up.
Ingredients
– 1/4 cup unsalted butter
– 10 oz. mini marshmallows (about 1 standard bag)
– 5 cups Rice Krispies cereal (or a mix of rice cereal and crushed graham cereal)
– 2 cups Marshmallow Fluff (marshmallow creme)
– 1 cup semi-sweet chocolate chips (divided use for filling and drizzle)
– Non-stick cooking spray
Step-by-Step Instructions
1. Prepare Your Workspace: Lay out a large sheet of parchment paper or a silicone baking mat on your counter. Lightly spray it with non-stick cooking spray. Spray a rolling pin and a silicone spatula as well.
2. Melt the Binder: In a large saucepan over medium-low heat, melt the unsalted butter. Once melted, add the mini marshmallows. Stir continuously with your greased spatula until the marshmallows are completely melted and the mixture is smooth. Remove from heat immediately.
3. Mix in the Cereal: Add the 5 cups of Rice Krispies cereal to the melted marshmallow mixture. Stir vigorously until all the cereal is evenly coated and sticky.
4. Form the Base: Turn the warm cereal mixture out onto your prepared parchment paper. With greased hands, press it out roughly into a rectangle. Use your greased rolling pin to roll the mixture into a flat, even, tight rectangle, about 1/2-inch thick.
5. Add the Fillings: Spread the 2 cups of Marshmallow Fluff evenly over the flattened cereal rectangle, leaving a 1-inch border bare around all edges to prevent spilling. Melt 1/2 cup of the chocolate chips in the microwave and drizzle it in a thick line straight down the center of the fluff horizontally.
6. Roll the Sushi: Starting from the long edge closest to you, use the parchment paper to lift the cereal base and fold it tightly over the chocolate and fluff center. Continue rolling tightly, peeling back the parchment paper as you go, until you have formed a solid log. Press the seam firmly to seal it.
7. Chill: Wrap the completed log tightly in plastic wrap or parchment paper. Place it in the refrigerator for at least 1 hour to allow the fluff and chocolate to set and firm up.
8. Slice and Drizzle: Remove the log from the fridge and unwrap it. Using a sharp, serrated knife, gently saw the log into 1-inch thick slices, wiping the knife clean between cuts if necessary. Arrange the slices on a platter. Melt the remaining 1/2 cup of chocolate chips and drizzle heavily over the top of the sushi pieces.
9. Serve: Serve immediately and enjoy the crunchy, gooey, chocolatey perfection of your homemade S’mores Sushi!
Conclusion
S’mores Sushi is a brilliant testament to the fact that playing with your food can lead to extraordinary culinary creations. By taking the beloved, rustic flavors of a campfire classic and presenting them in a highly stylized, accessible, and incredibly fun format, you create a dessert that appeals to the child in all of us. The contrast between the crunchy cereal exterior, the pillowy soft marshmallow fluff, and the rich, snapping chocolate center is truly a masterpiece of texture and taste. So gather your ingredients, roll up your sleeves, and prepare to amaze your friends and family with this unforgettable, no-bake delight.
S’mores Sushi
Ingredients
Equipment
Method
- Lay out a sheet of parchment paper and spray with non-stick cooking spray. Spray a rolling pin and spatula.
- In a large saucepan over medium-low heat, melt the butter. Add the mini marshmallows and stir continuously until completely melted and smooth.
- Remove from heat and quickly stir in the Rice Krispies cereal until fully coated.
- Turn the mixture onto the greased parchment. Using greased hands and a rolling pin, flatten it into an even 1/2-inch thick rectangle.
- Spread the Marshmallow Fluff evenly over the rectangle, leaving a 1-inch border. Melt 1/2 cup chocolate chips and drizzle horizontally down the center.
- Using the parchment to help, tightly roll the cereal mixture into a log, pressing the seam to seal.
- Wrap the log tightly and chill in the refrigerator for at least 1 hour until firm.
- Unwrap and slice into 1-inch rounds using a sharp serrated knife.
- Arrange slices on a platter. Melt the remaining 1/2 cup of chocolate chips and drizzle heavily over the top before serving.