The Ultimate No-Bake Oreo Dirt Cake
The Ultimate No-Bake Oreo Dirt Cake: A Chocolate Lover’s Dream
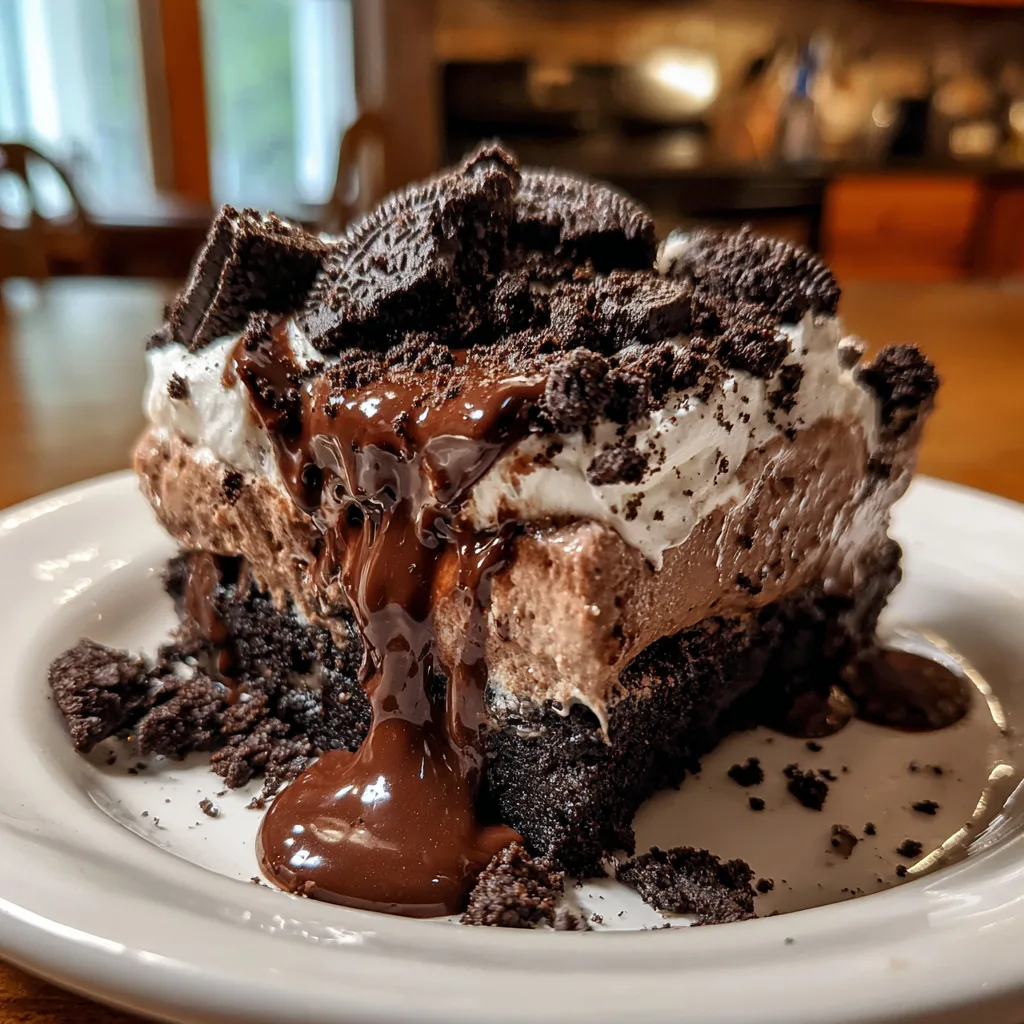
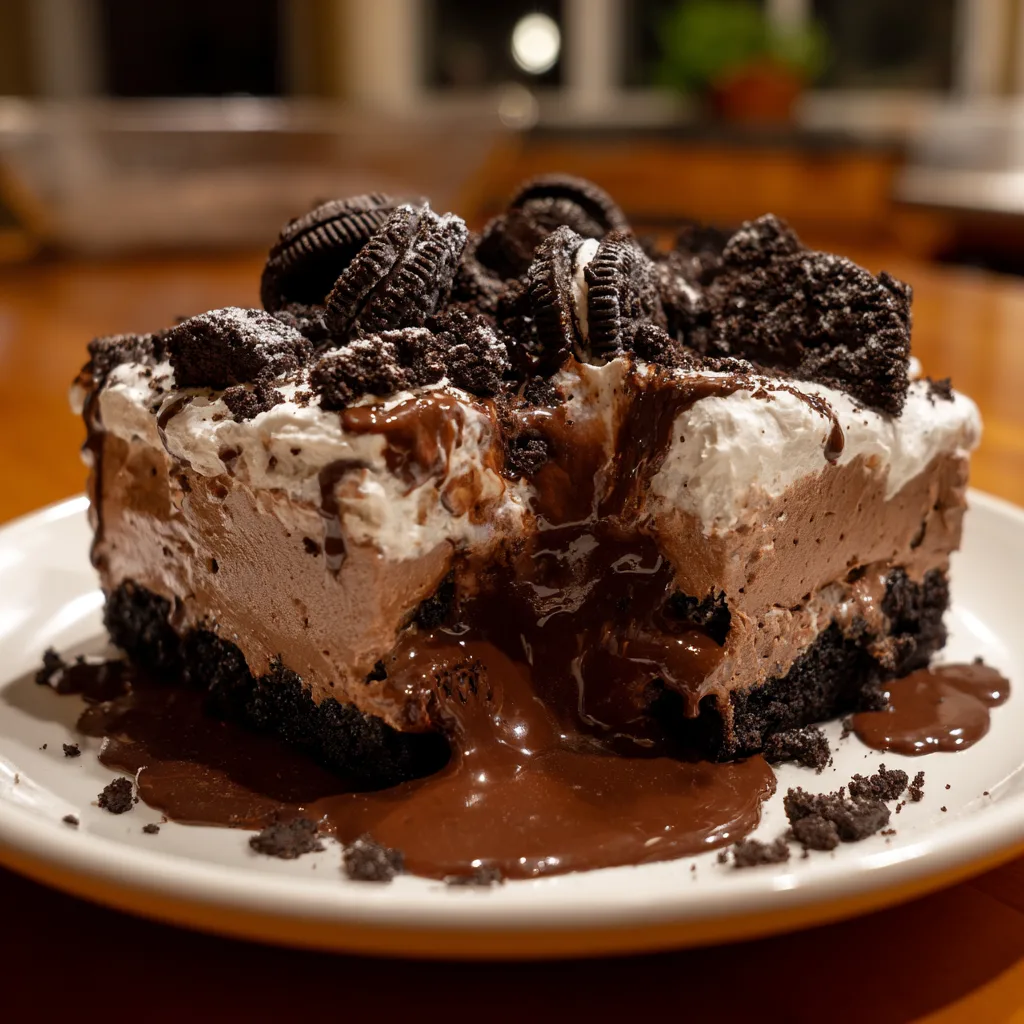
If you are looking for the perfect crowd-pleasing dessert that requires zero baking and delivers maximum flavor, look no further than this Oreo Dirt Cake. Often referred to as “Oreo Delight” or “Chocolate Lasagna,” this dessert is a nostalgic classic that combines the crunchy, dark cocoa flavor of crushed cookies with velvety layers of sweetened cream cheese and rich chocolate pudding. It is the ultimate comfort food, perfect for summer BBQs, holiday potlucks, or just a Tuesday night when you need a serious chocolate fix.
Unlike traditional cakes that can be dry or fussy to bake, this dirt cake is all about texture and moisture. It is cool, creamy, and decadently smooth. The contrast between the softened cookie layers and the airy whipped filling creates a mouthfeel that is absolutely addictive. Plus, because it is a “icebox” style cake, it actually gets better as it sits in the fridge, allowing the flavors to meld and the cookies to soften into a cake-like consistency. Whether you are a novice cook or a seasoned baker, this recipe is foolproof and guaranteed to have your guests scraping the pan clean.
Why You Will Love This Recipe
There is a reason this dessert has remained a staple at family gatherings for decades. Here is why this specific version stands out:
- No Oven Required: This is completely no-bake, keeping your kitchen cool during hot months and saving you time.
- Texture Heaven: The combination of crunchy toppings, creamy mousse, and silky pudding is unmatched.
- Make-Ahead Friendly: This dessert needs time to set, making it the perfect candidate for preparing the day before an event.
- Highly Customizable: While this recipe sticks to the classic chocolate and vanilla profile, you can easily swap pudding flavors or cookie types.
Ingredients
The beauty of this recipe lies in its simplicity. You don’t need fancy equipment or hard-to-find ingredients. Everything here can be found at your local grocery store.
For the Crust and Topping:
- – 1 package (14.3 oz) Oreo cookies (regular or Double Stuf work equally well)
- – 1/2 cup unsalted butter, melted
For the Cream Cheese Layer:
- – 1 block (8 oz) cream cheese, softened to room temperature
- – 1 cup powdered sugar (confectioners’ sugar)
- – 1 tub (8 oz) Cool Whip (whipped topping), thawed
- – 1 teaspoon vanilla extract
For the Chocolate Pudding Layer:
- – 2 packages (3.9 oz each) instant chocolate pudding mix
- – 3 cups cold whole milk (whole milk yields the creamiest result)
Step-by-Step Instructions
Follow these steps to build the perfect layered dessert. The key is patience between layers to ensure distinct, beautiful strata when you cut into it.
1. Prepare the Cookie Crumble
Place the Oreo cookies (entire cookies, including the filling) into a food processor. Pulse until you have fine crumbs. If you like a bit of texture, leave a few larger chunks. Reserve about 1 cup of the crumbs for the topping. Mix the remaining crumbs with the melted butter in a medium bowl until the mixture resembles wet sand.
2. Create the Base
Press the buttered cookie crumbs firmly into the bottom of a 9×13 inch baking dish. You can use the bottom of a measuring cup or glass to pack it down evenly. Place the dish in the refrigerator to chill while you prepare the fillings.
3. Make the Cream Cheese Filling
In a large mixing bowl, beat the softened cream cheese, butter, and powdered sugar with a hand mixer until smooth and creamy. There should be no lumps. Add the vanilla extract. Gently fold in the thawed Cool Whip using a rubber spatula. Be careful not to over-mix, as you want to keep the mixture light and airy. Spread this white layer carefully over the chilled crust.
4. Whip Up the Pudding
In a separate bowl, whisk together the instant chocolate pudding mix and cold milk. Whisk vigorously for about 2 minutes until the pudding starts to thicken. Let it sit for another 2-3 minutes to soft-set.
5. Assemble the Layers
Spread the chocolate pudding layer evenly over the cream cheese layer. Use an offset spatula to smooth the top. Finally, sprinkle the reserved cup of Oreo crumbs over the top of the wet pudding layer.
6. Chill and Serve
Cover the dish with plastic wrap and refrigerate for at least 4 hours, though overnight is best. This allows the layers to firm up and the flavors to marry. Serve chilled.
Tips for the Perfect Dirt Cake
Temperature Matters: Ensure your cream cheese is completely at room temperature before mixing. If it is cold, you will end up with small lumps in your white layer that are impossible to whisk out later. Conversely, ensure your milk is very cold for the pudding to set properly.
Clean Cuts: This dessert can be messy (hence the name!), but for cleaner slices, place the dessert in the freezer for about 30 minutes before serving. Use a sharp knife and wipe it clean between cuts.
Whipped Topping vs. Real Cream: While Cool Whip stabilizes the dessert better for potlucks, you can use homemade stabilized whipped cream if you prefer. Just be aware it may not hold its shape as firmly over several days.
Variations to Try
The “Gummy Worm” Classic: If you are serving this for a children’s birthday party or Halloween event, add gummy worms crawling out of the “dirt” topping. It is a classic presentation that kids adore.
Mint Chocolate: Swap the regular Oreos for Mint Oreos and add a drop of peppermint extract to the cream cheese layer for a refreshing twist.
Peanut Butter Lover’s: Mix 1/2 cup of creamy peanut butter into the cream cheese mixture, or swap the chocolate pudding for chocolate-peanut butter pudding.
Golden Dirt Cake: Use Golden Oreos and vanilla pudding for a blonde version of this dessert. It is just as sweet and creamy but with a vanilla-forward profile.
Serving Suggestions
This Oreo Dirt Cake is rich, so a small square goes a long way. It pairs beautifully with a glass of cold milk or a hot cup of coffee to cut through the sweetness. Because it is visually layered, serving it in clear glass cups or trifle bowls can make for an elegant individual presentation. If you are hosting a party, you can even make “dirt cups” by layering the ingredients in small plastic cups, making serving effortless.
Storage and Leftovers
Leftovers should be covered tightly with plastic wrap or a lid and stored in the refrigerator. The cake will stay fresh for up to 3-4 days. In fact, many people find that it tastes even better on day two as the cookie crust softens further. We do not recommend freezing the fully assembled cake, as the pudding texture can become watery upon thawing.
Nutritional Note
While this is certainly an indulgent treat, you can make lighter modifications. Using sugar-free pudding mix, light cream cheese, and light whipped topping can significantly reduce the sugar and calorie count without sacrificing the creamy texture that makes this dessert famous.
Conclusion
There is something timeless about an Oreo Dirt Cake. It bridges the gap between childhood nostalgia and adult indulgence. The combination of textures—from the grainy, sweet cookie earth to the smooth, luxurious pudding mud—makes every bite interesting. It is the kind of dessert that disappears first at any gathering, leaving behind only a few stray crumbs and many happy guests. Give this recipe a try for your next event, and get ready to share the recipe with everyone who takes a bite!
Oreo Dirt Cake
Ingredients
Equipment
Method
- Place Oreos in a food processor and pulse into crumbs. Reserve 1 cup for topping.
- Mix remaining crumbs with melted butter. Press firmly into bottom of 9×13 dish. Chill.
- Beat softened cream cheese, butter, and powdered sugar until smooth. Mix in vanilla.
- Fold in thawed Cool Whip gently until combined. Spread over crust.
- Whisk pudding mix and cold milk for 2 minutes until thickened.
- Spread pudding layer over cream cheese layer. Top with reserved Oreo crumbs.
- Refrigerate for at least 4 hours to set before slicing.