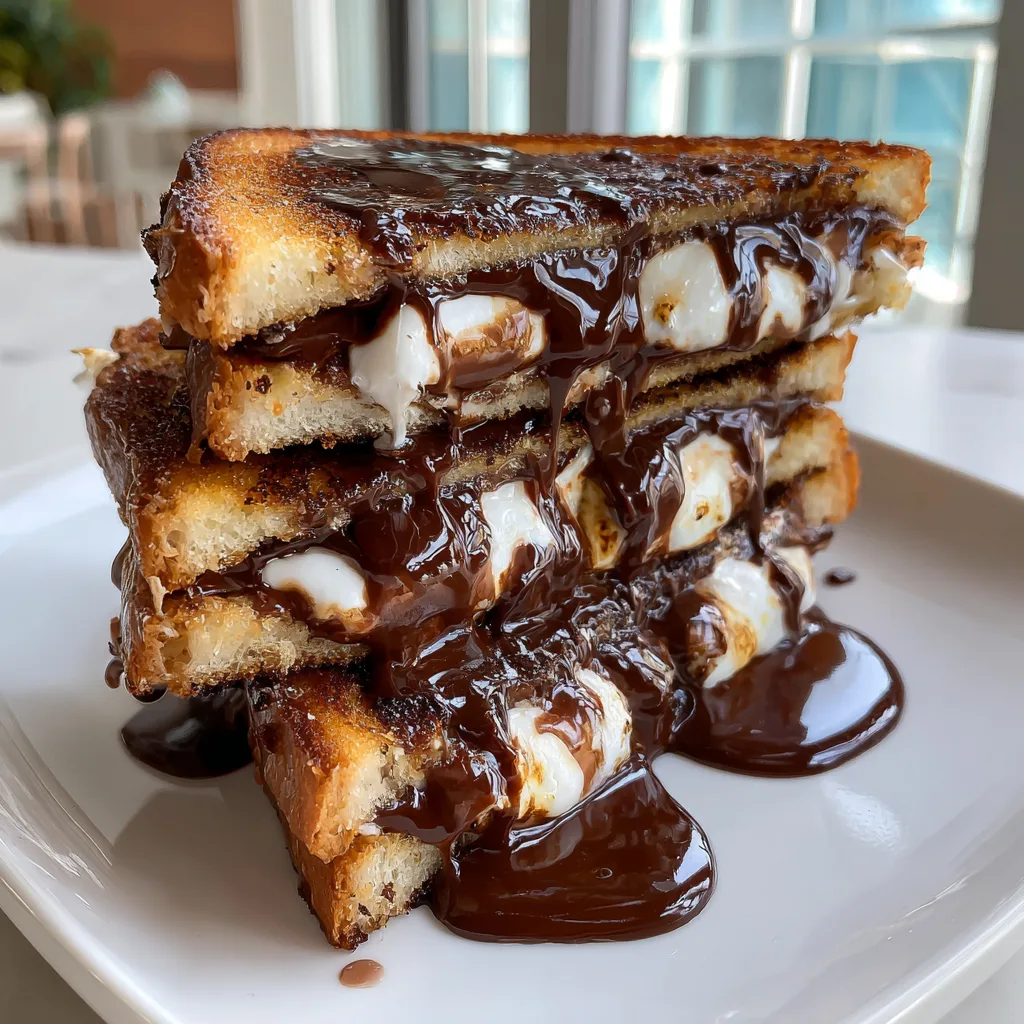
S’mores Grilled Cheese
The Ultimate S’mores Grilled Cheese: A Campfire Classic Transformed into an Indoor Dessert Masterpiece
There is a profound, almost universal nostalgia tied to the flavor profile of a classic s’more. The mere mention of it conjures images of crackling autumn campfires, crisp evening air, laughing with friends, and the smoky, sweet aroma of marshmallows roasting on the ends of sharpened twigs. However, satisfying that very specific craving for toasted marshmallow, melting chocolate, and buttery crunch usually requires a fire pit, favorable weather, and a commitment to smelling like woodsmoke for the rest of the evening. But what if you could capture that exact, magical trio of flavors from the absolute comfort of your own kitchen, any time of the year, rain or shine? Enter the phenomenal culinary invention known as the S’mores Grilled Cheese.
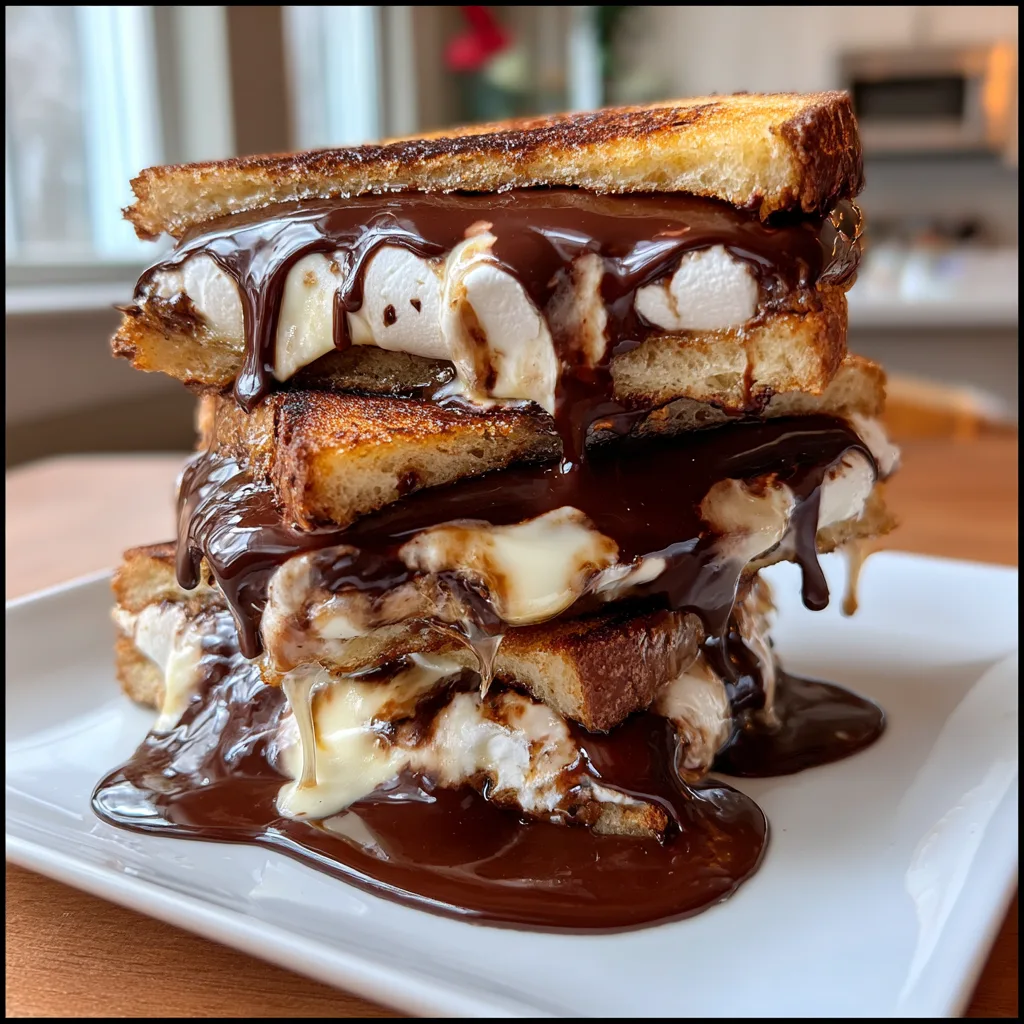
This recipe is a brilliant, beautiful collision of two beloved comfort foods: the warm, buttery, pan-toasted perfection of a diner-style grilled cheese sandwich, and the gooey, unapologetic sweetness of a traditional campfire s’more. By swapping out the savory cheese for a thick layer of rich chocolate and pillowy marshmallows, and grilling the bread in butter until it achieves a spectacular golden-brown crunch, you create a dessert sandwich that is quite frankly out of this world. It is the perfect impromptu dessert, a spectacular after-school treat for kids, and a decadent late-night indulgence for adults. In this comprehensive guide, we will explore exactly how to master the art of the indoor s’more, ensuring your chocolate is perfectly molten and your bread is flawlessly crisped every single time.
Why You Will Be Obsessed with the S’mores Grilled Cheese
It is incredibly easy to fall in love with this recipe, and the reasons go far beyond its obvious visual appeal. First and foremost is the sheer convenience factor. Traditional s’mores require planning, outdoor space, and specific conditions. The S’mores Grilled Cheese requires nothing more than a skillet, a stovetop, and about ten minutes of your time. It completely democratizes the s’more experience, bringing it indoors and making it accessible on a whim, whether you are dealing with a snowy Tuesday night or a rainy Sunday afternoon.
Secondly, the texture contrast in this sandwich is arguably superior to the traditional graham cracker version. While graham crackers are delicious, they can be brittle, dry, and prone to shattering into a million messy crumbs upon the first bite, squeezing the filling out the sides. A perfectly pan-toasted slice of bread, however, offers a sturdy yet yielding exterior. The buttered, crispy outside provides that essential crunch, while the soft interior of the bread acts like a sponge, absorbing the edges of the melting chocolate and marshmallow, holding the sandwich securely together. The structural integrity is vastly improved, allowing for a much cleaner (though still wonderfully gooey) eating experience.
Finally, the introduction of a buttery, slightly salty crust elevates the flavor profile tremendously. Traditional s’mores can sometimes lean too far into cloying sweetness. The savory notes of salted butter used to toast the bread help to cut through the intense sugar of the marshmallow and chocolate, providing a beautifully balanced, sweet-and-salty dynamic that keeps you coming back for another bite.
Deconstructing the Ingredients: Building the Perfect Dessert Sandwich
Because this recipe utilizes so few ingredients, the quality and type of each component will drastically affect the final outcome. Let us break down exactly what you need to build the ultimate S’mores Grilled Cheese.
- – 4 slices of bread: The foundation of your dessert. While standard white sandwich bread works perfectly well and provides a wonderful nostalgic feel, you can elevate this dish by using brioche or challah. These egg-enriched breads are naturally slightly sweeter, incredibly tender, and toast up to a brilliant golden color. If you prefer a sturdier, slightly tangy contrast, a mild sourdough is a surprisingly fantastic choice.
- – 2 tablespoons of salted butter, softened: Butter is non-negotiable for achieving that iconic grilled cheese crust. It must be salted butter; the hint of salt is crucial for balancing the sweetness of the filling. Ensure it is softened to room temperature so it spreads smoothly and evenly over the bread without tearing the delicate crumb.
- – 1 cup of chocolate: You have a few options here. Standard milk chocolate bars (broken into pieces) provide the most authentic s’mores flavor. However, high-quality semi-sweet chocolate chips or dark chocolate bars are excellent if you prefer a richer, less intensely sweet profile. You can even use a chocolate hazelnut spread if you are in a pinch.
- – 1 cup of marshmallows: Mini marshmallows are generally the easiest to work with for this recipe, as they distribute evenly across the bread and melt uniformly. If you only have large marshmallows, simply cut them in half lengthwise so they lay flat against the bread. Alternatively, a thick smear of marshmallow fluff (creme) works beautifully and guarantees a supremely gooey center.
- – 2 tablespoons of crushed graham crackers (optional): If you are a purist who firmly believes a s’more isn’t a s’more without graham crackers, you can include them! Crushing them lightly and sprinkling the crumbs inside the sandwich before grilling adds that signature honey-wheat flavor and an extra layer of hidden crunch.
Step-by-Step Instructions to Melty Perfection
Making a dessert grilled cheese requires a slightly different technique than its savory counterpart. Sugar burns much faster than cheese, so temperature control is paramount. Follow these detailed steps for flawless execution.
- Prep your workspace and ingredients: Begin by making sure your butter is truly softened. Trying to spread cold, hard butter will destroy your bread. If using large chocolate bars, break them into smaller, uniform squares. If using large marshmallows, slice them in half carefully with a damp knife (the moisture prevents sticking). Have your graham cracker crumbs ready if you are using them.
- Butter the bread: Take your four slices of bread. Using a butter knife, generously and evenly coat one side of each slice with the softened salted butter. Make sure to spread it all the way to the absolute edges—this guarantees a uniformly crispy crust without any burnt, dry corners.
- Assemble the sandwiches: Place two slices of bread onto a clean cutting board, buttered side facing down. On the unbuttered side facing up, begin layering your chocolate. Try to keep the chocolate slightly away from the very edge of the bread so it doesn’t immediately leak into the pan when it melts. Next, add an even, generous layer of marshmallows (or a thick spread of marshmallow fluff) directly on top of the chocolate. Sprinkle with graham cracker crumbs if desired. Finally, top with the remaining two slices of bread, buttered side facing outward.
- Heat the skillet: Place a non-stick skillet or a well-seasoned cast-iron pan on the stove. Turn the heat to medium-low. Do not rush this process with high heat! High heat will instantly burn the buttered bread long before the thick layers of chocolate and marshmallow have a chance to soften and melt. Low and slow is the absolute secret to success here.
- Grill the sandwiches: Once the pan is warm, carefully place the assembled sandwiches into the skillet. Let them cook undisturbed for about 3 to 4 minutes. You are looking for the bottom slice of bread to turn a rich, golden brown. You should also start to see the bottom layer of chocolate just beginning to soften and glisten.
- The critical flip: Using a wide spatula, very carefully and swiftly slide under the sandwich and flip it over. Because the filling is bulky, it might try to slide—use your free hand (or another spatula) to guide it gently. Press down very lightly with the spatula to encourage the bread to make contact with the pan and the ingredients to meld together.
- Finish the melt: Cook on the second side for another 3 to 4 minutes. If the bread is browning nicely but the marshmallows are still stubborn, you can place a lid over the skillet for the final minute. This traps the heat, creating an oven effect that encourages the marshmallows to rapidly soften and turn into molten perfection without burning the bread.
- Rest and serve: Once both sides are beautifully golden and the filling is oozing out the sides, remove the sandwiches from the skillet to a cutting board. Let them rest for just one minute—this prevents the liquid lava chocolate from pouring out completely when cut. Slice diagonally and serve immediately while still warm and gloriously messy.
Pro Tips and Troubleshooting for the Best Experience
While making a grilled cheese seems foolproof, working with pure sugar and chocolate introduces a few variables. To avoid common pitfalls, keep these expert tips in mind.
First, beware the “sugar burn.” Chocolate, especially milk chocolate, contains a high amount of sugar and milk solids, which will scorch rapidly if it makes direct contact with a hot pan. This is why we advise keeping the filling slightly centralized. If chocolate does leak out into the pan, wipe it away with a paper towel before it burns and imparts a bitter flavor to the outside of your bread.
Second, consider the bread-to-filling ratio. It can be tempting to stack your sandwich a mile high with marshmallows, but as they heat, they expand before they melt. If you overload the sandwich, it will become impossible to flip without the contents exploding everywhere. Moderation is key; a single layer of chocolate and a single layer of marshmallows is usually sufficient to achieve a magnificent, gooey center.
Lastly, for an extra decadent crust, try a technique known as the “sugar crust.” After buttering the outside of your bread slices, sprinkle a tiny pinch of granulated sugar over the butter before placing it in the pan. The sugar will caramelize as it cooks, creating a brulée-like, crackling exterior that contrasts incredibly well with the soft interior.
Creative Variations: Beyond the Basic S’more
The standard S’mores Grilled Cheese is a masterpiece, but it also serves as a phenomenal canvas for flavor experimentation. Once you have mastered the basic technique, try incorporating these delicious twists to keep things exciting.
The Fruit and Nut: Introduce a layer of thinly sliced fresh strawberries or bananas. The fruit adds a bright, fresh flavor that cuts through the heavy richness of the chocolate. Alternatively, swap out the chocolate bars for a thick layer of peanut butter or almond butter. The combination of salty peanut butter, sweet marshmallow, and toasted bread is reminiscent of a fluffernutter sandwich but infinitely better.
The Salted Caramel: For a sophisticated, gourmet twist, use dark chocolate chips, a layer of marshmallows, and a generous drizzle of thick caramel sauce. Sprinkle a pinch of flaky sea salt on the inside before closing the sandwich. The complex interplay of bitter dark chocolate, sweet caramel, and sharp salt is absolutely breathtaking.
The Cookie Monster: Instead of graham cracker crumbs, crush up chocolate chip cookies, Oreos, or Biscoff cookies and add them to the center of the sandwich. This adds a fantastic textural element and shifts the flavor profile dramatically depending on the cookie you choose.
Serving Suggestions: Completing the Dessert Experience
Because the S’mores Grilled Cheese is so intensely rich and sweet, pairing it with the right beverage is essential to balance the palate. A tall, ice-cold glass of whole milk is the traditional and arguably perfect accompaniment. The cold milk provides a refreshing contrast to the hot, gooey sandwich and helps wash down the sticky sweetness.
If you are serving this during the colder months, pairing it with a slightly bitter, robust beverage works wonders. A strong cup of black coffee or a shot of espresso cuts through the sugar beautifully. Alternatively, a mug of hot cocoa (perhaps not as sweet as the sandwich!) makes for a ridiculously cozy, ultimate chocolate-lover’s dessert pairing.
The Cultural Phenomenon of the S’more
To truly appreciate this sandwich, it is fun to look back at the origins of its inspiration. The first recorded recipe for “Some Mores” appeared in the 1927 publication “Tramping and Trailing with the Girl Scouts.” It was credited to a troop leader named Loretta Scott Crew. The recipe was brilliantly simple and designed to quickly feed hungry children around a fire.
Over nearly a century, the s’more has evolved from a simple scouting treat into a defining flavor of American culture. We see s’mores-flavored cereals, ice creams, coffee creamers, and high-end bakery pastries. The S’mores Grilled Cheese is simply the latest, and perhaps greatest, evolution of this historic flavor profile. It takes a cherished outdoor tradition and adapts it for modern, fast-paced, indoor living, proving that true culinary classics can always be reimagined to fit our current lives without losing the magic that made them beloved in the first place. So heat your skillet, grab your butter, and prepare to experience the campfire classic in a wonderfully new, intensely comforting way.
S’mores Grilled Cheese
Ingredients
Equipment
Method
- Butter one side of each slice of bread completely to the edges using the softened salted butter.
- Place two slices of bread, butter side down, on a clean surface. Layer the unbuttered side with chocolate pieces and marshmallows. Sprinkle with graham cracker crumbs if using.
- Top with the remaining two slices of bread, butter side facing out.
- Heat a skillet over medium-low heat. Place the sandwiches in the pan and cook for 3-4 minutes until the bottom is golden brown.
- Carefully flip the sandwiches using a spatula and cook the other side for another 3-4 minutes. (Cover with a lid for the last minute if the marshmallows need help melting).
- Remove from heat, let rest for 1 minute so the filling sets slightly, cut in half, and serve immediately.