Beaded Spiral Pine Ornament Crochet Pattern
📖 B. INTRODUCTION
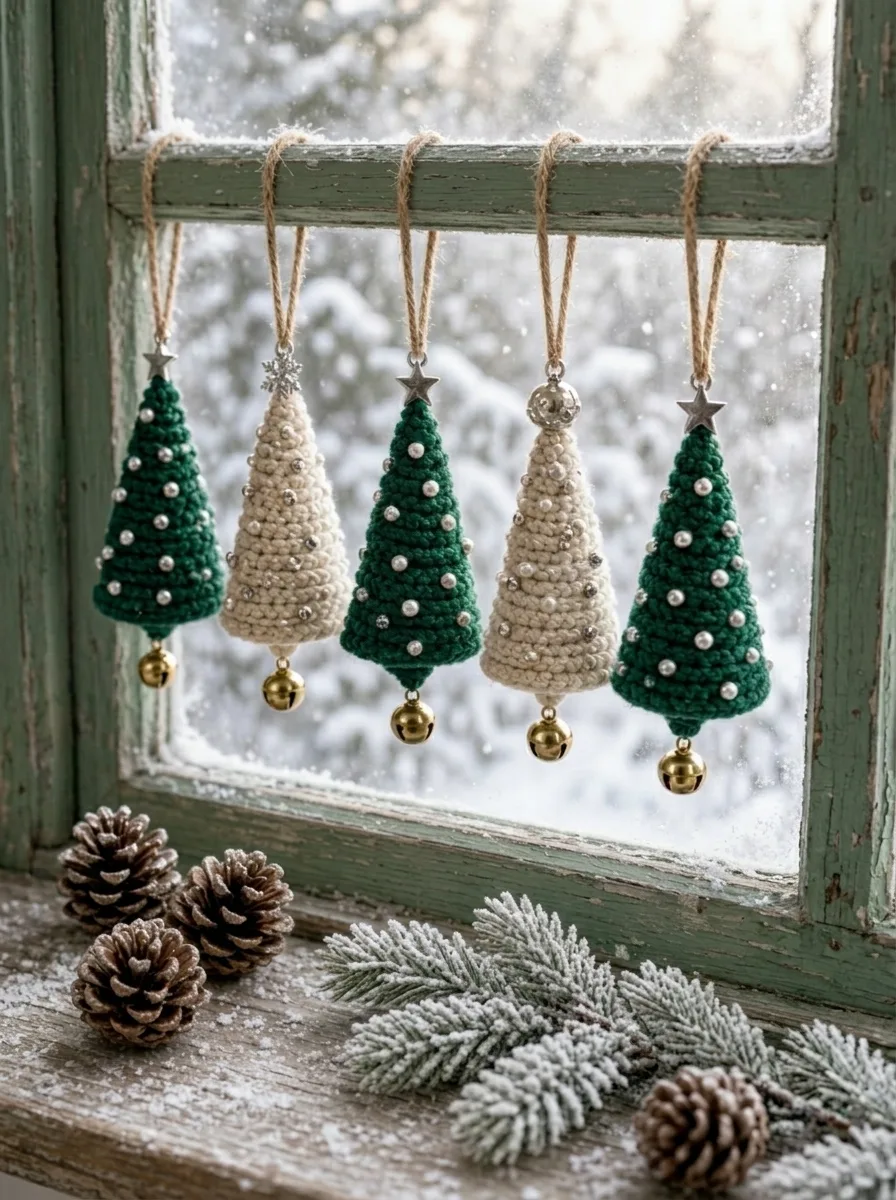
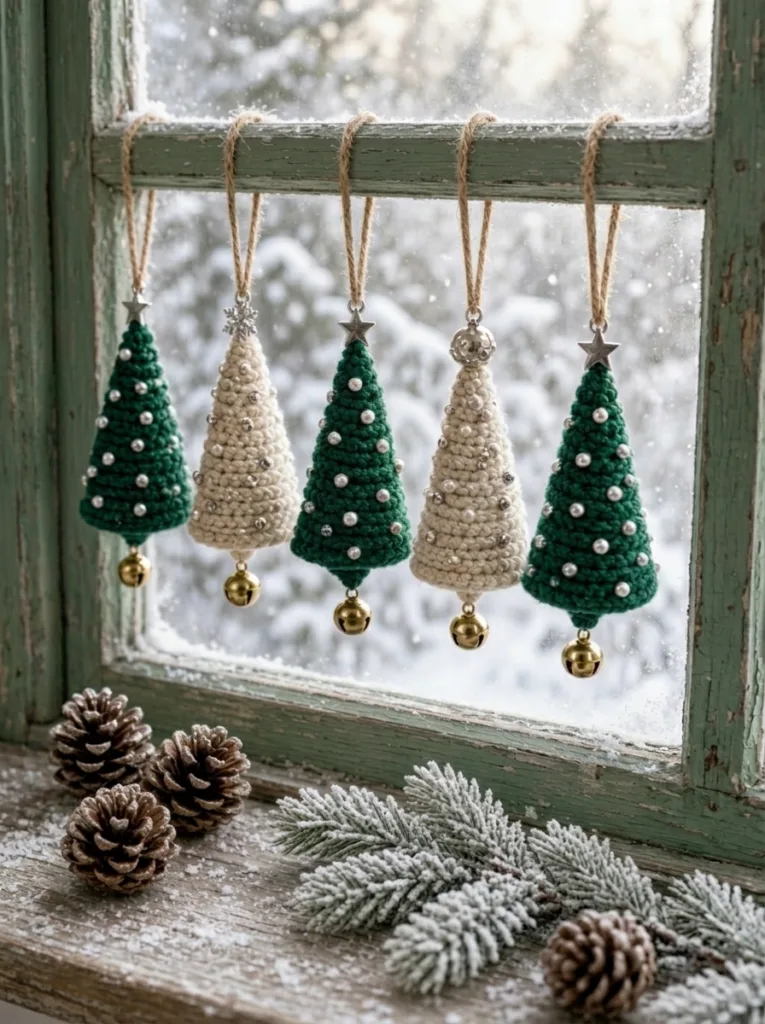
Bring timeless rustic charm and delicate sparkle to your holiday decor with these handcrafted Beaded Spiral Pine Ornaments. Combining clean, minimalist geometry with classic holiday embellishments, these tree-shaped ornaments offer a sophisticated twist on traditional festive crochet. Whether worked in deep forest green or soft cream alabaster, each cone-shaped pine ornament features a subtle textured spiral, delicate scattered pearls, a gleaming star or snowflake topper, and a charming metal jingle bell dangling at the base.
These pine ornaments make wonderfully satisfying quick-crochet projects during the holiday season. They are perfect as heirloom Christmas tree decorations, window sill accents, mantel garland pieces, or elevated gift tags tied onto holiday packages. Because they work up quickly using small amounts of yarn, you can easily craft a coordinated set in an evening or two using your favorite seasonal color palette.
The visual beauty of this design lies in its neat, crisp conical silhouette balanced by tactile embellishments. By altering yarn shades, bead finishes, or metallic findings, you can easily customize each ornament to suit rustic farmhouse decor, Scandinavian winter styles, or vibrant vintage Christmas themes.
This comprehensive guide covers everything you need to create your own set of ornaments, including step-by-step instructions for a seamless cone construction, two distinct bead placement techniques, hardware assembly, and professional finishing methods.
🔍 C. MAIN PATTERN OVERVIEW
The Beaded Spiral Pine Ornament features a structured, top-down conical body worked in seamless continuous rounds. The smooth tapering silhouette is achieved through gradual, evenly spaced single crochet increases. The bottom edge turns inward via a clean back-loop-only transition, closing into a flat, well-stuffed base disk that holds its crisp cone shape.
Each ornament incorporates four primary design elements:
- 🌲 Conical Pine Body: A firm, 3D stitched cone stuffed with fiberfill to maintain structure.
- ⚪ Scattered Pearl & Seed Beads: Delicate pearl beads (4mm to 6mm) and metallic accents scattered across the pine surface for a frosted winter look.
- ⭐ Apex Hardware Topper: A metallic star charm, snowflake charm, or decorative bead cap fitted tightly to the pointed top.
- 🔔 Jingle Bell Base Accent: A metallic jingle bell suspended from the center of the bottom base plate, adding weight and auditory charm.
- 🪢 Rustic Jute Hanging Loop: Natural twin cord knotted through the top for easy hanging on branches or hooks.
🎯 D. SKILL LEVEL
Level: Easy / Advanced Beginner
This project is suitable for crocheters who are comfortable with basic amigurumi fundamentals.
Techniques Required:
- ⭕ Working in a Magic Ring (MR)
- 🧶 Single Crochet (sc) in continuous rounds
- 📈 Single Crochet Increase (inc)
- 📉 Invisible Decrease (dec)
- ➰ Working in Back Loops Only (BLO)
- 🧵 Basic hand sewing and bead placement
- ✂️ Hardware attachment and securing tails
📏 E. FINISHED SIZE
- 📏 Height (Cone Body Only): ~12.5 cm (~5.0 inches)
- 📏 Width (Base Diameter): ~6.5 cm (~2.5 inches)
- 📏 Total Hanging Length (Loop to Bell): ~22 cm (~8.5 inches)
Note: Finished measurements will vary depending on your yarn weight, hook size, and stuffing density. Working with a smaller hook creates a firmer stitch texture that helps the cone maintain its sharp geometric shape.
🧮 F. GAUGE
- 📐 Gauge: 22 single crochet stitches x 24 rounds = 10 cm x 10 cm (4″ x 4″) using a 2.5 mm crochet hook.
Gauge is not critical for this project, but tension should be tight and consistent to prevent fiberfill stuffing from showing through the stitches.
🧶 G. REQUIRED YARN AMOUNTS
The pattern uses light worsted / DK weight (Category 3) or Sport weight (Category 2) mercerized cotton yarn for a crisp stitch definition.
- 🟢 Forest Green Ornament: Approx. 25 grams / 62 meters (68 yards) per ornament.
- ⚪ Cream / Off-White Ornament: Approx. 25 grams / 62 meters (68 yards) per ornament.
- 🧵 Total for Set of 5 Ornaments: Approx. 125 grams / 310 meters (340 yards).
🧰 H. MATERIALS
- 🪡 Crochet Hook: 2.5 mm (US C/2 or B/1)
- 🧶 Yarn: DK or Sport weight cotton yarn in Forest Green and Cream
- ⚪ Pearl Beads: 20–25 white faux pearl beads (4mm and 6mm mixed) per ornament
- 🔘 Metallic Seed Beads: 15–20 silver or gold glass seed beads (Size 6/0 or 8/0) per ornament
- 🔔 Jingle Bells: 12mm–15mm brass or silver metal jingle bells (1 per ornament)
- ⭐ Topper Charms: Metal star or snowflake charms/bead caps (1 per ornament)
- 🪢 Hanging Cord: Natural jute twine or hemp cord (approx. 30 cm / 12 inches per ornament)
- ☁️ Stuffing: Premium polyester fiberfill
- 🪡 Notions: Fine bead needle, embroidery needle, tapestry needle, stitch marker, scissors, sewing thread
⚠️ Safety Note: Small beads, bells, and charms present a choking hazard. Keep these ornaments out of reach of unsupervised infants and small children.
🔤 I. ABBREVIATIONS – US TERMS
- 🔴 MR: Magic Ring
- 🧶 sc: Single crochet
- 📈 inc: Single crochet increase (2 sc in same stitch)
- 📉 dec: Invisible single crochet decrease (sc 2 together using front loops)
- ➰ BLO: Back Loop Only
- ⭕ st(s): Stitch(es)
- 🔄 Rnd(s): Round(s)
- 🧵 sl st: Slip stitch
- 🔗 ch: Chain
- 🪡 b-sc: Bead single crochet (optional pre-strung method)
📝 J. NOTES BEFORE YOU BEGIN
- 🔄 Continuous Rounds: The cone body is worked in a continuous spiral. Do not join rounds with a slip stitch or chain 1 unless explicitly instructed.
- 📍 Stitch Markers: Place a stitch marker in the first stitch of every round and move it up as you progress to track stitch counts accurately.
- ☁️ Stuffing Strategy: Stuff the cone firmly as you reach the lower rounds. Pay special attention to keeping the apex sharp while maintaining a flat base shape.
- ⚪ Two Bead Methods:
- Method 1 (In-Line): Pre-string beads onto yarn before starting and slide them into place while crocheting.
- Method 2 (Post-Embroidery): Crochet the full ornament cone, then sew beads onto the surface using matching thread and a needle. Method 2 allows precise placement.
- 🪡 Tails: Leave generous yarn tails at the start and end for attaching top charms and securing bottom bells.
🪡 K. COMPLETE PATTERN
🌲 Cone Body Construction
Work from top apex down to bottom base using Forest Green or Cream yarn.
- 🔄 Rnd 1: MR 4 sc. (4 sts)
- 🔄 Rnd 2: [1 sc, inc] x2. (6 sts)
- 🔄 Rnd 3: 6 sc around. (6 sts)
- 🔄 Rnd 4: [1 sc, inc] x3. (9 sts)
- 🔄 Rnd 5: 9 sc around. (9 sts)
- 🔄 Rnd 6: [2 sc, inc] x3. (12 sts)
- 🔄 Rnd 7: 12 sc around. (12 sts)
- 🔄 Rnd 8: [3 sc, inc] x3. (15 sts)
- 🔄 Rnd 9: 15 sc around. (15 sts)
- 🔄 Rnd 10: [4 sc, inc] x3. (18 sts)
- 🔄 Rnd 11: 18 sc around. (18 sts)
- 🔄 Rnd 12: [5 sc, inc] x3. (21 sts)
- 🔄 Rnd 13: 21 sc around. (21 sts)
- 🔄 Rnd 14: [6 sc, inc] x3. (24 sts)
- 🔄 Rnd 15: 24 sc around. (24 sts)
- 🔄 Rnd 16: [7 sc, inc] x3. (27 sts)
- 🔄 Rnd 17: 27 sc around. (27 sts)
- 🔄 Rnd 18: [8 sc, inc] x3. (30 sts)
- 🔄 Rnd 19: 30 sc around. (30 sts)
- 🔄 Rnd 20: [9 sc, inc] x3. (33 sts)
- 🔄 Rnd 21: 33 sc around. (33 sts)
- 🔄 Rnd 22: [10 sc, inc] x3. (36 sts)
- 🔄 Rnd 23: 36 sc around. (36 sts)
⭕ Base Closure Disk
Transition to closing the bottom of the pine cone.
- ➰ Rnd 24 (Turning Edge): Working in BLO only: 36 sc around. (36 sts)
- 🔄 Rnd 25: Working in both loops: [4 sc, dec] x6. (30 sts)
- 🔄 Rnd 26: [3 sc, dec] x6. (24 sts)
- ☁️ Stuffing Note: Pause here. Fill top apex firmly using small tufts of fiberfill, packing it steadily into a clean cone shape.
- 🔄 Rnd 27: [2 sc, dec] x6. (18 sts)
- 🔄 Rnd 28: [1 sc, dec] x6. (12 sts)
- ☁️ Final Stuffing Note: Add final stuffing into center base. Keep base disk flat—do not over-stuff into a rounded bulge.
- 🔄 Rnd 29: 6 dec around. (6 sts)
Fasten off, leaving a 20 cm (8 inch) tail. Thread tail through front loops of final 6 stitches, pull tightly to close center ring, and weave through center base point.
✨ Bead Attachment Methods
Method 1: In-Line Bead Crochet (Optional)
- 🧵 Thread 25–30 beads onto yarn skein prior to Round 1 using a bead needle.
- 🧶 On even rounds (e.g., Rnds 6, 8, 10, 12, 14, 16, 18, 20, 22), perform b-sc: slide bead up against work, insert hook into st, yarn over behind bead, complete sc. The bead seats securely on the exterior fabric.
- 📍 Space beads roughly every 4 to 6 stitches across alterating rounds.
Method 2: Post-Crochet Sewing (Recommended)
- 🪡 Complete cone body and base closure completely.
- 🧵 Thread a fine needle with matching thread or clear nylon monofilament.
- ⚪ Secure thread at base and stitch 4mm and 6mm faux pearls scattered across outer wall in an asymmetrical, starry layout.
- 🔘 Add silver or gold metallic seed beads adjacent to pearls for accent lighting reflections.
🔔 Jingle Bell Attachment
- 🧵 Thread a 20 cm length of sturdy yarn or matching embroidery thread onto a tapestry needle.
- 🔔 Pass needle through top loop of metal jingle bell.
- 📍 Insert needle directly into bottom center point (Rnd 29) of pine ornament base.
- 🪡 Anchor bell firmly against base point, leaving a tiny 2-3mm suspension space so bell rings freely when moved.
- 🧵 Secure with 2-3 firm knots inside base fabric and weave tail inside body.
⭐ Topper & Hanging Loop Assembly
- 🪢 Cut a 30 cm (12 inch) piece of natural jute twine or hemp cord.
- 🔗 Fold twine in half to form a loop. Thread loop through metal star charm, snowflake charm, or bead cap.
- 🪡 Using a tapestry needle, insert twine ends through top apex (Rnd 1) of cone, pulling loop anchor down flush onto top tip.
- 🪢 Tie a secure double knot with twine ends just beneath inner apex inside tree cavity (or secure at exterior tip with a decorative knot).
- 🪢 Tie upper ends of jute twine into an 8 cm hanging loop.
🎨 L. STYLING / ASSEMBLY / STABILITY / FINAL SHAPING
           [ Jute Loop ]
                ||
            ⭐ [Star/Cap]
             /      \
            /   ⚪   \
           /  ⚪   ⚪  \  <-- Pine Cone Body
          / ⚪   ⚪   ⚪ \
         /______________\
            | BLO Edge |
               🔔 [Bell]
📍 Recommended Assembly Order
- 🌲 Crochet Body & Base: Work Rnds 1 through 23 of main cone.
- ➰ Turn Base: Work Rnd 24 in BLO to create a sharp base angle.
- ☁️ Stuff & Close: Stuff firmly while executing Rnds 25–29; weave end tight.
- ⚪ Attach Beads: Hand-sew pearls and metallic seed beads scattered across surface (if using Method 2).
- 🔔 Attach Bell: Stitch jingle bell securely to bottom center.
- ⭐ Attach Topper & Loop: Thread star charm and jute twine loop through apex tip.
✅ Final Shaping Checklist
- ✅ Silhouette Check: Roll cone gently between hands to achieve a uniform taper from sharp point to flat base.
- ✅ Base Flatness: Verify bottom base disk sits flat with BLO ridge creating a distinct edge.
- ✅ Bead Symmetry: Ensure beads are evenly distributed around all 360 degrees of cone body.
- ✅ Hardware Tension: Confirm star topper sits tight at top apex without wobbling.
- ✅ Bell Ring: Test that jingle bell dangles centered and rings freely when shaken.
💡 M. HELPFUL CROCHET TIPS
- 💡 Use Cotton Yarn: Mercerized cotton gives crisp stitch definition, keeps cone walls rigid, and prevents fuzz from catching on beads.
- 💡 Keep Hooks Small: Using a hook 0.5mm–1.0mm smaller than yarn label recommendation keeps stitches tight enough to hold stuffing securely.
- 💡 Avoid Top Over-Stuffing: Use tiny tufts of fiberfill for top point. Inserting large clumps at once distorts apex point into a rounded bulb.
- 💡 Create Sharp Edge with BLO: Round 24 (BLO) is essential—it creates a 90-degree fold line for a flat base plate.
- 💡 Stagger Bead Placements: When placing beads, avoid rigid vertical lines. Asymmetrical positioning gives a natural pine foliage appearance.
- 💡 Secure Hardware Ends: Knot top twine internally before final base closure whenever possible, or anchor deeply through stuffing using long needles.
- 💡 Use Stitch Markers: Continuous spirals easily shift. Mark start of each round to avoid uneven increase distribution.
- 💡 Color Pairings: Make matching pairs in contrasting colors (e.g., Forest Green with gold accents alongside Cream with silver accents) for visual depth on trees.
🧼 N. CARE INSTRUCTIONS
- 🧼 Spot Clean Only: Clean surface using a damp cloth and mild soap solution. Do not submerge completely in water to protect metal bells and charms from rusting.
- 💨 Air Dry: Allow ornament to air dry thoroughly at room temperature away from direct sunlight.
- 📦 Off-Season Storage: Store ornaments wrapped individually in acid-free tissue paper inside a rigid box to prevent flattening or crushing cone shapes.
- 🛡️ Hardware Protection: Keep storage area low-humidity to preserve metallic luster of bells and star charms.
❓ R. FAQ
❓ Can I use acrylic yarn instead of cotton?
Yes, acrylic yarn works well. However, cotton yarn provides greater rigidity and structure, which helps the cone hold a sharp geometric shape without bulging.
❓ What if I don’t have bead charms or metal toppers?
You can easily substitute metal toppers with a crocheted mini star applique or attach a wooden bead to top apex.
❓ How do I make smaller or larger pine trees?
To alter size without changing pattern math, swap yarn weight and hook size. Use fingering weight yarn with a 1.75mm hook for mini ornaments, or bulky yarn with a 4.5mm hook for table-centerpiece trees.
❓ How do I ensure the base of the ornament stays flat?
Rnd 24 uses Back Loop Only (BLO) to create a sharp structural fold. Avoid over-stuffing the final rounds (Rnds 27–29) so base does not bow outwards.
❓ Can I attach beads after finishing the whole crochet cone?
Yes! Post-crochet embroidery (Method 2) is often easier for beginners because it allows precise control over bead placement after cone is fully shaped.
❓ Is this ornament heavy enough to pull down Christmas tree branches?
No, each finished pine ornament weighs less than 35 grams (1.2 oz), making them light enough for all natural or artificial tree branches.