Sage & Cream Floral Crochet Table Runner Pattern
📖 B. INTRODUCTION
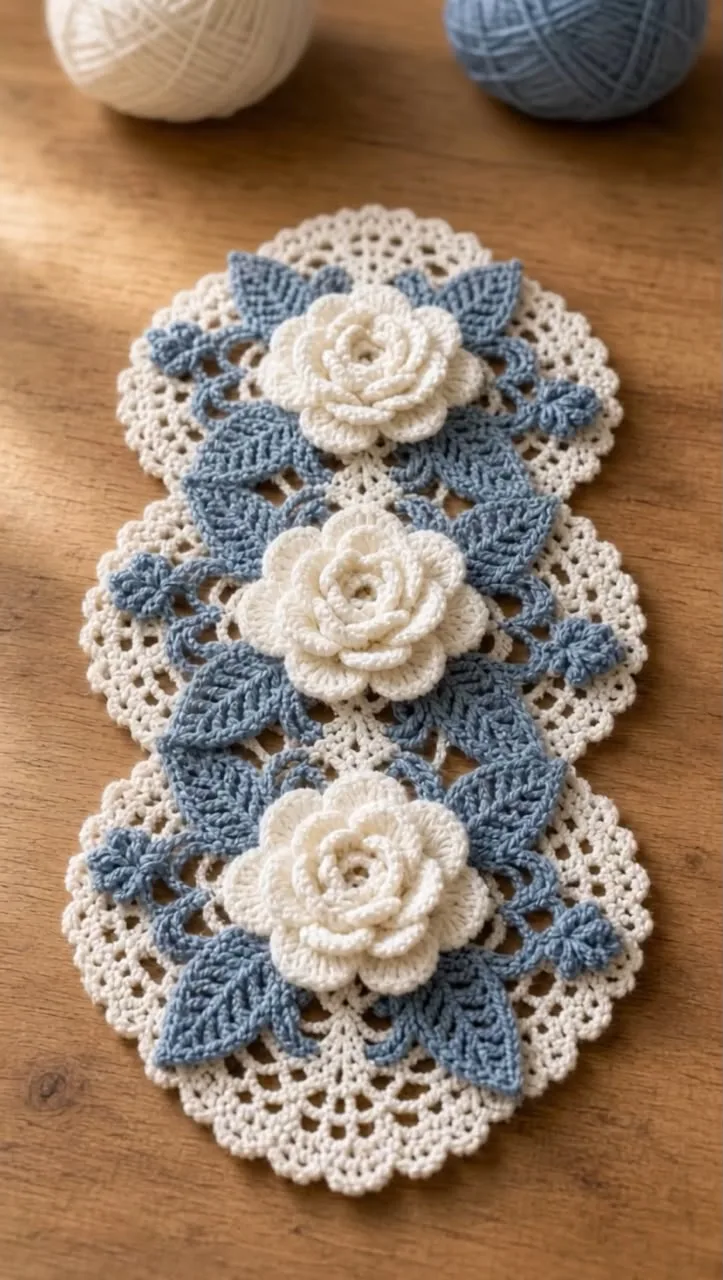
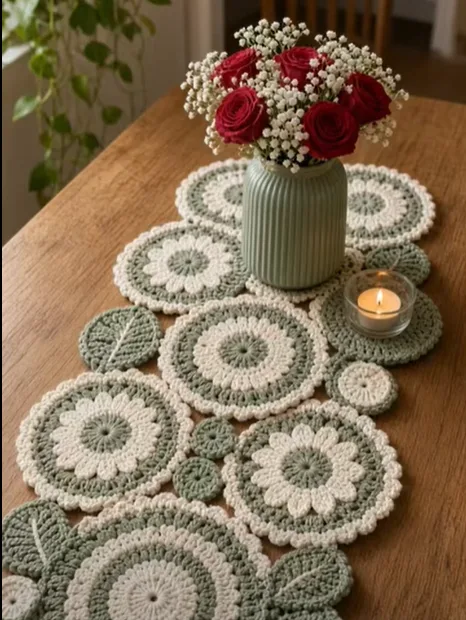
Elevate your dining space or entryway console with this botanical Sage & Cream Floral Crochet Table Runner 🌿🤍. Designed with an organic arrangement of oversized floral and concentric medallions, delicate filler circles, and sculpted leaf appliques, this piece combines vintage lace tradition with a modern color palette. The soft contrast between muted sage green and warm cream creates an understated focal point that brings calm, handcrafted elegance to any tabletop.
This project is ideal for crocheters looking for a rewarding, modular piece. Because the runner is built from individual motifs, it is remarkably portable and easy to customize. Whether you need a short accent piece for an entryway table or an extended runner for a full holiday dining table, you can easily adjust the length simply by adding or subtracting motifs.
Beyond everyday home styling, this crochet table runner pattern makes a cherished keepsake gift for housewarmings, weddings, spring gatherings, and autumn dinner parties. It pairs naturally with rustic wooden surfaces, ceramic vases, white porcelain, and soft candlelight.
🔍 C. MAIN PATTERN OVERVIEW
This table runner is constructed by crafting four distinct modular elements that are subsequently joined to form a unified, undulating lace banner:
- Large Floral Medallions (Type A): Multi-layered circular motifs featuring a solid sage center, a prominent cream petal round, an outer sage ring, and a scalloped cream border.
- Large Concentric Medallions (Type B): Geometric circular motifs featuring alternating rings of sage and cream, finished with a matching scalloped cream edge.
- Small Filler Circles: Compact two-tone accent disks designed to bridge the gaps between major motifs and stabilize the overall silhouette.
- Textured Leaf Appliques: Sculpted sage leaves worked with a central vein structure, positioned along the outer edges to create a botanical border.
Once all motifs are completed, they are arranged in an interlocking layout down the center axis and joined securely along contact points using a neat whipstitch or Join-As-You-Go (JAYG) technique.
🎯 D. SKILL LEVEL
Intermediate This pattern requires comfort with working in the round, executing cluster stitches, switching colors cleanly between rounds, and assembling multiple geometric components.
Techniques Involved:
- 🧶 Magic Ring (MR)
- 🧶 Working in continuous foundation chain loops (for leaves)
- 🧶 2-dc and 3-dc cluster stitches (petal creation)
- 🧶 Color changing at the end of rounds
- 🧶 Shell/scallop border edging
- 🧶 Surface slip stitching (for leaf vein texture)
- 🧶 Hand-sewing motif contact points & blocking lace flat
📏 E. FINISHED SIZE
- Width: Approximately 14 inches (35.5 cm) at the widest point across the motifs.
- Length: Approximately 42 inches (106.5 cm) long when using the recommended motif layout.
- Note on Adjustability: The length can be adjusted in increments of roughly 6.5 inches (16.5 cm) by adding or removing pairs of major medallions. Using a lighter yarn weight (such as DK or Sport weight) will produce a narrower, delicate dresser scarf, while heavier worsted yarn yields a larger table centerpiece.
🧮 F. GAUGE
- Motif Diameter: 1 Large Medallion (Rounds 1–6) = 6.5 inches (16.5 cm) in diameter after light blocking.
- Gauge Note: Gauge is not strictly critical for fit, but maintaining consistent stitch tension across all individual motifs ensures that the runner lies completely flat without bubbling or warping at the joins.
🧶 G. REQUIRED YARN AMOUNTS
Estimates are based on standard #4 Worsted Weight 100% Mercerized Cotton Yarn:
- 🧵 Main Color A (Sage Green): Approximately 350 yards (320 meters).
- 🧵 Main Color B (Cream / Ivory): Approximately 280 yards (256 meters).
- 🧵 Total Project Estimate: Approximately 630 yards (576 meters) total.
🧰 H. MATERIALS
- 🪡 Crochet Hook: US G/6 (4.0 mm) crochet hook (or size needed to obtain gauge).
- 🧶 Yarn: #4 Worsted Weight 100% Cotton Yarn in Sage Green and Cream.
- ✂️ Scissors: Sharp craft snips.
- 📍 Tapestry Needle: Blunt-ended yarn needle for weaving in ends and whipstitching motifs.
- 📌 Blocking Equipment: Foam blocking boards, rust-proof stainless steel T-pins, and a steam iron or water spray bottle.
🔤 I. ABBREVIATIONS – US TERMS
- ch – chain
- sl st – slip stitch
- sc – single crochet
- hdc – half double crochet
- dc – double crochet
- inc – increase (2 stitches in same stitch)
- 2-dc cluster – 2 double crochet closed together in same stitch
- 3-dc cluster – 3 double crochet closed together in same stitch
- MR – magic ring
- st(s) – stitch(es)
- sp(s) – space(s)
- FO – fasten off
- MC – Main Color
- CC – Contrast Color
📝 J. NOTES BEFORE YOU BEGIN
- 📝 Cotton Yarn Recommendation: 100% cotton yarn is strongly recommended for table runners because it holds shape well under steam blocking and offers heat resistance for hot dishes or candles.
- 📝 Joined Rounds: All circular motifs are worked in joined rounds. Do not work in continuous spirals unless specifically instructed.
- 📝 Color Changes: When changing colors at the end of a round, complete the final slip stitch join by pulling through the new color.
- 📝 Weaving Ends: Because this item features openwork and will be viewed from both sides, weave in yarn tails thoroughly through dense stitch bases rather than across open chain spaces.
🪡 K. COMPLETE PATTERN
🌸 Large Floral Medallion (Type A) — Make 5
Featuring a sage center, cream petal ring, sage outer ring, and cream scalloped border.
Yarn/Color: Sage Green (R1, R2, R4, R5) & Cream (R3, R6) Starting Point: Center ring
- R1 (Sage Green): Start with MR. Ch 3 (counts as first dc throughout), work 11 dc into the ring. Join with sl st to 3rd ch of starting ch-3. (12 dc)
- R2 (Sage Green): Ch 3, 1 dc in same st, 2 dc in each st around. Join with sl st to 3rd ch of starting ch-3. (24 dc)
- R3 (Cream): Fasten off Sage Green; attach Cream in any st. Ch 3, 2-dc cluster in same st (counts as first 3-dc cluster), ch 1. *(3-dc cluster in next st, ch 1); rep from * 22 more times. Join with sl st to top of first cluster. (24 clusters, 24 ch-1 sps)
- R4 (Sage Green): Fasten off Cream; attach Sage Green in any ch-1 sp. Ch 1, work 2 sc in each ch-1 sp around. Join with sl st to first sc. (48 sc)
- R5 (Sage Green): Ch 3, 1 dc in next st, 2 dc in next st, *(2 dc, 2 dc in next st); rep from * 14 more times, 1 dc in last st. Join with sl st to top of starting ch-3. (64 dc)
- R6 (Cream): Fasten off Sage Green; attach Cream in any st. *(Sl st in st, skip 1 st, 5 dc in next st, skip 1 st); rep from * 15 more times. Join with sl st to first sl st. (16 shell scallops)
- FO Cream. Weave in all ends.
🔘 Large Concentric Medallion (Type B) — Make 4
Featuring alternating sage and cream circular bands with a cream scalloped border.
Yarn/Color: Sage Green (R1, R2, R4, R5) & Cream (R3, R6) Starting Point: Center ring
- R1 (Sage Green): Start with MR. Ch 3, work 11 dc into the ring. Join with sl st to 3rd ch of starting ch-3. (12 dc)
- R2 (Sage Green): Ch 3, 1 dc in same st, 2 dc in each st around. Join with sl st to 3rd ch of starting ch-3. (24 dc)
- R3 (Cream): Fasten off Sage Green; attach Cream in any st. Ch 3, 2 dc in next st, *(1 dc in next st, 2 dc in next st); rep from * 10 more times. Join with sl st to top of starting ch-3. (36 dc)
- R4 (Sage Green): Fasten off Cream; attach Sage Green in any st. Ch 3, 1 dc in next st, 2 dc in next st, *(2 dc, 2 dc in next st); rep from * 11 more times. Join with sl st to top of starting ch-3. (48 dc)
- R5 (Sage Green): Ch 3, 1 dc in next 2 sts, 2 dc in next st, *(3 dc, 2 dc in next st); rep from * 11 more times. Join with sl st to top of starting ch-3. (60 dc)
- R6 (Cream): Fasten off Sage Green; attach Cream in any st. *(Sl st in st, skip 1 st, 5 dc in next st, skip 1 st); rep from * 14 more times. Join with sl st to first sl st. (15 shell scallops)
- FO Cream. Weave in all ends.
🟢 Small Filler Circle — Make 8
Compact two-tone disks to fill gaps between large medallions.
Yarn/Color: Sage Green (R1) & Cream (R2) Starting Point: Center ring
- R1 (Sage Green): Start with MR. Ch 2 (counts as hdc), work 11 hdc into the ring. Join with sl st to 2nd ch of starting ch-2. (12 hdc)
- R2 (Cream): Fasten off Sage Green; attach Cream in any st. Ch 1, 2 sc in each st around. Join with sl st to first sc. (24 sc)
- FO Cream, leaving an 8-inch tail for sewing.
🍃 Textured Leaf Applique — Make 8
Sculpted sage leaves worked with central vein detail.
Yarn/Color: Sage Green Starting Point: Foundation chain
- Foundation: Ch 13.
- Round 1 (Leaf Outer Body): Sl st in 2nd ch from hook, sc in next ch, hdc in next ch, dc in next 5 chs, hdc in next ch, sc in next ch, 3 sc in last ch (leaf tip). Working along the opposite side of the foundation chain: sc in next ch, hdc in next ch, dc in next 5 chs, hdc in next ch, sc in next ch, sl st in last ch.
- Center Vein Detail: Do not fasten off. Ch 1. Working down the center line of the leaf from tip back to base, insert hook through the center chain gaps and work surface slip stitches along the length of the foundation chain.
- FO, leaving a 10-inch tail for sewing to motif edges.
🎨 L. STYLING / ASSEMBLY / STABILITY / FINAL SHAPING
🧩 Recommended Assembly Order & Layout
- Layout Preparation: On a clean, flat surface, arrange the motifs into an alternating central column:
- Position 5 Floral Medallions (Type A) and 4 Concentric Medallions (Type B) in a staggered, interlocking zig-zag row down the center axis.
- Place 1 Small Filler Circle into the small side crevices formed between adjoining large medallions.
- Place 1 Leaf Applique along the outer edges of the major medallions, pointing outward at dynamic angles.
- Joining Motifs:
- Using a tapestry needle and Cream yarn, whipstitch the touching shell scallop points of adjacent Type A and Type B medallions through the back loops only. Secure with 3–4 tight stitches per contact shell.
- Attach the Small Filler Circles into the interior crevices, whipstitching 2–3 outer stitches of the filler circle to the adjacent medallion borders.
- Pin and whipstitch the base of each Leaf Applique to the outer edge of a medallion.
📌 Stability & Blocking
- Steam Blocking (Essential): Because motif lace can curl at the edges, blocking is crucial. Pin the assembled runner onto foam boards using rust-proof T-pins, gently expanding each shell scallop and leaf tip.
- Hover a steam iron 1 inch above the fabric (do not press directly) until damp, or mist thoroughly with cold water. Allow to dry completely for 24 hours before unpinning.
💡 M. HELPFUL CROCHET TIPS
- 💡 Mercerized Cotton Works Best: Use mercerized cotton yarn for crisp stitch definition on the cluster petals and shell borders.
- 💡 Check Shell Counts: Always double-check your stitch count on Round 5 before starting Round 6 to ensure your shell scallops fit evenly around the motif.
- 💡 Flat Contact Joins: Whipstitch through back loops only during assembly to keep the join seam hidden on the underside of the runner.
- 💡 Symmetrical Leaf Angles: Point the leaf appliques in alternating directions along the sides to create an organic, climbing vine appearance.
- 💡 Adjusting Runner Length: To make the runner longer for a large dining table, craft additional pairs of Type A and Type B medallions.
- 💡 Keep Tension Even: Maintain uniform tension across all motifs so individual pieces do not pull or warp neighboring motifs when joined.
🧼 N. CARE INSTRUCTIONS
- 🧼 Washing: Hand wash gently in cold water using a mild wool or delicate detergent. Do not wring or twist.
- 🧼 Drying: Press excess water out by rolling the runner inside a clean dry towel. Lay flat on a blocking mat or towel to dry.
- 🧼 Maintenance: Lightly steam-iron on the cotton setting (with a press cloth between iron and runner) to restore crisp edges after washing.
❓ R. FAQ
❓ Can I use acrylic yarn instead of cotton for this runner? While acrylic yarn can be used, cotton is strongly recommended for table runners. Cotton lies flatter, holds blocking better, and offers natural heat resistance under warm dishes or candles.
❓ How do I make the table runner longer or shorter? You can adjust the length by adding or removing major medallions in pairs (1 Type A + 1 Type B). Each added pair increases the total length by approximately 6.5 inches (16.5 cm).
❓ What is the best way to join the motifs together? The simplest method is whipstitching touching shell scallops together using a tapestry needle and matching cream yarn through the back loops only. Advanced crocheters can also use a Join-As-You-Go (JAYG) slip stitch join during Round 6 of each motif.
❓ My motifs are curling up at the edges. How can I flatten them? Minor curling during construction is normal for round motifs. Steam blocking the completed motifs or the fully assembled runner with pins will permanently flatten the edges and crisp up the shell borders.
❓ Can I change the color scheme to suit different seasons? Absolutely! Swap Sage Green for Burgundy or Navy for a dramatic winter holiday look, or use Ochre Yellow and Cream for a warm autumnal table setting.