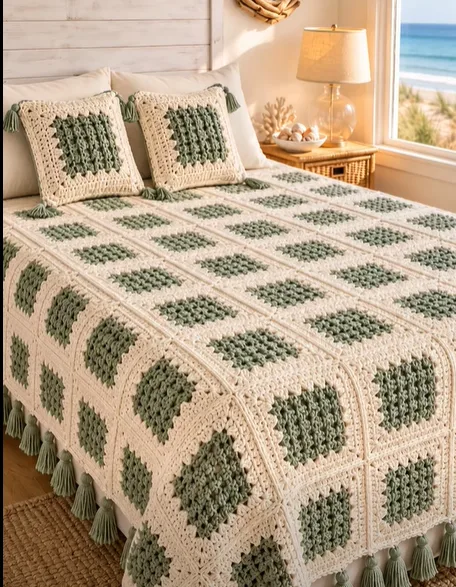
Coastal Granny Square Blanket & Pillow Set Crochet Pattern
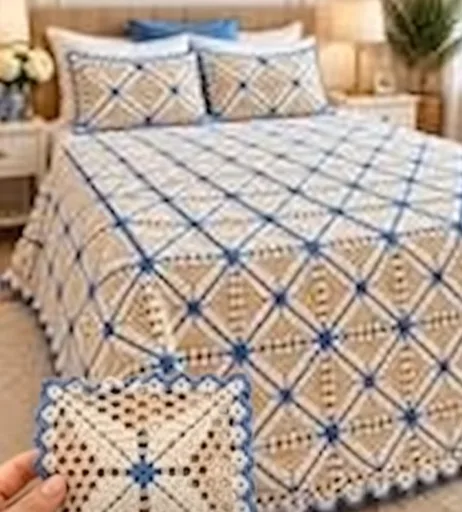
The coastal-inspired granny square blanket with matching decorative pillows brings timeless charm to any bedroom or living space. This set features classic granny squares in soft seafoam green and creamy white, arranged in a crisply geometric pattern. The blanket is finished with large, bold tassels along the edge, evoking an inviting and beachy atmosphere. Paired with two accent pillows trimmed with matching tassels, this crochet set brightens any décor with vintage style and modern simplicity.
Each square boasts a richly textured center motif balanced by airy eyelets and crisp color changes. The blanket is perfect as a bedspread, throw, or cozy snuggle layer for breezy evenings. Coordinated pillows add an extra touch of comfort and elegant detail to your ensemble. This project is rewarding and visually striking, making it a wonderful undertaking for crocheters who love the enduring appeal of classic granny designs paired with fresh, coastal hues.
Project Overview
This blanket and pillow set is constructed from multiple granny squares joined together as you go or seamed afterwards. Each square is started in the round, working outward from center with color changes. The blanket is edged with a row of coordinated tassels. The pillows are made from the same squares and finished with a whipstitch seam and decorative tassels at each corner.
Skill Level
Advanced Beginner to Intermediate. This project involves working granny squares in the round, changing colors, joining motifs, and assembling tassels. The stitches are mostly simple, but the assembly, color changes, and consistency in stitching make it best suited for those with some crochet experience.
Materials
- Worsted weight (Medium/4) yarn:
- Main color (Cream): Approx. 1,500g (about 2,600 yards) for blanket and pillow borders/background
- Accent color (Seafoam Green): Approx. 700g (about 1,200 yards) for motif centers and tassels
- Fiber suggestion: 100% cotton or a cotton-acrylic blend for drape and durability
- Crochet hook: US size H/8 (5.0 mm) or size needed to obtain gauge
- Tapestry needle (for sewing and weaving in ends)
- Sharp scissors
- Stitch markers (helpful for marking corners and rounds)
- Pillow forms: 2 forms, approximately 18″ x 18″ (45 x 45 cm)
- Cardboard or tassel maker: For tassels approx. 5″ (13 cm) long
Finished Size
- Blanket: Approx. 210 cm x 180 cm (82.5″ x 71″), fits a queen-size bed (size can be customized by adding or subtracting squares)
- Pillows: Approximately 45 cm x 45 cm (18″ x 18″)
To adjust the sizing, alter the number of squares across and down. Each square measures about 18 cm (7″) before joining and blocking.
Gauge
Each completed granny square (prior to joining and blocking): approx. 18 cm x 18 cm (7″ x 7″) using H/8 (5.0mm) hook and worsted weight yarn. 14 dc and 8 rows = 4″ (10 cm) in granny stitch.
Small gauge differences will slightly adjust finished dimensions.
Stitches and Abbreviations
- ch – chain
- sl st – slip stitch
- sc – single crochet
- dc – double crochet
- tr – treble crochet
- sp – space
- st – stitch
- RS – right side
- WS – wrong side
Important Pattern Notes
- Chains at the beginning of rounds count as a stitch unless noted.
- Work granny squares in joined rounds; join with a slip stitch at the end of each round.
- Join new color with a slip stitch in any corner space, chain up to required height.
- When joining squares, RS should be facing outwards; wrong sides face each other during whipstitching.
- To keep color changes neat, always fasten off and join in a corner space.
- Use stitch markers to keep track of square corners and layout.
- Tension should be consistent across all motifs for a uniform finish.
Detailed Crochet Pattern
Part 1: Making the Granny Squares
Each square will use an accent color (seafoam green) for center and a main color (cream) for outer rounds.
With Accent Color (Seafoam Green)
- Start with a slip knot and ch 4, join with a sl st to form a ring (or use a magic ring).
- Round 1: Ch 3 (counts as dc), 2 dc in ring, ch 2; *3 dc in ring, ch 2;* repeat from * to * 2 more times, join with sl st to top of ch-3. (Four 3-dc groups, four ch-2 sps)
- Round 2: Sl st to next ch-2 corner sp, ch 3 (counts as dc), 2 dc in same sp, ch 2, 3 dc in same sp (first corner made), ch 1; (3 dc, ch 2, 3 dc) in next ch-2 sp, ch 1, rep 2 more times, join with sl st to top of ch-3. Fasten off accent color. (Eight 3-dc groups, four ch-2 corners, four ch-1 sides)
Switch to Main Color (Cream)
- Join cream yarn with sl st in any ch-2 corner sp.
Round 3: Ch 3, 2 dc in corner sp, ch 2, 3 dc in same sp (corner), [ch 1, 3 dc in next ch-1 sp, ch 1, (3 dc, ch 2, 3 dc) in next corner] repeat around, join with sl st to top of ch-3.
(Four corners, twelve 3-dc groups) - Round 4: Sl st to next ch-2 corner sp, ch 3, 2 dc, ch 2, 3 dc in same sp, *ch 1, 3 dc in each ch-1 sp across to next corner,* ch 1, (3 dc, ch 2, 3 dc) in corner; repeat from * three times; join with sl st to top of ch-3.
- Round 5: Repeat as in Round 4, working (3 dc, ch 2, 3 dc) in each corner, 3 dc in each ch-1 sp between corners. Join with sl st, fasten off and weave ends.
Make enough squares to reach your desired blanket size. For a blanket approx. 210 cm x 180 cm, you will need 77 squares (7 by 11) and 18 squares for two pillows (9 per pillow).
Part 2: Laying Out and Joining Granny Squares
- Lay out the squares in rows and columns, alternating the orientation for visual variety if desired. Double-check color placement to ensure a balanced look.
- With RS facing up, use the whipstitch join (or other preferred seaming method): Place two squares with WS together and sew through outer loops of each edge using matching cream yarn. Repeat for rows, then join columns.
Alternative join: Use the join-as-you-go method in the last square round, attaching squares to each other by slip stitching in adjacent square’s spaces as you complete the final round.
Part 3: Blanket Edging
- With cream yarn, attach in any corner of the blanket.
- Round 1: Ch 1, sc evenly around entire blanket edge, making 3 sc in each corner sp. Join with sl st to first sc.
- Round 2: Ch 3, dc in each st around, working (2 dc, ch 2, 2 dc) in each corner. Join and fasten off.
- Weave in any ends before adding tassels.
Part 4: Making the Tassels
- For each tassel, cut several lengths of seafoam yarn (approx. 25 cm/10″ each). Group 20-24 pieces for thick tassels.
- Lay the strands together and fold at midpoint. Tie a separate strand securely around the top, leaving a loop, and knot tightly.
- Wrap another strand around the bundle about 2 cm (just under 1″) from top to form a tassel head. Knot and thread ends into tassel with tapestry needle. Trim the cut ends to even.
- Make enough tassels for each blanket edge (usually 2 per granny square along the blanket’s shorter edge and 1 per square along the longer edge; about 48-56 total). Attach by sewing each tassel firmly to blanket edge under the border or in corner spaces using seafoam yarn and tapestry needle.
Part 5: Pillow Covers
- Arrange 9 squares (3 x 3) for each pillow. Join as for blanket.
- Make two squares panels for each pillow (front and back), or use a solid square panel for back if preferred.
- With RS together, whipstitch three edges closed, insert pillow form, then sew final seam shut.
- Sew a matching tassel on each pillow corner, using seafoam yarn and tapestry needle for secure attachment.
Assembly and Finishing
- Weave in all yarn tails on the WS with a tapestry needle.
- Lay the blanket flat, spray lightly with water, and block to measurements; pin corners and edges to keep the motifs crisp and neat as it dries.
- For pillows, shape each corner after inserting tassels to maintain fullness and symmetry.
- Make sure all tassels are uniform length and density for a polished look.
- Gently fluff the blanket and pillows once dry to reshape and align borders and granny square seams.
Customization Ideas
- Swap colors for any palette: try navy and white for a nautical look or earth tones for autumn vibes.
- Make each square in different colors for a cheerful patchwork throw.
- Adjust blanket size by making more or fewer squares, or using thinner or thicker yarn for smaller/larger motifs.
- Turn motifs into stand-alone coasters, placemats, or wall hangings.
- Attach only one row of tassels instead of all sides for a subtler look.
- Use as a baby blanket, lapghan, or statement afghan for couches and benches.
- The pillow motif can be adjusted into a cozy seat cushion cover or even a bag front!
Troubleshooting Tips
- If your squares curl, block them individually before assembly.
- If motif edges are uneven, check tension and keep chains loose at corners.
- If blanket becomes too large or small, alter your hook size or check your gauge against the sample.
- Loose color changes: Always finish off and weave ends where changing yarns for crisp transitions.
- Uneven joins: Use stitch markers at corners while joining and check alignment every row.
- Inconsistent tension within a square can be evened out by gentle blocking with steam or water.
Care Instructions
- Hand-wash or gentle machine cycle in cold water with mild detergent.
- Lay flat to dry to preserve shape; do not wring or twist.
- Iron on low, if necessary, through a thin pressing cloth.
- Store folded out of direct sunlight to prevent fading.
Final Notes
Before final assembly, carefully count your stitches and rows on each motif. Adjust tension to maintain even, square shapes for tidy joins. Let the photo of the finished item inspire the arrangement of your squares and colors. Enjoy the process—the result is a classic, heirloom-quality piece you’ll treasure for years to come!