Crochet Hanging Triple Basket Organizer – Lattice Toilet Paper Holder Pattern
Introduction
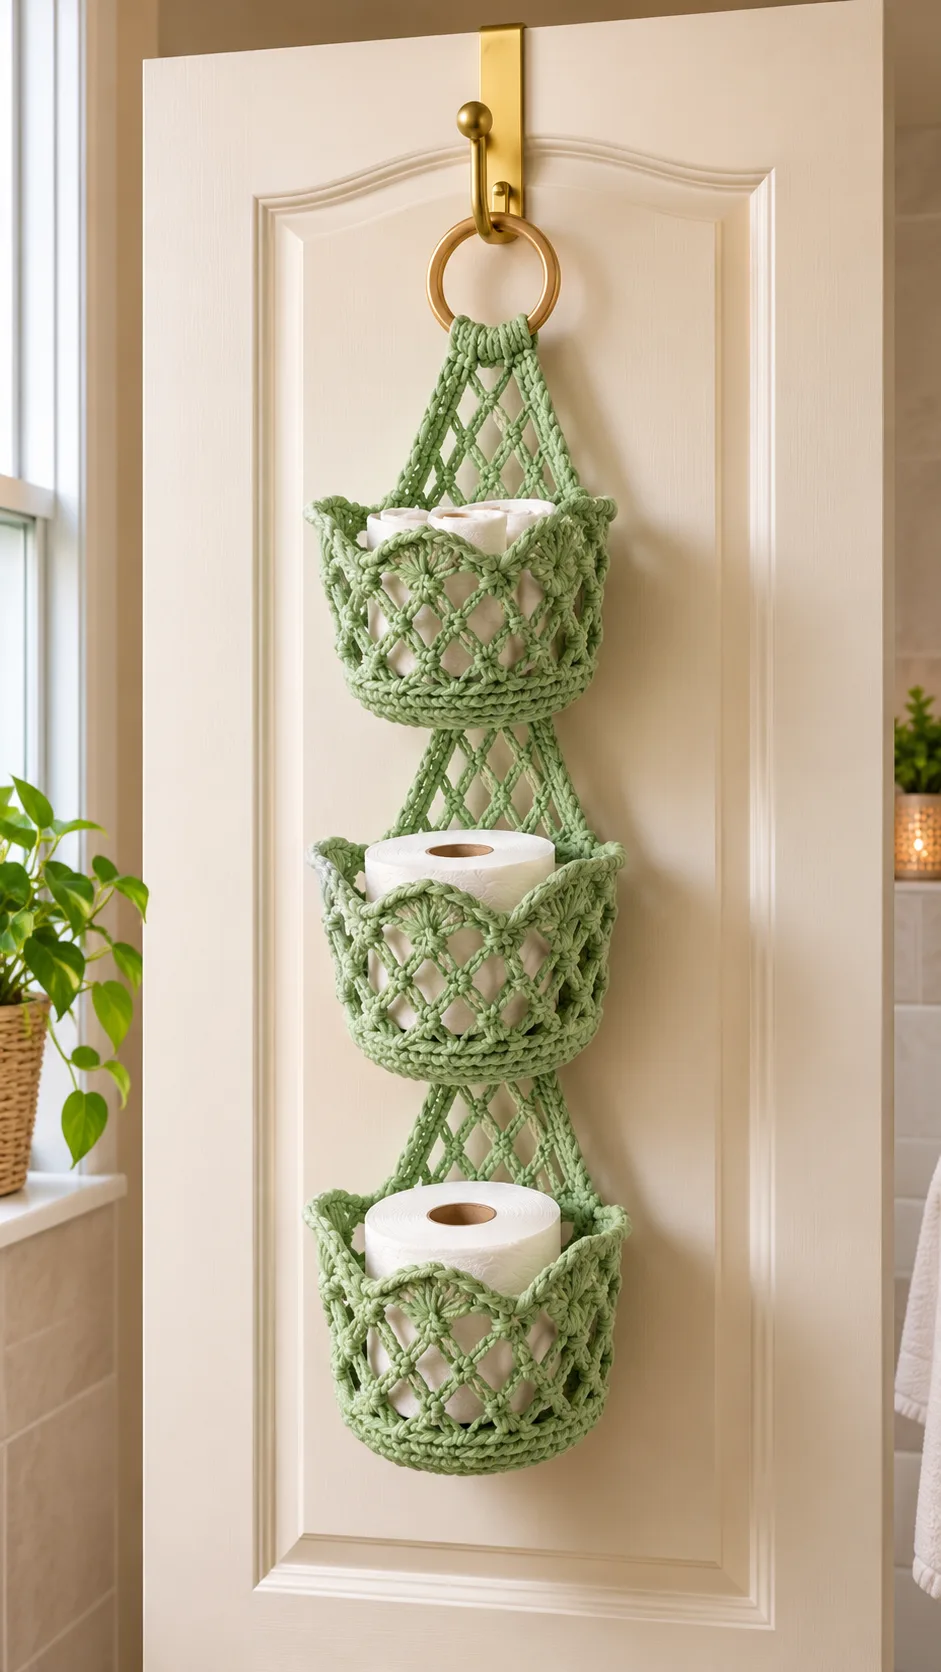
This project creates a practical and decorative solution for extra bathroom storage: a hanging organizer featuring three stacked crochet baskets, all in a coordinated sage green. Each basket is perfectly sized to fit a standard roll of toilet paper and is connected by netted, lattice-style crochet straps. The entire unit hangs from a thick wooden ring, making it ideal for positioning on a bathroom door, towel hook, or any wall where space is tight but storage is needed.
The design’s main features include the scalloped upper basket edge, a strong-textured solid bottom, and open lattice sides that provide support and breathability. The woven-look strap between baskets shows off the contents, creating a spa-inspired look in soft, natural green. Whether you use it for toilet paper, hand towels, or small accessories, this project is both eye-catching and highly functional. Making multiple baskets and connecting them is an enjoyable creative challenge, perfect for gifting or upgrading your home.
Project Overview
This pattern is constructed in modular sections. Each basket is crocheted in the round, beginning with the flat base, followed by the lattice-patterned body and finished with a wavy, scalloped edge. The baskets are attached with crocheted lattice straps worked in rows, and the whole piece is suspended from a solid ring. You’ll use a combination of working in rounds and rows, plus a little sewing for assembly.
Skill Level
Intermediate. This project requires comfort with crocheting in the round, working post stitches, creating even lattice/mesh motifs, joining crochet pieces together, and maintaining even tension, especially on the openwork. If you are familiar with basic and a few intermediate stitches, you will find this project enjoyable and learn a little along the way.
Materials
- Yarn: Bulky (category 5) 100% cotton yarn or sturdy cotton-blend. Approx. 400–450 g total in a single color (sage green), or divide if desired for contrasting straps or baskets.
- Crochet hook: 6.5 mm (K-10.5) or size needed for a dense fabric with some flexibility.
- Tapestry needle (for weaving in ends and assembly).
- Sharp scissors.
- Four locking stitch markers.
- Large (5–6 inch/12–15 cm diameter) wooden or plastic ring for hanging (optional: crochet over the ring for a finished look).
- Measuring tape.
Finished Size
- Each basket, approx. 14 cm (5.5 in) diameter x 12 cm (4.75 in) high.
- Total hanging length (with three baskets, straps, and ring): approx. 80 cm (31.5 in).
To adjust the size, change the base diameter or basket height, or add or subtract baskets. Adjust strap lengths as needed for spacing.
Gauge
Approximate gauge: 10 sc x 11 rows = 10 x 10 cm (4 x 4 in) with bulky yarn and 6.5 mm hook, measured in a solid portion of the basket. As the pattern features openwork, exact gauge is less critical, but check basket base diameter for best fit. Small adjustments will alter finished size, but baskets are forgiving in fit.
Stitches and Abbreviations
- ch – chain
- sl st – slip stitch
- sc – single crochet
- hdc – half double crochet
- dc – double crochet
- tr – treble crochet
- MR – magic ring
- inc – increase
- dec – decrease
- sk – skip
- st/sts – stitch/stitches
- sp – space
Important Pattern Notes
- Chains at beginning of rounds usually do not count as a stitch unless otherwise noted.
- Baskets are started from a magic ring for a tight center; you may substitute ch 2 and work into 2nd ch if preferred.
- Lattice (mesh) sections are worked in rounds or rows; keep ch-3 arches even for best result.
- Use a stitch marker to mark the first st of each round, especially for the basket base and body.
- When changing color (if desired), join new color in the last yo of previous stitch and fasten off previous color.
- Maintain even, firm tension for sturdy baskets; if your baskets feel too floppy, try a smaller hook or tighter yarn.
Detailed Crochet Pattern
Part 1: Crochet Basket Base (Make 3)
- Round 1: With sage green, make a MR, ch 2 (does not count as st), 12 dc in ring. Sl st to first dc. (12 sts)
- Round 2: Ch 2, 2 dc in each st around. Sl st to first dc. (24 sts)
- Round 3: Ch 2, (1 dc in next st, 2 dc in next st) around. Sl st to first dc. (36 sts)
- Round 4: Ch 2, (1 dc in next 2 sts, 2 dc in next st) around. Sl st to first dc. (48 sts)
- Round 5: Ch 1, (1 sc in next 3 sts, 2 sc in next st) around. Sl st to first sc. (60 sts)
- Round 6: Ch 1, (1 sc in next 4 sts, 2 sc in next st) around. Sl st to first sc. (72 sts)
You should now have a flat round base roughly 14 cm (5.5 in) across. If your roll of toilet paper is larger, add another increase round as above.
Part 2: Basket Sides: Lattice Mesh
- Round 7: Ch 1, working in back loops only, sc in each st around. Sl st to first sc. (72 sts)
- Round 8: Ch 4 (counts as 1 dc + ch-2), sk next 2 sts, (dc in next st, ch 2, sk next 2 sts) repeat around. Sl st to 2nd ch of starting ch 4. (24 dc, 24 ch-2 sps)
- Rounds 9–15: Sl st into first ch-2 sp, ch 4 (counts as dc, ch 2), dc in same sp, ch 2, (dc in next ch-2 sp, ch 2) repeat around. Sl st to 2nd ch of starting ch 4. (24 dc, 24 ch-2 sps per round)
Your sides should be growing in height and forming an open mesh. Adjust the number of rounds for desired basket height, keeping it proportional to hold a roll securely (suggested: 7 rounds total, about 11–12 cm high).
Part 3: Basket Upper Edge – Scalloped Border
- Round 16: Ch 1, (sc in next dc, hdc and dc in same dc, tr in next ch-2 sp, dc and hdc in next dc, sc in next dc) repeat around to create a gentle wave. Adjust if stitch count leaves a partial repeat; sl st to first sc.
- Round 17: Work one more round of sc evenly around (placing 1 sc in each st/space) to smooth the border. Sl st to join. Fasten off, weave in ends.
Part 4: Lattice Hanging Straps and Assembly
This section connects the baskets and attaches the hanging ring.
- For each connection, join yarn with a sl st to the outer edge of one basket (choose a dc or tr on the border, at the back of basket center for balance).
- Ch 22, sl st to matching position on the next basket above or below. Fasten off securely. Repeat for a second strap, spaced about 1/3 of the way around, so each basket hangs evenly by two straps.
- (Optional) To mimic the lattice, you may work the straps as a chain arch then go back and sc or sl st in each ch for a corded look, or keep them as simple chains for flexibility.
- After attaching all baskets, make the top hanging section: join yarn near top of the uppermost basket, ch 28 (or as needed for a loop of about 18 cm / 7 in), sl st around wooden ring, sl st back down chain and fasten off. Alternatively, crochet directly around the ring by working sc steps evenly along the ring’s circumference, then attach with a firm cord to the basket.
Part 5: Finishing Touches
Neaten all ends. Check that baskets hang straight and the spacing between each is even. Reinforce strap joins if needed by sewing with tapestry needle and extra yarn. For added strength, a row of surface slip stitching along the back of each basket (where straps join) can help maintain shape.
Assembly and Finishing
- Weave in all yarn tails securely with a tapestry needle.
- Lightly steam block each basket and the entire assembled organizer to set the lattice, if cotton yarn is used (avoid overstretching).
- Reshape the basket openings with your hands to enhance the scallop, if necessary. Place a roll in each to shape.
- Make sure the top loop is firmly attached to the ring to bear weight.
Customization Ideas
- Try using different colors for each basket or straps for a cheerful look, or natural tones for a spa feel.
- Use super bulky t-shirt yarn for larger bathroom storage, or worsted cotton for a mini version (adjust stitch count accordingly).
- Use the basket motif singly as a wall cubby or turn into a plant holder.
- Make the baskets deeper or create additional stacked tiers for more storage.
- Transform a single basket into a hanging fruit basket or craft organizer for other rooms.
Troubleshooting Tips
- Piece curls: If the basket base curls, check your stitch count and gauge. Blocking usually corrects slight curl.
- Uneven edges: Count stitches regularly, especially at joins and border. Keep spikes/scallops the same size.
- Motif becomes too large/small: Adjust hook or yarn size, or add/remove increase rounds to achieve the correct diameter.
- Loose color changes/joins: Always change color or join a new ball by finishing the last yo of a stitch with the new yarn; weave in ends tightly.
- Lattice looks floppy: Switch to a smaller hook or crochet more tightly for firmer straps and sides.
Care Instructions
- Hand wash or gentle machine wash on cold with mild detergent.
- Reshape baskets while damp and air dry. Do not wring or tumble dry.
- For wood or metal rings, wipe with a damp cloth as needed.
Final Notes
As you work, check your stitch counts and keep baskets consistent in size for a neat result. If adjusting tension or dimensions, use the sample photo as a general guide for proportions and construction. Enjoy creating a useful, attractive addition to your bathroom or home organization—and don’t be afraid to make the project your own with color and size choices!