Stunning 3D Rose Granny Square Crochet Blanket – Step-by-Step Pattern
Introduction
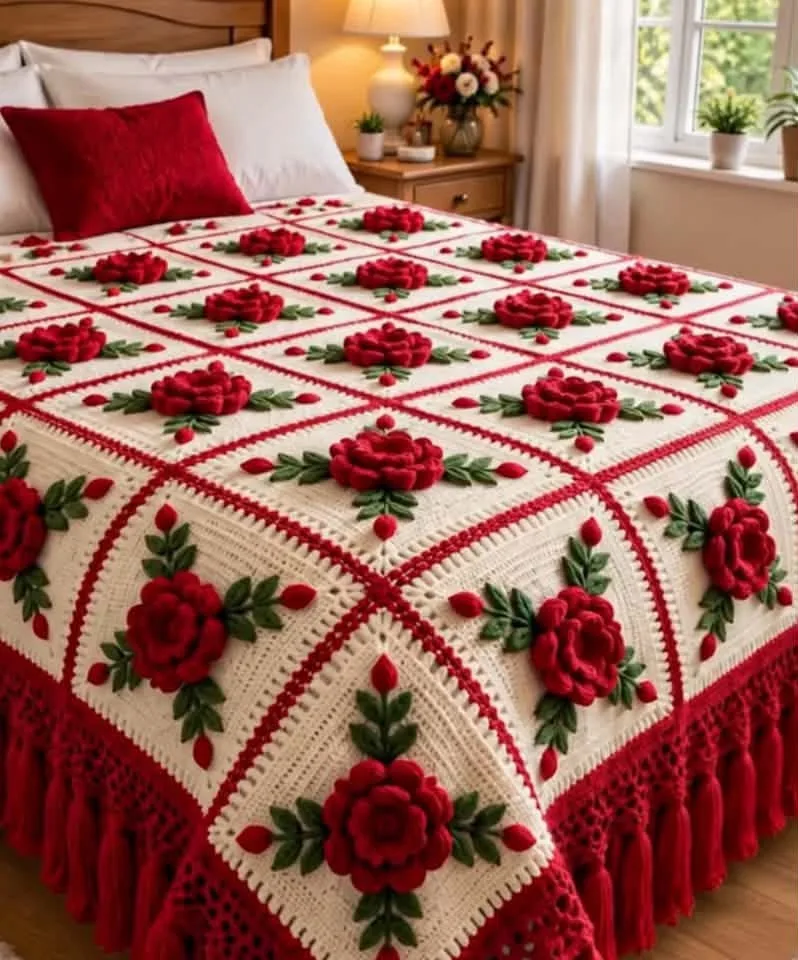
This striking crochet blanket is an absolute showstopper: an heirloom-quality piece that features prominent 3D red rose motifs centered on each creamy white square. The textured roses are surrounded by lush green leaves and dainty rosebuds, all framed by bold red lines and finished with a dramatic tasseled border. The overall effect is both romantic and classic, making it perfect as a statement bedspread, a stunning throw, or even a treasured gift. Its vivid floral details pop delightfully against the neutral backdrop, bringing depth and elegance to any room.
The blanket is a joy to create for intermediate to advanced crocheters, thanks to its combination of flat and three-dimensional crochet work. The layered rose petals, the sculpted leaves and buds, and the precise seaming of the crisp squares will keep you engaged throughout the entire process. Not only does the colorwork create visual interest, but the tactile elements add another layer of delight for touch, making this blanket both luxurious and functional. This project is an interesting adventure in combining motif and appliqué techniques with classic granny square construction.
Project Overview
This cozy blanket is constructed by working multiple individual squares (granny-style) in rows, each featuring a 3D rose at the center. Leaves, buds, and stems are crocheted separately and then sewn onto the squares. Once all motifs are completed, the squares are joined together in rows, bordered with red accents, and finished with a luscious row of red tassels for a polished and decorative edge. The result is an orderly yet organically embellished arrangement that brings the garden indoors.
Skill Level
Intermediate to Advanced: The blanket requires knowledge of basic and intermediate crochet techniques including working in the round, 3D flower construction, motif joining, color changes, surface joining, and making and attaching tassels. Some sections involve careful assembly and sewing of appliqué pieces for best effect.
Materials
- Yarn: Medium Worsted weight (category 4) recommended.
- Fiber: Soft acrylic or a sturdy cotton blend works best for durability and definition.
- Colors & Yards Needed (for a full-sized blanket, approx. 60×70 in / 152×178 cm):
- Red (roses, borders, details, and tassels): 800-1,000 g
- Cream or White (background of squares): 1,000-1,500 g
- Leaf Green (leaves, stems, and buds): 400-500 g
- Crochet Hook: US size H (5.0 mm) or size needed to obtain gauge
- Tapestry needle for sewing and weaving in ends
- Sharp scissors
- Stitch markers, helpful for the initial square rounds and marking rose placement
- Measuring tape
- Optional: Small amount of fiberfill if you want slightly puffy buds
Finished Size
Each square measures approximately 25 x 25 cm (10 x 10 inches) when blocked. Assembled as a large blanket of 6 squares by 7 squares (42 squares total), the finished size is about 150 x 175 cm (59 x 69 inches), excluding tassels. Adjust the number of squares for a smaller throw or a larger bedspread.
Gauge
One finished square (without border or appliqués) should measure approximately 25 x 25 cm (10 x 10 inches) after blocking.
To check: 16 dc x 10 rows of dc = 10 cm x 10 cm (4 x 4 inches).
Small variances in your gauge will affect the overall blanket dimensions.
Stitches and Abbreviations
- ch – chain
- sl st – slip stitch
- sc – single crochet
- hdc – half double crochet
- dc – double crochet
- tr – treble crochet
- MR – magic ring
- inc – increase
- dec – decrease
- sk – skip
- RS – right side
- WS – wrong side
Important Pattern Notes
- Chains at the beginning of rounds/rows usually count as the first stitch unless otherwise specified.
- Squares are worked in joined rounds: always join with a sl st and ch up to begin the next round.
- Color changes are completed at the end of the round unless otherwise noted; carry or weave in yarn tails as you go.
- Use stitch markers to mark the start of rounds and important placement points (such as where the rose and leaves will be attached).
- The rose and its leaves are created separately and sewn on with neat invisible stitches.
- Work with RS facing out for all visible motifs and appliqués.
Detailed Crochet Pattern
Part 1: The Cream Granny Square Base (Make 42)
- Round 1: With cream yarn and H hook, MR, ch 3 (counts as dc), 2 dc into ring, *ch 2, 3 dc into ring* repeat from * to * 3 more times (you’ll have 4 groups of 3 dc, separated by ch-2 corners). Join with sl st to top of beg ch-3. (12 dc, 4 ch-2 spaces)
- Round 2: Sl st into the next 2 dc and into the corner ch-2 space. Ch 3 (counts as dc), 2 dc, ch 2, 3 dc all in the same ch-2 space (corner made), *ch 1, (3 dc, ch 2, 3 dc) in the next corner sp* repeat 3 times, ch 1, join to top of beg ch-3. (24 dc, 4 ch-2 spaces, 4 ch-1 spaces)
- Round 3: Sl st over to the next ch-2 corner, ch 3 (counts as dc), 2 dc, ch 2, 3 dc in ch-2 sp, *ch 1, 3 dc in ch-1 sp, ch 1, (3 dc, ch 2, 3 dc) in corner* repeat 3 times, ch 1, 3 dc in ch-1 sp, ch 1, join. (36 dc, 4 corners, 8 ch-1 spaces)
- Rounds 4-8: Continue as established: make (3 dc, ch 2, 3 dc) in corners, 3 dc in each ch-1 space on sides, separated by ch 1. Expand square until side length is approx. 25 cm (10 in), finishing after an even round so all sides are equal.
- Fasten off and weave in ends.
Tip: Block each square to ensure uniform size.
Part 2: 3D Rose Motif (Make 42)
- Layer 1 – Center of Rose: With red yarn, MR, ch 1, work 6 sc into ring. Pull tight and join with sl st to first sc. (6 sc)
- Layer 2 – Petal Base: Ch 1, (sc, hdc, 3 dc, hdc, sc) in the same st, *skip next st, (sc, hdc, 3 dc, hdc, sc) in next st* repeat until you have 3 large petals. Join with sl st.
- Layer 3 – Larger Outer Petals: Ch 2, working behind previous petals, insert hook into base of skipped stitches, *sc, hdc, 4 dc, hdc, sc* in each, forming 3 larger petals. Join.
- Layer 4 – Final Outer Petals: Ch 2, working even further behind, make 6 petals: for each, (sc, hdc, 4 dc, hdc, sc) in base of next available round. Fasten off, weave in center-tail but leave a long tail for sewing flower to square.
- Shape the flower: Use your fingers to gently curve each petal forward for a full 3D effect.
Part 3: Leaves and Rosebuds
Leaves (Make 8 per square; 336 total):
- With green yarn, ch 8.
- Row 1: Sc in 2nd ch from hook, hdc in next ch, dc in next 3 ch, hdc in next ch, sc in last ch. Do not turn.
- Pivot around to work along the other side of foundation chain: sc in first, hdc, dc in next 3, hdc, sc. Join to first sc. Fasten off, leaving a long tail for sewing.
Rosebuds (Make 4 per square; 168 total):
- With red yarn, MR, ch 1, 6 sc in ring. Pull tight and join. (6 sc)
- Ch 1, (sc in next st, 2 sc in next st) repeat around. (9 sc)
- Fasten off, stuff lightly if desired.
Bud Stems: For each bud, with green, ch 6. Fasten off, thread through base of bud when sewing to square.
Part 4: Arranging Motifs and Appliqués
- Lay each square RS up.
- Pin or mark the center spot. Center the rose and sew down securely using the long red tail.
- Place four large leaves symmetrically around the rose, angled outward like a compass (N, S, E, W) and sew down at the base.
- Attach four smaller leaves in the diagonal positions (NE, SE, SW, NW), slightly radiating outward for fullness.
- Arrange four rosebuds outside the leaves at evenly spaced points (between leaves), attaching each bud at the tip of a ch-6 green stem sewn to the square for realism.
- Secure all ends neatly on the back, ensuring pieces are firmly attached.
Part 5: Joining the Squares
- Arrange squares in a 6×7 grid (or desired dimensions), RS facing up.
- With red yarn, use a flat slip stitch seam or whipstitch to join squares edge to edge, following the solid red lines seen in the blanket.
- Work one long strip at a time, then join strips together, making sure that motif placement is consistent (roses all upright, matching corners).
- Make sure joins are not too tight—allow a little flexibility for the border to lay flat.
Part 6: Blanket Border and Tassels
Red Accent Border:
- With red yarn, work one complete round of sc evenly along the blanket’s outer edge, placing 3 sc in each corner to keep the shape.
- Next round: Ch 1, sc in each st around, again making 3 sc at corners. Fasten off.
- For a wider border, add additional rounds of dc or more rounds of sc as desired.
Tassel Fringe:
- Cut 6-8 strands of red yarn, each about 25 cm (10 in) long, per tassel.
- Fold bundle in half, insert hook through border edge, pull fold through and make a lark’s head knot to secure.
- Repeat, spacing tassels every 2-3 stitches along the entire lower edge of the blanket. Ensure spacing is even for a neat finish.
- Trim tassels to even length.
Assembly and Finishing
- Sew down any remaining loose leaves, rosebuds, or decorative elements securely after final blocking.
- Weave in all ends on the wrong side with a tapestry needle.
- For best results, lightly steam or wet block the finished squares and the assembled blanket before you add the tassels, to allow the motifs and joins to relax and lie flat.
- Gently shape the rose petals and leaves for maximum 3D effect while drying.
- Ensure the motif in every square is centered and that all applique elements are flat and secure.
Customization Ideas
- Colorways: Try soft pastels for a spring look, or deep jewel tones for modern drama.
- Yarn Weight: Use lighter yarn for a delicate, lacy summer throw, or chunky yarn for a bold, cozy winter version.
- Motif Adjustment: Make smaller squares for coasters, or just one square as a large decorative pillow.
- Alternative Uses: Assemble fewer squares for a table runner, wall hanging, or stroller blanket.
- Add Embellishments: Sprinkle a few sparkling beads or a touch of surface embroidery if desired.
Troubleshooting Tips
- Curling squares: Block each square before joining. If corners curl, try adding an extra dc or sc in corners on the last round.
- Uneven edges: Make sure to work evenly spaced stitches along edges, especially when joining squares.
- Motif too large/small: Adjust hook size up/down or check stitch tension if pieces aren’t matching.
- Loose color joins: Secure color changes by pulling new yarn snugly and weaving in ends in several directions.
- Uneven tension: Practice first with a sample square, adjust grip until stitches and motifs are consistent.
Care Instructions
- Gently hand-wash or use cold delicate cycle if acrylic; lay flat to dry.
- Avoid wringing or high heat (which can distort the texture).
- Spot clean where possible to preserve tassel shape and 3D motifs.
Final Notes
Take time at the end of each square to check your stitch counts and gently shape motifs by hand. Don’t rush the assembly—regularly step back and view your work to ensure even motif orientation and color balance. This blanket rewards careful attention to detail and offers a rewarding way to practice both 3D embellishments and classic methodical assembly. Use the original image as an inspirational visual guide and have fun customizing it for your own creative signature!