Whimsical Crochet Christmas Cones Pattern: Gnome, Tree, and Reindeer Friends
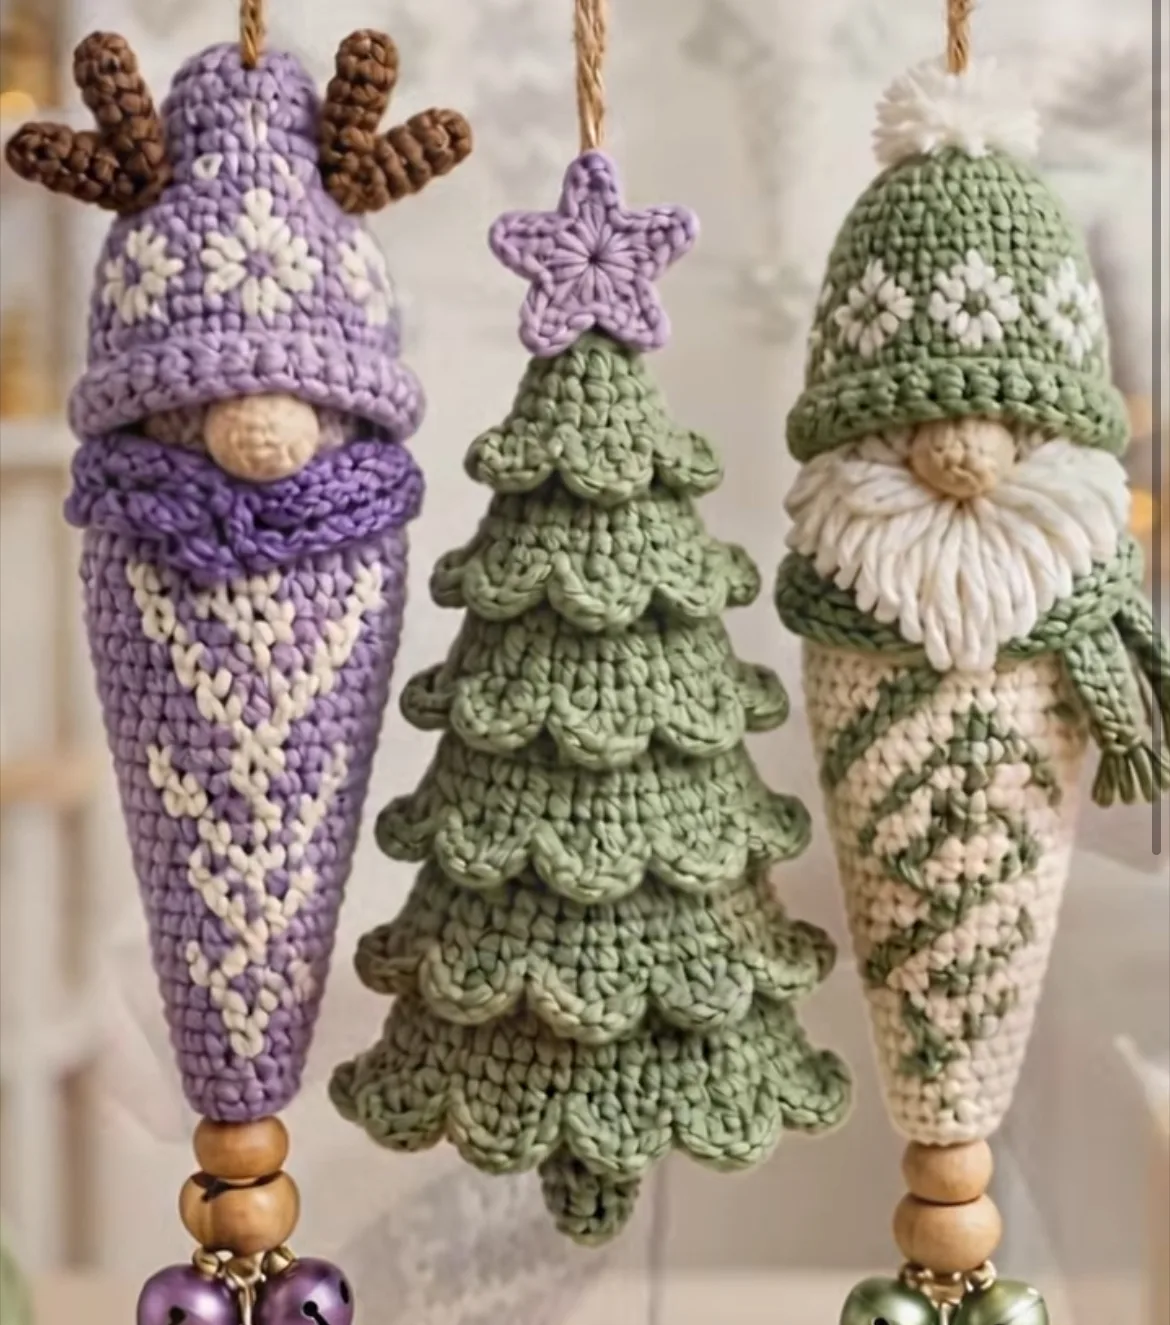
Bring handmade cheer to your holiday décor with this detailed crochet pattern for festive cone ornaments: a cozy gnome, a whimsical Christmas tree, and a charming reindeer-inspired figure. Featuring bright seasonal colors, playful textures, and clever cone shaping, these ornaments will become a highlight on any tree or as a special decorative touch throughout your home. Each character showcases eye-catching colorwork panels, textured stitches, classic bearded gnome and scarf details, or layered scallops for a tree effect, while the reindeer variation includes antlers and snowflake-like embroidery. Large wooden beads and shiny jingle bells anchor each ornament, while sturdy hanging loops make them ready for gifting or displaying. This project is perfect for crafters who cherish intricacy and love adding personal, handmade warmth to the holiday season.
Project Overview
The Christmas cone ornaments are each worked separately using continuous rounds from the tip downward. The main cone forms the body for the gnome and reindeer, and becomes the tree structure for the pine design. Additional elements—like hats, beards, scarves, antlers, embellishments, beads, and bells—are crocheted individually and sewn onto the main cone. Some colorwork is achieved via tapestry crochet, alternately carrying yarn colors for geometric or fair isle-like effects. Most details are crocheted flat or in the round and then attached, creating layered and dimensional ornaments that capture whimsical holiday spirit.
Skill Level
Intermediate: These ornaments are best suited for intermediate crocheters due to:
- Shape shaping with increases and decreases in continuous rounds
- Colorwork using tapestry crochet
- Attaching small, separate pieces for details like beards, scarves, antlers, and scalloped tree layers
- Some embroidery or surface crochet for snowflake or fair isle accents
Materials
- Yarn: Worsted weight cotton or cotton-blend yarn in the following approximate colors and amounts:
- Light purple (approx. 30g) – for reindeer cone and hat
- Cream (approx. 20g) – for accent colorwork and gnome cone
- Light sage green (approx. 35g) – for tree and gnome hat
- Dark brown (approx. 5g) – for reindeer antlers
- Lavender (approx. 8g) – for scarf
- White (approx. 10g) – for beard, fair isle, and pompom
- Pale pink (approx. 3g) – for noses
- Optional: Extra accent colors for star, scarf, or additional details
- Crochet hook: 3.5 mm (E-4)
- Tapestry needle (for sewing and weaving ends)
- Scissors
- Stitch markers (for marking start of rounds)
- Wooden beads: 2 per ornament (around 1–1.5 cm diameter)
- Small jingle bells: 1–2 per ornament
- Fiberfill stuffing
- Jute, twine, or strong yarn for hanging loops
- Optional: Hot glue (for attaching beads/bells if preferred)
Finished Size
- Each ornament: approx. 15–17 cm tall (6–6.75 inches), including hanging loop but not bells/beads
- Width at base: approx. 5–6 cm (2–2.5 inches)
Adjust size by choosing a different yarn weight and corresponding hook size. Finer yarn yields smaller ornaments; chunky yarn makes larger ones.
Gauge
Approximate gauge: 20 sc x 21 rounds = 10 cm/4 inches. Gauge is not critical, but significant differences may slightly change size and stuffing requirements. Use tight tension for a sturdy shape.
Stitches and Abbreviations
- ch – chain
- sl st – slip stitch
- sc – single crochet
- inc – increase (2 sc in next st)
- dec – decrease (sc2tog)
- hdc – half double crochet
- dc – double crochet
- tr – treble crochet
- MR – magic ring
- FLO – front loop only
- BLO – back loop only
Important Pattern Notes
- Work continuous (spiral) rounds—use a stitch marker to mark the first stitch of each round.
- Colorwork sections use tapestry crochet. Carry unused yarn inside stitches and switch colors at final yarn-over of previous stitch.
- Chains at round beginnings do not count as stitches unless otherwise specified.
- Amigurumi-style: Keep tension firm to prevent stuffing from showing through.
- Weave in all yarn ends securely inside cones/hats for neatness and durability.
- Sew additional features (noses, antlers, scarf, beard, star, beads) firmly for child-safety.
- The right side is the outside of the ornament unless otherwise stated.
Detailed Crochet Pattern
Part 1: Cone Body (Gnome or Reindeer)
Start with the color of your choice for the cone. Example: Light purple for the reindeer, cream for the gnome.
- MR, 6 sc in ring (6)
- Inc in each st around (12)
- (Sc in next st, inc) repeat around (18)
- (Sc in next 2 sts, inc) repeat around (24)
- (Sc in each st around) (24)
- (Sc in next 3 sts, inc) repeat around (30)
- (Sc in each st around) (30)
- Begin introducing tapestry colorwork (see chart below for arranging V-shape or zigzag details—carry 2nd color as you crochet): work as (sc 6, switch to contrasting color for 2 sts, back to main for 6, repeat around). Adjust spacing to match visual style.
- (Sc in next 4 sts, inc) repeat around (36)
- (Sc in each st around) (36)
- (Sc in 5, inc) around (42)
- (Sc in each st around) (42)
- Continue colorwork patterning; stagger your color stitches to achieve a zigzag or cross-motif, increasing/decreasing contrast sections as needed for a pointed pattern.
- (Sc in next 6, inc) around (48)
- (Sc in each st around) (48), repeat until the cone reaches about 12–13 cm (5 inches) long.
- Optional (for gnome’s lower edge/boot shape): One round in BLO (48), then one round in both loops (48).
- Fasten off, leaving a long tail. Lightly stuff the cone with fiberfill as you go to keep a dense shape. Set aside.
Part 2: Tree Cone
In sage green or desired tree color.
- MR, 6 sc (6)
- Inc around (12)
- (Sc, inc) around (18)
- (Sc 2, inc) around (24)
- (Sc around) (24)
- (Sc 3, inc) around (30)
- (Sc around) (30)
- (Sc 4, inc) around (36)
- (Sc around) (36)
- (Sc 5, inc) around (42)
- (Sc around) (42), repeat for 2–3 additional rounds or until cone reaches approx. 12 cm (4.75 in).
- Finish with a round in BLO (42); this will help anchor scalloped layers. Lightly stuff cone, fasten off.
Part 3: Hat (for Gnome & Reindeer)
Gnome’s Hat (sage green):
- MR, 6 sc (6)
- Inc around (12)
- (Sc, inc) around (18)
- (Sc 2, inc) around (24)
- (Sc 3, inc) around (30)
- (Sc around) (30)
- Begin fair isle/snowflake pattern using tapestry crochet: For 2–3 rounds, work as (sc 4 main color, sc 2 contrast, sc 4 main, etc), adjusting placement for a geometric motif.
- (Sc 4, inc) around (36)
- (Sc around) (36) until hat reaches approx. 5–6 cm (2.25 in)
- One round in BLO (36) for brim anchoring
- For brim: Join main hat color in FLO of last round. Work 1 hdc in each st around for 1 or 2 rounds. Fasten off, leave tail to sew onto cone.
- Make a small pompom (wrap white yarn around fingers, tie in middle, cut ends). Sew securely to hat tip.
Reindeer’s Hat (purple):
- Work as above but include reindeer antler holes if desired by skipping a stitch and chaining 1 in appropriate places on last round of hat before brim.
- Embroider small white dots or snowflakes onto hat after crocheting if not worked in tapestry crochet.
- For brim: sc in FLO of last round, working around as before.
Part 4: Decorative Details
Beard (for Gnome):
- Cut 18–20 pieces of white yarn, each 10–12 cm (4–5 in) long.
- Attach as fringe beneath hat edge: Pull through front loops below brim with hook (lark’s head knot), placing closely together in semicircle.
- Unravel plies and trim to shape (rounded at the bottom).
Scarf (for Gnome and/or Reindeer):
- With lavender or green yarn, ch 30, turn, sc in each ch across. Fasten off, weave ends.
- Knot both ends for fringe or attach extra strands. Wrap around cone below nose and sew in place at one side.
Antlers (for Reindeer):
- With brown yarn, ch 7, sc in 2nd ch from hook and next 2 ch, ch 3, sc back down 2 ch for first antler branch, continue sc in main chain to end. Fasten off.
- Repeat for second antler. Sew on top sides of hat.
Nose (for Gnome and Reindeer):
- With blush pink or pale skin-tone, MR, 6 sc, pull tight, sl st to join, fasten off leaving long tail.
- Stuff very lightly and sew just under hat rim.
Star Topper (for Tree):
- With lavender, ch 2, work (sc, ch 3, sl st in first ch, sc) 5 times in 2nd ch from hook, forming five points. Sl st to first sc, fasten off, leaving long tail for sewing.
- Sew securely to tip of tree cone.
Scalloped Tree Branches:
- Attach sage yarn to BLO row on the cone (3–4 positions down the cone, evenly spaced).
- For each round, *skip 1 st, 5 dc in next st, skip 1 st, sl st in next*, repeat around. Fasten off and weave ends at end of each scalloped round.
- Repeat for each BLO round as you work down the tree, adjusting scallop spacing as necessary.
Part 5: Assembly
- Stuff all cones and hats as needed for firmness.
- Sew hats atop gnome and reindeer cones at a tilt, with rim overlapping slightly for depth.
- Sew noses half-tucked under hat rim, centered.
- Attach antlers to hat sides on reindeer; embroider snowflakes/dots as desired.
- Fringe beard for gnome; glue or sew in place.
- Position and sew scarf around lower edge of gnome’s or reindeer’s hat, crossing ends below the nose. Tack down.
- Attach star to tree top.
- Thread two small wooden beads and jingle bells on a length of jute or string; knot securely.
- Sew or tie to bottom tip of each cone for hanging weight and cheerful sound.
- Attach a sturdy loop at the top of the hat (or tree star), knotted and sewn in place for hanging.
- Check for securely attached pieces, especially small ones on ornaments for children.
Assembly and Finishing
- Weave in all yarn ends securely inside cones and hats.
- Lightly block any flat pieces (scarves, star) if desired with steam or a damp cloth.
- Shape cones as needed for evenness, gently molding while stuffing.
- Straighten and trim beard and scarf edges neatly.
- Ensure all sewn elements (antlers, noses, hats, star) are anchored firmly and symmetrically.
- Check that each ornament hangs straight; adjust loop and bead positioning if needed.
Customization Ideas
- Use classic red, green, and white for a traditional holiday palette, or switch to pastel hues for a whimsical Nordic feel.
- Substitute metallic or glitter yarns for beards, scarves, or star for extra festive sparkle.
- Add safety eyes or tiny buttons for extra detail on gnomes or reindeer.
- Crochet tree cone in dark green and add mini pompoms or embroidered baubles.
- Attach a ring at the top and make a garland of cones, or use a single motif as a gift topper, keychain, or festive bag charm.
- Make several cones and join squares for a holiday throw, pillow cover, or wall hanging.
- Embroider initials, dates, or tiny hearts for a personalized ornament.
Troubleshooting Tips
- If cones curl or spiral, gently twist and pull after stuffing, and ensure even increases in rounds.
- Wavy or loose colorwork: Carry unused yarn with even tension and avoid too-tight floats.
- Gaps at color changes: Switch to new color on the last yarn-over of previous stitch.
- Motif too large or small: Adjust hook size or yarn and check tension—stuffing more firmly will plump up loose areas.
- Uneven edges: Block gently with steam and shape by hand while warm.
- Loose beads or bells: Secure knot with a drop of glue if needed; ensure beads can’t slide off easily.
- Beard or fringe messy: Separate yarn plies before trimming, and shape evenly.
Care Instructions
Hand wash gently in cool water with mild soap. Squeeze out water without wringing. Reshape, stuff lightly, and allow to air dry flat. For cotton yarn, block shapes as needed. Avoid machine drying or ironing.
Final Notes
For best results, check stitch counts at the end of each round, especially when working increases and colorwork. Adjust tension for neat color transitions and firm cone structure. Use the image as inspiration for color placement, scarf and beard styling, and unique character details. Enjoy turning simple cones into a whole set of festive, heartwarming holiday friends that are sure to bring joy year after year!