halloween decoration crochet ideas!
📖 B. INTRODUCTION
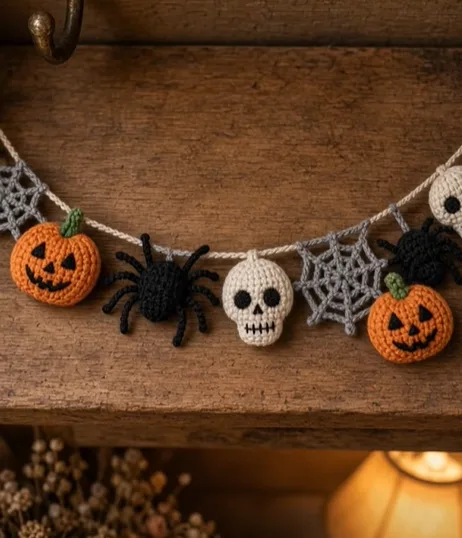
This Spooky Amigurumi Halloween Garland brings festive, handmade charm directly to your mantle, staircase, or doorway. The design alternates between slightly stuffed, three-dimensional amigurumi pieces and flat appliqués to create a textured, visually interesting display. It is the perfect seasonal touch for those who prefer their Halloween decor to be more cute than creepy, offering a playful aesthetic that works well in family spaces or classrooms.
Crocheting your own bunting allows for complete customization of length and motif placement. The visual design centers around a simple, rustic color palette: bright orange jack-o’-lanterns, stark black spiders, creamy white skulls, and grey spiderwebs, all strung along a natural beige cord. Because each piece is crafted individually before being attached to the main chain, this is an excellent project for using up scrap yarn and can easily be broken up into quick, manageable crafting sessions.
🔍 C. MAIN PATTERN OVERVIEW
This garland is constructed modularly. You will first crochet a collection of individual Halloween motifs. The pumpkins, skulls, and spiders are crocheted in continuous rounds and lightly stuffed for a 3D effect. The spiderwebs are crocheted flat in joined rounds. Finally, a long chain is crocheted in a neutral beige, and the finished motifs are sewn or crocheted directly onto the cord at even intervals.
🎯 D. SKILL LEVEL
Skill Level: Easy to Intermediate
This pattern requires basic amigurumi knowledge and simple flat crochet techniques. It is suitable for a confident beginner ready to practice shaping and embroidery.
- Crocheting in a magic ring
- Working in continuous rounds and joined rounds
- Basic increasing and decreasing for shaping
- Simple chain-stitch legs and loops
- Basic facial embroidery (backstitch and satin stitch)
📏 E. FINISHED SIZE
- Motif Size: Each motif measures approximately 2 to 2.5 inches (5 to 6.3 cm) in diameter.
- Garland Length: Adjustable. As written with 7 motifs, the garland measures approximately 45 inches (114 cm) long.
- Note: Yarn weight, hook size, and personal tension will naturally alter the final dimensions.
🧮 F. GAUGE
- Amigurumi (Pumpkins, Skulls, Spiders): 5 sc x 5 rows = 1 inch (2.5 cm).
- Tight, consistent stitches are crucial to prevent the fiberfill stuffing from showing through the fabric. If your stitches are loose, drop down a hook size. Gauge is less critical for the flat spiderwebs.
🧶 G. REQUIRED YARN AMOUNTS
Estimates are based on medium/worsted weight (Category 4) acrylic or cotton yarn.
- Orange: ~25 yards (for 2 pumpkins)
- Black: ~30 yards (for 2 spiders and facial embroidery)
- Cream/White: ~15 yards (for 1 skull)
- Grey: ~20 yards (for 2 spiderwebs)
- Beige/Natural: ~15 yards (for the garland string)
- Green: ~2 yards (for pumpkin stems)
🧰 H. MATERIALS
- Hook: 3.5 mm (E) crochet hook
- Yarn: Worsted weight yarn in Orange, Black, Cream/White, Grey, Green, and Beige
- Stuffing: Polyester fiberfill
- Needle: Tapestry/yarn needle for sewing and embroidery
- Scissors: Sharp craft scissors
- Stitch Markers: To mark the beginning of continuous rounds
- ⚠️ Safety Note: This pattern uses embroidered details instead of plastic safety eyes, making it safer for households with very young children or pets.
🔤 I. ABBREVIATIONS – US TERMS
- MR: Magic Ring
- ch: chain
- sc: single crochet
- hdc: half double crochet
- dc: double crochet
- tr: treble crochet
- inc: single crochet increase (2 sc in one stitch)
- dec: single crochet decrease (invisible decrease recommended)
- sl st: slip stitch
- st(s): stitch(es)
- FO: fasten off
📝 J. NOTES BEFORE YOU BEGIN
- Continuous Rounds: The pumpkins, spiders, and skulls are worked in a continuous spiral. Do not join with a slip stitch or chain 1 at the end of a round unless explicitly instructed.
- Joined Rounds: The spiderwebs are worked in joined rounds.
- Stuffing: Stuff the 3D motifs firmly to hold their shape, but not so tightly that the stitches stretch and expose the white fiberfill.
- Tails: Leave a long yarn tail (about 8-10 inches) when fastening off each motif to sew it to the garland string later.
🪡 K. COMPLETE PATTERN
🎃 Jack-o’-Lantern (Make 2)
The pumpkin is crocheted as a slightly flattened sphere in bright orange with a small green stem.
Main Pumpkin (Orange Yarn) R1: MR 6 sc. (6) R2: inc in each st around. (12) R3: (1 sc, inc) x 6. (18) R4: (2 sc, inc) x 6. (24) R5: (3 sc, inc) x 6. (30) R6-R10: sc in each st around. (30) R11: (3 sc, dec) x 6. (24) R12: (2 sc, dec) x 6. (18) Stuff the pumpkin firmly. R13: (1 sc, dec) x 6. (12) R14: dec x 6. (6) FO, leaving a long tail. Weave the tail through the front loops of the remaining 6 stitches and pull tight to close.
Stem (Green Yarn) Join green yarn to the top center of the pumpkin. Row 1: ch 3, sc in 2nd ch from hook, sc in next ch. Sl st back into the top of the pumpkin. FO and weave in ends.
Face Embroidery (Black Yarn or Thread) Using black yarn, embroider two small triangles for the eyes and a jagged smile on the front of the pumpkin.
🕷️ Spider (Make 2)
The spider features a stuffed, dome-like black body with eight chain-stitch legs.
Body (Black Yarn) R1: MR 6 sc. (6) R2: inc in each st around. (12) R3: (1 sc, inc) x 6. (18) R4: (2 sc, inc) x 6. (24) R5-R8: sc in each st around. (24) R9: (2 sc, dec) x 6. (18) Stuff the body lightly. R10: (1 sc, dec) x 6. (12) R11: dec x 6. (6) FO and close the hole.
Legs (Black Yarn) Join black yarn to the side of the body (around R7).
- Leg 1: ch 6, sl st in 2nd ch from hook and in next 4 chs, sl st into the next st on the body.
- Leg 2: sl st into next st, ch 7, sl st in 2nd ch from hook and next 5 chs, sl st into body.
- Leg 3: sl st into next st, ch 7, sl st in 2nd ch from hook and next 5 chs, sl st into body.
- Leg 4: sl st into next st, ch 6, sl st in 2nd ch from hook and next 4 chs, sl st into body. FO. Repeat this process on the exact opposite side of the body to create the remaining 4 legs.
💀 Skull (Make 1)
The skull is crocheted in a dome shape for the top of the head, with a flat extension for the jaw.
Head (White/Cream Yarn) R1: MR 6 sc. (6) R2: inc in each st around. (12) R3: (1 sc, inc) x 6. (18) R4: (2 sc, inc) x 6. (24) R5-R8: sc in each st around. (24) R9: (2 sc, dec) x 6. (18) R10: (1 sc, dec) x 6. (12) Stuff the top of the head firmly. R11: flatten the opening so the stitches line up. Working through both thicknesses to close the bottom: sc in next 5 sts. (5)
Jaw (White/Cream Yarn) Continue from R11 to create the jaw block. Row 1: ch 1, turn, sc in next 5 sts. (5) Row 2: ch 1, turn, sc in next 5 sts. (5) FO, leaving a long tail for sewing.
Face Embroidery (Black Yarn or Thread)
- Eyes: Embroider two large, solid black circles (or small squares) above the jawline.
- Nose: Embroider a small inverted “V” between the eyes.
- Teeth: Stitch a horizontal line across the jaw, then add 4-5 small vertical lines crossing it.
🕸️ Spiderweb (Make 2)
The web is a flat motif crocheted in joined rounds, featuring spokes and chain spaces.
Web (Grey Yarn) R1: MR, ch 4 (counts as dc + ch 1). (1 dc, ch 1) 5 times in the ring. Join with sl st to 3rd ch of starting ch 4. (6 dc, 6 ch-1 spaces) R2: ch 5 (counts as dc + ch 2). (dc in next dc, ch 2) 5 times. Join with sl st to 3rd ch of starting ch 5. R3: ch 6 (counts as dc + ch 3). (dc in next dc, ch 3) 5 times. Join with sl st to 3rd ch of starting ch 6. R4: ch 7 (counts as tr + ch 3). (tr in next dc, ch 3) 5 times. Join with sl st to 4th ch of starting ch 7. FO, weave in ends. (Leaves the web as a flat, hexagonal shape).
🧵 Garland String
String (Beige Yarn) Leave a 5-inch tail, ch 150 (or until desired length is reached). FO, leaving another 5-inch tail. (Optional: For a thicker cord, ch the desired length, turn, and sl st back down the entire chain).
🎨 L. STYLING / ASSEMBLY / STABILITY / FINAL SHAPING
Recommended Assembly Sequence:
- Complete all individual motifs and their respective embroidery.
- Lay the beige garland string flat on a table.
- Arrange the motifs in your desired order. The reference image uses an alternating pattern: Spiderweb, Pumpkin, Spider, Skull, Spiderweb, Pumpkin.
- Space the items approximately 3 to 4 inches apart.
- Using the long yarn tails left on each motif, securely whip stitch the top of each piece to the beige chain.
- Ensure the flat spiderwebs lay flat against the wall, while the 3D items hang naturally downward.
✅ Finishing Checklist:
- ✅ All facial features are cleanly embroidered and facing forward.
- ✅ Spider legs are untwisted and fanned out.
- ✅ The skull’s jawline sits perfectly vertical.
- ✅ Motifs are spaced evenly along the cord.
- ✅ All loose ends from the motifs are woven in completely.
💡 M. HELPFUL CROCHET TIPS
- 💡 Embroidery Precision: When embroidering the faces, split your yarn plies or use standard embroidery floss for cleaner, sharper edges on the teeth and eyes.
- 💡 Leg Curling: If the spider legs curl too much, lightly dampen them and pin them flat to a blocking mat overnight.
- 💡 Invisible Decrease: Always use the invisible decrease method (working only in the front loops) for the 3D shapes to avoid gaps where stuffing might show.
- 💡 Symmetrical Webs: When finishing the magic ring on the spiderweb, do not pull it so tight that the center bunches up. Leave a tiny hole so the web stays perfectly flat.
- 💡 Attachment: Sew through the bottom loop of the garland chain so the top braided edge of the chain remains visible and neat.
- 💡 Customization: You can easily slide wooden beads onto the string between the motifs for an extra decorative touch.
🧼 N. CARE INSTRUCTIONS
Because this item contains fiberfill and intricate embroidery, machine washing is not recommended. If the garland becomes dusty from hanging, use a lint roller or carefully shake it out. For small stains, spot clean with a damp cloth and mild soap. Allow it to air dry completely. Store the garland flat in a sealed container or ziplock bag during the off-season to prevent the spider legs from becoming tangled or misshapen.
❓ R. FAQ
❓ Can I make the garland longer? Absolutely! Simply crochet a longer starting chain for the string and make additional motifs. Keep the 3-4 inch spacing consistent.
❓ Can I use plastic safety eyes instead of embroidery? Yes. If using safety eyes for the pumpkins or skulls, insert them and secure the backings between Rounds 7 and 8 before you begin decreasing and stuffing the motif.
❓ My spiderwebs are curling. How do I fix this? Flat crochet motifs often need blocking. Pin the spiderwebs to a blocking board, mist them lightly with water, and let them dry completely before attaching them to the garland.
❓ What if I don’t have worsted-weight yarn? You can use any yarn weight (DK, sport, or bulky) as long as you use a corresponding hook size. Just note that using thicker or thinner yarn will change the final size of the motifs.