Rose & Lily Crochet Table Runner Reveal 🌹
📖 B. INTRODUCTION
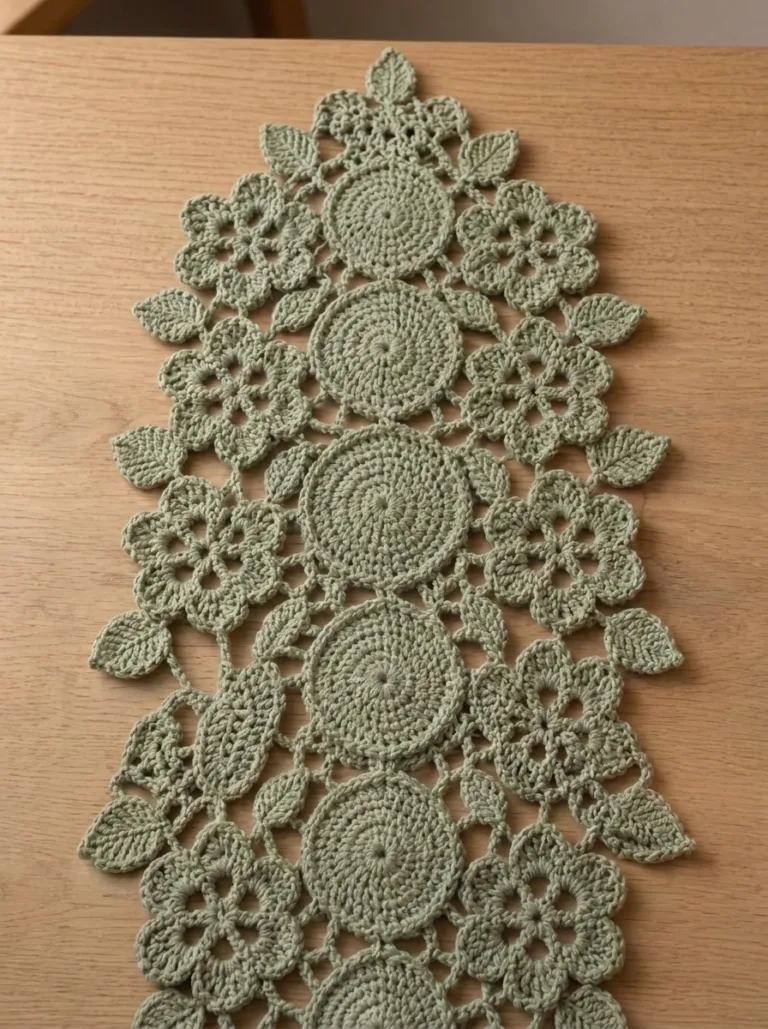
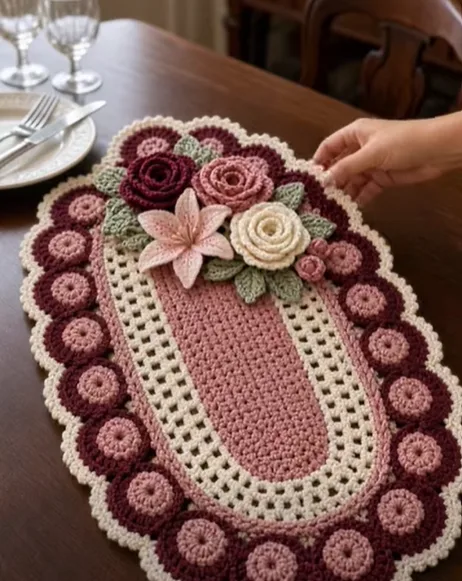
The Rose & Lily Crochet Table Runner brings an immediate sense of vintage romance and botanical elegance to any dining room or entryway. Designed as an intricate oval centerpiece, it features a warm, tonal palette of dusty pinks, deep burgundies, and creamy whites, mimicking the look of a classic English garden. This runner is perfect for dressing up a holiday table, gifting to a newlywed couple as a handmade keepsake, or simply adding a touch of cottagecore charm to your everyday home decor.
The design relies on striking visual contrasts: a solid inner oval is framed by a delicate openwork mesh, while a bold border of circular motifs creates a beautifully scalloped edge. The true focal point, however, is the asymmetrical 3D floral bouquet resting gracefully on one side. By combining heavily textured rolled roses, a striking open-petaled lily, and nestled green leaves, the runner breaks free from traditional flat doilies to offer stunning, three-dimensional dimension. The floral cluster can be customized in color to match any seasonal theme or interior palette.
🔍 C. MAIN PATTERN OVERVIEW
Base Runner The foundation is worked as a large flat oval. It begins with a solid center worked in dusty pink double crochet stitches, providing a dense, protective base for table settings. This is surrounded by a cream-colored openwork mesh created using chain spaces, lending the piece an airy, lace-like transition.
Motif Border & Outer Scallop A continuous ring of two-tone circular motifs (pink centers with burgundy borders) frames the runner. These are crocheted individually and joined together, followed by a final, unifying cream scalloped edge that wraps around the entire exterior.
3D Floral Embellishments The decorative bouquet is crocheted in separate modules and securely sewn onto the finished base. It consists of three large rolled roses in varying shades, one dramatic center lily, a scattering of pointed green leaves, and two small berry-like buds.
🎯 D. SKILL LEVEL
Intermediate This pattern requires comfort with working in the round, maintaining stitch counts across flat oval curves, and assembling multi-part structural elements.
- Working flat ovals with precise corner increases
- Crocheting openwork mesh (chain spaces)
- Joining individual motifs
- Crocheting 3D floral structures (rolled roses and shaped petals)
- Blocking and sewing heavy appliqués securely
📏 E. FINISHED SIZE
- Length: 24 inches (61 cm)
- Width: 15 inches (38 cm)
- Note: The final dimensions will vary slightly based on your chosen yarn weight, hook size, and how aggressively the runner is blocked before the flowers are attached.
🧮 F. GAUGE
- Solid Center Oval: 14 dc stitches x 8 rows = 4 inches (10 cm).
- Consistent tension is more important than exact gauge to ensure the oval remains flat without rippling or cupping. If your oval begins to ruffle, you may need to adjust your hook size or decrease your tension.
🧶 G. REQUIRED YARN AMOUNTS
Estimates are based on DK weight (Category 3) mercerized cotton yarn, which provides the best stitch definition and durability for table linens.
- Dusty Pink: ~200 yards (for center oval, motif centers, lily, and one rose)
- Cream/Off-White: ~150 yards (for mesh border, outer scallops, and one rose)
- Burgundy/Wine: ~120 yards (for motif borders and one rose)
- Sage Green: ~40 yards (for leaves)
- Light Pink: ~20 yards (for small buds and lily accents)
🧰 H. MATERIALS
- Hook: 3.5 mm (E) crochet hook
- Yarn: DK weight mercerized cotton in Dusty Pink, Cream, Burgundy, Sage Green, and Light Pink
- Needle: Large-eye tapestry needle for weaving in ends and heavy sewing
- Pins: Rust-proof T-pins for blocking
- Scissors: Sharp craft scissors
- Stitch Markers: 4 markers to track the corners of the oval increases
- Optional: Liquid starch or fabric stiffener for the lily petals
🔤 I. ABBREVIATIONS – US TERMS
- ch: chain
- sc: single crochet
- hdc: half double crochet
- dc: double crochet
- tr: treble crochet
- sl st: slip stitch
- st(s): stitch(es)
- sp: space
- inc: increase (2 sts in same st)
- MR: Magic Ring
- FO: fasten off
📝 J. NOTES BEFORE YOU BEGIN
- Oval Increases: The base oval is worked in joined rounds. The sides are worked straight, while the ends have concentrated increases. Use stitch markers to mark the first and last stitch of the curved ends to easily track where your increases belong.
- Blocking is Mandatory: Do not skip blocking the base runner and border before attaching the 3D flowers. Cotton yarn requires wet blocking to relax the stitches and achieve the proper flat drape.
- Joining Motifs: The circular motifs can be joined using a join-as-you-go (JAYG) method during the final round of the motif, or whipstitched together using a tapestry needle. The pattern assumes whipstitching for beginner friendliness, but JAYG is highly encouraged for a seamless finish.
🪡 K. COMPLETE PATTERN
Base Runner: Solid Center Oval Worked in Dusty Pink. R1: Ch 42. dc in 4th ch from hook, dc in next 37 ch. 6 dc in the last ch. Working down the opposite side of the foundation chain: dc in next 37 ch, 4 dc in the last ch (same ch as the first sts). Join with sl st to top of starting ch-3. (84 dc) R2: Ch 3, dc in same st. dc in next 37 sts, 2 dc in each of the next 6 sts (the curve). dc in next 37 sts, 2 dc in each of the last 5 sts. Join with sl st. (96 dc) R3: Ch 3, dc in same st, 1 dc in next st. dc in next 37 sts. (2 dc in next st, 1 dc in next st) 6 times. dc in next 37 sts. (2 dc in next st, 1 dc in next st) 5 times. Join. (108 dc) R4: Ch 3, dc in same st, dc in next 2 sts. dc in next 37 sts. (2 dc in next, dc in next 2) 6 times. dc in next 37 sts. (2 dc in next, dc in next 2) 5 times. Join. (120 dc) R5-R8: Continue this established oval increase pattern (adding one more plain dc between increases on the curves each round, keeping the straight sides at 37 dc). FO Dusty Pink.
Base Runner: Openwork Mesh Join Cream yarn to any stitch on the straight edge. R9: Ch 4 (counts as dc + ch 1), skip next st, dc in next st, ch 1, skip next st. Repeat from * to * around. On the curves, to prevent curling, you may need to (dc, ch 1, dc) into the same stitch at the 3 peak points of each curve. Join to 3rd ch of starting ch-4. R10-R12: Sl st into first ch-sp. Ch 4 (counts as dc + ch 1). dc in next ch-sp, ch 1. Repeat from * to * around. Join to 3rd ch of starting ch-4. FO Cream.
Border Motifs (Make 24 – adjust quantity based on base size) Inner Circle (Dusty Pink) R1: MR, ch 3 (counts as dc), 11 dc in ring. Join with sl st. (12) FO Dusty Pink. Outer Ring (Burgundy) Join Burgundy to any st. R2: Ch 3, dc in same st. 2 dc in each st around. Join with sl st. (24) FO Burgundy, leaving a long tail for sewing.
Joining Motifs & Outer Edge
- Lay the motifs in a ring around the cream mesh base.
- Whipstitch the motifs to each other side-by-side (sewing about 3 stitches together where they touch).
- Whipstitch the inner curve of the motif ring to the outermost edge of the Cream mesh base.
- Outer Scallop (Cream): Join Cream to the outer edge of any motif. sc in 8 sts across the top of the motif, skip the dip where the motifs join. Repeat around to create a unified scalloped edge. FO and weave in ends.
Rolled Roses (Make 1 Burgundy, 1 Cream, 1 Dusty Pink) Row 1: Ch 55. dc in 5th ch from hook, ch 2, skip 2 ch, (dc, ch 2, dc) in next ch. Repeat from * across. Turn. Row 2: * (sc, hdc, 3 dc, hdc, sc) into the ch-2 space of the V-stitch, sl st into the space between V-stitches *. Repeat across. FO, leaving a very long tail (15 inches). Assembly: Roll the strip tightly starting from one end. Use the long tail and a tapestry needle to sew through the bottom foundation chain layers, securing the rose shape so it doesn’t unroll.
Open Lily (Make 1 in Light Pink) Make 6 petals. Row 1: Ch 12. sc in 2nd ch from hook, hdc in next 2, dc in next 5, hdc in next 2, 3 sc in last ch. Working down opposite side: hdc in next 2, dc in next 5, hdc in next 2, sc in last ch. Row 2: Sl st around the entire perimeter of the petal to give it firm structure. FO, leaving a tail. Assembly: Sew the bases of the 6 petals together in a star shape.
Leaves (Make 8 in Sage Green) Row 1: Ch 10. sc in 2nd ch from hook, hdc in next, dc in next 2, tr in next 2, dc in next, hdc in next, 3 sc in last. Opposite side: hdc in next, dc in next, tr in next 2, dc in next 2, hdc in next, sc in last. FO, leaving a tail.
Flower Buds (Make 2 in Light Pink) R1: MR, 6 sc. (6) R2: inc around. (12) R3-R4: sc around. (12) R5: dec around. (6) FO, stuff slightly with yarn scraps, close hole.
🎨 L. STYLING / ASSEMBLY / STABILITY / FINAL SHAPING
Preparation & Blocking Before assembling the flowers, wash or wet the flat runner base. Pin it out on a blocking mat, ensuring the oval is symmetrical and the motif border lays perfectly flat. Allow it to dry completely. Do not skip this step, or the weight of the flowers will warp the runner.
Bouquet Assembly
- Placement: Position the runner flat on a table. Choose one end of the inner pink oval (where it meets the cream mesh) to be the anchor point for your bouquet.
- Anchor the Lily: Sew the large lily down first, slightly off-center.
- Nestle the Roses: Arrange the three rolled roses around the lily. The varying sizes and colors should create a tight, triangular cluster. Sew firmly through all layers of the roses into the base runner.
- Tuck the Leaves: Slide the green leaves under the edges of the roses and lily. Tack them down only at the base of the leaf, allowing the tips to curl up slightly for a lifelike 3D effect.
- Add the Buds: Sew the small pink buds peeking out from the edge of the leaf cluster.
✅ Finishing Checklist:
- ✅ Base oval is blocked flat with no rippling.
- ✅ All border motifs are securely joined without gaps.
- ✅ The floral bouquet is heavily secured; it should not flop or detach if the runner is shaken.
- ✅ Lily petals are shaped (use a light touch of fabric stiffener if they droop).
- ✅ All loose ends on the back of the runner are woven securely.
💡 M. HELPFUL CROCHET TIPS
- 💡 Preventing Oval Ripples: If your flat oval begins to ripple like a potato chip, it means you have too many stitches or your tension is too loose. Try dropping down a hook size. If it bows up like a bowl, you have too few stitches or tight tension.
- 💡 Seamless Color Changes: When changing colors on the border motifs, complete the final yarn over of the last stitch in the old color with the new color for a crisp transition.
- 💡 Stiffening Petals: To make the open lily petals stand out beautifully, paint the back of them lightly with a 50/50 mixture of white PVA glue and water, and let them dry draped over a curved surface (like a rolling pin).
- 💡 Hidden Seams: When sewing the heavy 3D flowers to the runner, only catch the back loops of the base oval stitches so the sewing thread doesn’t show on the underside of the table runner.
- 💡 Yarn Tails as Stuffing: Instead of using polyfill for the tiny flower buds, just stuff them with the yarn tails from your color changes to save materials and avoid white fluff showing through.
🧼 N. CARE INSTRUCTIONS
Because of the 3D floral elements, this table runner requires delicate care. Do not machine wash. Spot clean the flat base with a damp cloth and mild detergent as needed. If a full wash is required, gently submerge the runner in cool water with a gentle wool/cotton wash, taking care not to crush the rolled roses. Press the flat sections between dry towels to remove moisture, then lay flat to air dry. You may need to manually reshape the lily petals and leaves while damp. Do not iron directly over the 3D flowers.
❓ R. FAQ
❓ Can I make this runner longer for a large dining table? Yes! To make the runner longer, simply start with a longer foundation chain for the center oval. The curve increases at the ends will remain exactly the same, you will just have more plain stitches along the straight sides.
❓ Can I use acrylic yarn instead of cotton? While you can use acrylic, mercerized cotton is highly recommended for table linens. Cotton is more heat-resistant (if you plan to put warm dishes on the flat parts), washes better, and blocks to a much crisper, flatter finish than acrylic.
❓ My circular border motifs are cupping. How do I fix this? If the burgundy edge of your motif is cupping, your tension is likely too tight. Try using a hook one size larger just for the outer ring of the motifs to give the stitches more room to lay flat.
❓ Is the back of the runner messy from sewing the flowers? If you carefully whipstitch the flowers by catching only the top loops of the base runner stitches, the back can remain remarkably clean. Weave all your floral yarn tails into the thick bases of the flowers themselves, rather than through the flat runner.
This Rose & Lily Crochet Table Runner is a true labor of love that transforms standard crochet stitches into a functional piece of art. Whether you are crafting it for a special holiday meal, a wedding table, or just to elevate your everyday dining space, the dimensional floral details are sure to become a conversational centerpiece.