Blue Irish Lace Table Runner 💙🤍
🧸 ## TITLE + category/tag line Blue Irish Lace Table Runner Free Crochet Pattern An heirloom-quality filet mesh and floral appliqué centerpiece for your table.
📖 ## INTRODUCTION
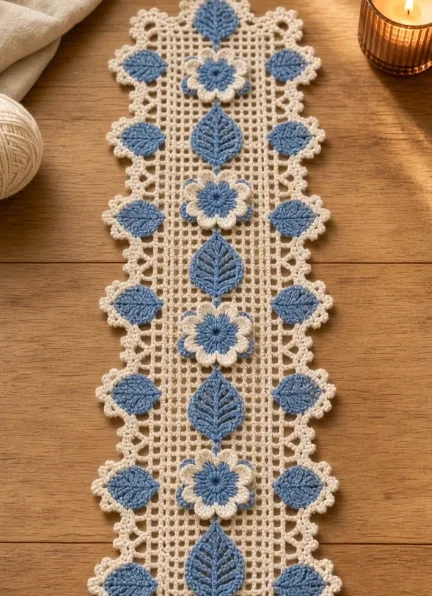
Bring a touch of timeless elegance to your dining room with the Blue Irish Lace Table Runner. Inspired by the intricate beauty of traditional Irish crochet, this stunning piece features a delicate, creamy white filet mesh base that perfectly frames a cascade of richly textured floral motifs. The contrast between the crisp, geometric background and the organic, sweeping curves of the leaves and blossoms creates a breathtaking focal point for any table setting.
This pattern is a wonderful project for those who want to create a true heirloom. Whether you are crocheting it as a bespoke wedding gift, a seasonal centerpiece for spring and summer gatherings, or a permanent fixture on your favorite vintage sideboard, this runner is sure to impress. The most recognizable visual details—the dusty blue ribbed leaves, the two-toned layered flowers, and the scalloped picot edging—give it a sophisticated, romantic charm.
While the classic cream and dusty blue combination offers a soothing, vintage aesthetic, this pattern is highly customizable. You can easily personalize it by swapping the blue for a soft sage green, a dusty rose, or even keeping the entire piece in solid white for a monochromatic, traditional bridal look.
🔍 ## MAIN PATTERN OVERVIEW
To make this design accessible while achieving the complex look of Irish lace, this runner uses an appliqué construction method. You will first crochet a long, rectangular filet mesh base bordered by elegant scallops. Once the foundation is complete and blocked, you will crochet the detailed floral and leaf motifs separately. Finally, you will carefully arrange and sew these blue and cream accents onto the mesh, creating a stunning three-dimensional, structured textile.
🎯 ## SKILL LEVEL
Intermediate This pattern requires comfort with thread or fine yarn, consistent tension, and careful finishing.
Techniques Involved:
- Working in flat rows (filet mesh)
- Working in joined rounds (flowers and borders)
- Working around both sides of a foundation chain (leaves)
- Creating ribbed textures using Back Loop Only (BLO) stitches
- Surface sewing and precise motif placement
📏 ## FINISHED SIZE
Measurements:
- Width: Approximately 12 inches (30 cm)
- Length: Approximately 36 inches (91 cm)
Note: The final size will vary depending on your yarn choice, hook size, and tension. You can easily adjust the length of the runner by adding or subtracting rows from the filet mesh base and adjusting the number of central motifs accordingly.
🧮 ## GAUGE
- Filet Mesh: 10 filet squares = 4 inches (10 cm) wide.
- Flower Motif: Finished flower measures approximately 3.5 inches (9 cm) in diameter.
Gauge is not strictly critical for this project, as it is a home decor item, but consistent tension is important to ensure your mesh base lies flat and your motifs fit proportionally within the border scallops.
🧶 ## REQUIRED YARN AMOUNTS
For this delicate, lacy look, a Fingering Weight (Size 1) yarn or a Size 3 Mercerized Crochet Thread is highly recommended.
- 🤍 Main Color (MC) – Cream / Off-White: Approximately 450 yards (410 meters). This covers the main filet mesh base, the scalloped border, and the flower petal edgings.
- 💙 Contrast Color (CC) – Dusty Blue: Approximately 300 yards (275 meters). This covers all the central leaves, the side leaves, and the main bodies of the flowers.
(Note: Yardage is an estimate. If you decide to lengthen the runner, be sure to purchase an extra skein of your Main Color.)
🧰 ## MATERIALS
- Hook: 2.5 mm (US Size C) crochet hook (or size needed to obtain a pleasing mesh tension)
- Yarn: Fingering weight cotton yarn or Size 3 crochet thread in MC (Cream) and CC (Blue)
- Needle: Tapestry needle with a small eye for weaving in ends and sewing motifs
- Scissors: Sharp embroidery scissors
- Stitch Markers: 4-6 locking stitch markers (helpful for marking corners)
- Blocking Tools: Rust-proof blocking pins and blocking mats (⚠️ Crucial for this project!)
- Optional: Liquid fabric stiffener or spray starch for a crisp finish
🔤 ## ABBREVIATIONS – US TERMS
- ch: chain
- sl st: slip stitch
- sc: single crochet
- hdc: half double crochet
- dc: double crochet
- tr: treble (triple) crochet
- sk: skip
- sp(s): space(s)
- st(s): stitch(es)
- BLO: back loop only
- picot: ch 3, sl st in the 3rd ch from hook
- MR: magic ring
- MC: Main Color (Cream)
- CC: Contrast Color (Blue)
📝 ## NOTES BEFORE YOU BEGIN
- Filet Mesh Turning Chain: The ch 5 at the beginning of mesh rows counts as 1 dc and a ch-2 space.
- Motif Sewing: Leave long yarn tails (about 12 inches) on all your leaves and flowers when you fasten off. You will use these tails to sew the motifs to the mesh base.
- Blocking: Do not skip blocking! Irish lace and filet crochet look crumpled until they are aggressively wet-blocked. Block your mesh base before sewing the motifs on.
- Symmetry: Pay close attention to the placement of the leaves; the side leaves are designed to nestle perfectly into the inner curves of the scalloped border.
🪡 ## COMPLETE PATTERN
🕸️ 1. The Filet Mesh Base (MC – Cream)
The base is a simple open mesh of double crochets and chain spaces.
Row 1: With MC, ch 77. dc in the 8th ch from the hook. ch 2, sk 2 chs, dc in the next ch. Repeat from * to the end of the chain. Turn. (24 open squares) Row 2: ch 5 (counts as dc + ch-2 sp). sk the first ch-2 sp, dc in the next dc. ch 2, sk next ch-2 sp, dc in the next dc. Repeat from * across, placing the final dc in the 3rd chain of the turning chain from the previous row. Turn. (24 open squares) Rows 3 – 85: Repeat Row 2. (Adjust the number of rows here if you want a shorter or longer runner. 85 rows will yield an approx. 34-inch base before the border.)
Do not fasten off. Continue to the border.
🌊 2. The Scalloped Border (MC – Cream)
Worked in joined rounds around the entire perimeter of the mesh rectangle.
Rnd 1 (Base Round): ch 1, sc evenly around the entire rectangle. Work 2 sc in each ch-2 space, 1 sc in each dc, and 3 sc in each corner space. sl st to the first sc to join. Rnd 2 (Arches): ch 1, sc in the first st. ch 5, sk 3 sts, sc in the next st. Repeat from * around the entire border. In the corners, ensure an arch lands squarely on the corner point (adjust skipped stitches to 2 instead of 3 near the corners if necessary to make the math work). sl st to first sc to join. Rnd 3 (Scallops): sl st into the first ch-5 space. ch 3 (counts as dc). Work (3 dc, picot, 4 dc) in the same ch-5 space. sc in the next ch-5 space. (4 dc, picot, 4 dc) in the next ch-5 space. Repeat from * around. sl st to the top of the beginning ch-3 to join. Fasten off MC and weave in ends.
🌸 3. Center Flowers (Make 4)
These layered flowers have 8 petals. The main body is blue, with a cream edging added at the end.
Rnd 1: With CC (Blue), make a MR. ch 1, work 16 sc into the ring. Pull tight to close. sl st to first sc to join. (16) Rnd 2 (Petals): sl st in the next st. ch 4, work 3 tr in the same st. ch 4, sl st in the next st. Repeat from * 7 more times to create 8 petals total. Fasten off CC, leaving a long tail for sewing.
Rnd 3 (Cream Edging): Join MC (Cream) with a sl st to the base of any ch-4 from Rnd 2. Work 4 sc up the side of the ch-4. Work (sc, ch 1, sc) in the top of the middle tr stitch of the petal. Work 4 sc down the next ch-4. sl st into the space between petals. Repeat from * around all 8 petals. Fasten off MC and weave in the cream ends (keep the blue tail for sewing).
🍃 4. Center Leaves (Make 5)
These are the large, ribbed leaves that run down the center of the runner. The ribbing is created by working in the Back Loop Only (BLO).
Row 1: With CC (Blue), ch 16. sc in 2nd ch from hook. hdc in next ch, dc in next 2 chs, tr in next 7 chs, dc in next 2 chs, hdc in next ch, 3 sc in the last ch (the tip). Rotate to work down the opposite side of the foundation chain. hdc in next ch, dc in next 2 chs, tr in next 7 chs, dc in next 2 chs, hdc in next ch, sc in the last ch. ch 1, turn. Row 2 (Ribbing): Working in BLO for this entire row: sc in first 3 sts, hdc in next 3 sts, dc in next 8 sts. When you reach the center tip (the middle sc of the 3-sc group), work (dc, ch 2, dc) in that center stitch. Continuing down the other side in BLO: dc in next 8 sts, hdc in next 3 sts, sc in last 3 sts. Fasten off, leaving a very long tail for sewing.
🌿 5. Side Leaves (Make 12)
These leaves are smaller and sit along the outer edges, nested inside the mesh near the border scallops. You will need 6 for each side.
Row 1: With CC (Blue), ch 11. sc in 2nd ch from hook. hdc in next ch, dc in next 6 chs, hdc in next ch, 3 sc in the last ch. Rotate to work down the opposite side of the chain. hdc in next ch, dc in next 6 chs, hdc in next ch, sc in the last ch. ch 1, turn. Row 2 (Ribbing): Working in BLO: sc in first 2 sts, hdc in next 2 sts, dc in next 5 sts. In the center tip stitch, work (hdc, ch 2, hdc). Down the other side in BLO: dc in next 5 sts, hdc in next 2 sts, sc in last 2 sts. Fasten off, leaving a long tail for sewing.
🎨 ## L. STYLING / ASSEMBLY / STABILITY / FINAL SHAPING
Assembly is where the magic of Irish lace happens. Follow these steps carefully to ensure a perfectly flat, professional finish.
- Phase 1: Blocking the Base. Before attaching any motifs, wet-block your cream mesh base. Pin it out squarely on blocking mats, pulling the scalloped border taut so the picots are sharp. Spray with starch if desired. Let it dry completely.
- Phase 2: The Center Column.
- Find the exact center of your mesh runner.
- Pin your central motifs in an alternating line down the middle: Leaf, Flower, Leaf, Flower, Leaf, Flower, Leaf, Flower, Leaf.
- Ensure the tips of the leaves point perfectly straight down the length of the runner.
- Phase 3: The Side Leaves.
- Take your 12 smaller side leaves and pin them along the left and right edges of the mesh.
- Position each side leaf so it points slightly outward, nestled comfortably just inside the inner dip of a cream border scallop. Space them evenly (6 on the left, 6 on the right), aligning them visually with the spaces between the center motifs.
- Phase 4: Sewing.
- Thread your tapestry needle with the blue yarn tails you left on the motifs.
- Carefully whip-stitch the motifs to the filet mesh.
- Crucial tip: Only sew through the blue back loops of the leaves and the blue center bases of the flowers. Leave the cream flower petal edges free and slightly lifted to create that beautiful 3D texture.
- Phase 5: Final Check. ✅
- ✅ Check the back of the runner; keep your yarn travels neat and hidden within the mesh bars.
- ✅ Ensure the runner still lies perfectly flat on a table. If it puckers, your sewing tension may be too tight.
💡 ## M. HELPFUL CROCHET TIPS
- 💡 Invisible Joins: When finishing your flower edging and border rounds, use an invisible join instead of a slip stitch for a seamless look.
- 💡 Pinning is Mandatory: Never try to eyeball the placement of 21 separate motifs while sewing. Pin them all securely first, step back, look at the symmetry, and then begin sewing.
- 💡 Stitching over Mesh: When sewing appliqués to filet mesh, try to anchor your stitches where the solid double crochets intersect, rather than wrapping yarn loosely around the delicate chain spaces.
- 💡 Manage your Tails: Weave in all the cream tails from the flower edgings before you sew the flowers to the mesh base. It will save you a headache later!
- 💡 Tension Control: If your mesh base feels too loose and floppy, go down half a hook size. Filet mesh looks best when the squares are crisp and tight.
- 💡 Customizing Length: If you alter the length, remember that you need a “Flower + Leaf” pairing for the center. For every ~4 inches of mesh you add, you will likely need to crochet one extra center flower, one extra center leaf, and two extra side leaves.
🧼 ## N. CARE INSTRUCTIONS
Because of the delicate mesh and 3D appliqués, this table runner should be treated as a hand-wash-only heirloom.
- Washing: Submerge gently in cool water with a mild, no-rinse wool or cotton wash. Do not wring or twist.
- Drying: Roll the runner in a clean, dry towel and press down to absorb excess water. Unroll and immediately pin it flat on blocking mats to dry.
- Starching: To keep the scalloped edges crisp and the leaves flat, a light misting of spray starch during the drying process is highly recommended.
- Storage: Store rolled loosely around a cardboard tube to prevent hard creases, rather than folding it in a drawer.
❓ ## R. FAQ
❓ Can I use regular medium worsted weight yarn for this? You can, but the finished runner will be massive and very thick—more like a rug than a delicate table runner. Sticking to fingering weight yarn or size 3 thread ensures the heirloom lace aesthetic.
❓ My mesh rectangle is slanting to one side. What did I do wrong? This usually happens if you accidentally add or drop a stitch at the end of a row, or if your tension changes dramatically. Counting your “squares” at the end of every row (you should always have 24) is the best way to prevent this. Aggressive blocking can fix minor slanting.
❓ Do I have to stiffen or starch the runner? It is not strictly required, especially if you used a mercerized cotton which has natural structure. However, starching gives the filet mesh that crisp, vintage look and prevents the scalloped borders from curling up.
❓ How do I make the runner wider for a large dining table? To make the runner wider, increase your starting chain for the mesh base by multiples of 3. For a wider runner, you could also crochet a second column of side leaves!
❓ Can I attach the motifs using fabric glue instead of sewing? For a long-lasting heirloom piece that can be washed, sewing is strongly recommended. Fabric glue can discolor the yarn over time and may stiffen the mesh awkwardly.