Crochet Christmas Tree Ornaments
📖 B. INTRODUCTION
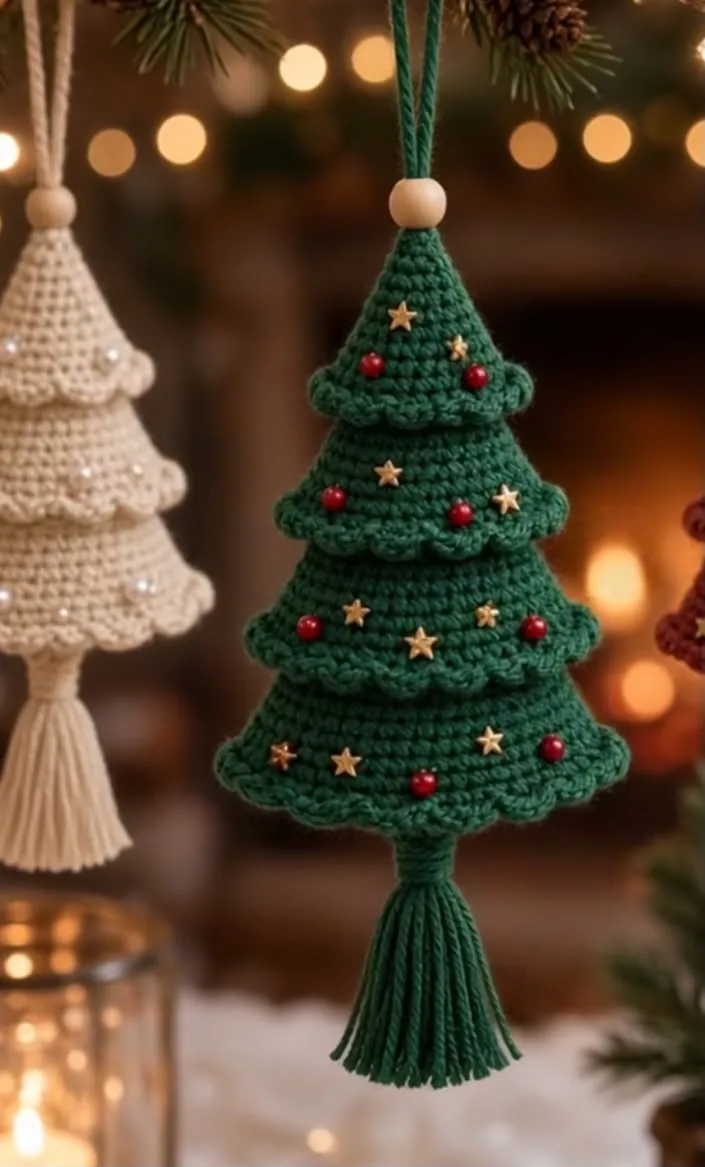
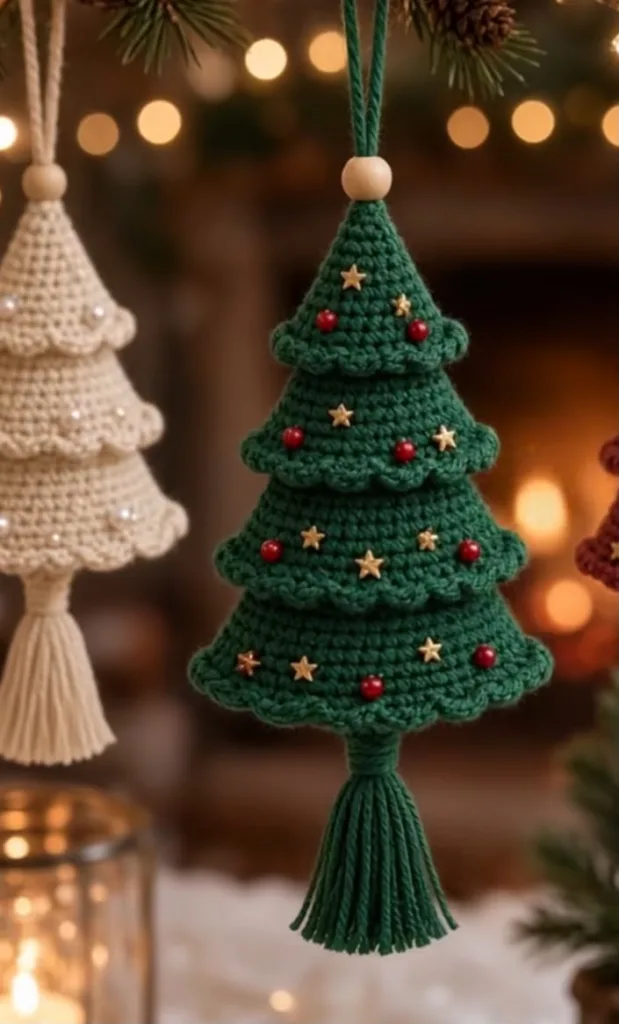
Bring a touch of cozy, bohemian charm to your holiday decor this year with this beautifully textured 3D Christmas tree ornament. Inspired by classic evergreen silhouettes and modern macrame aesthetics, this original pattern features a satisfyingly plump, stuffed cone base that brings the tree to life in three dimensions. The lovely layered branches are created using a clever front-loop crochet technique, resulting in four distinct, scalloped tiers that catch the light beautifully.
Instead of a traditional trunk, this design swaps in a lush, oversized yarn tassel at the base, giving the ornament a playful, elegant drape. Tiny decorative elements—like sewn-on gold stars and red mini-baubles—make each tree look fully dressed for the season. Finished with a rustic wooden bead on the hanging loop, it’s a perfect blend of natural textures and festive cheer.
Whether you crochet these in deep forest greens, snowy winter whites, or a vibrant modern palette, these ornaments make stunning additions to your tree, gorgeous gift-toppers, or lovely handmade presents for friends and family. The construction is intuitive once you grasp the base mechanism, making it highly addictive to whip up a whole forest of these little beauties!
🔍 C. MAIN PATTERN OVERVIEW
This Tiered Christmas Tree Ornament is an original amigurumi-style design worked in one continuous piece for the main body. You will begin at the top of the tree and work downwards in a spiral to create a stuffed cone. At specific intervals, you will crochet into the Back Loop Only (BLO), leaving the Front Loops exposed. Once the cone is stuffed and closed, you will re-attach your yarn to those exposed front loops to crochet the scalloped “branches” (ruffles) directly onto the tree.
After the crochet work is complete, you will construct a thick yarn tassel and attach it to the bottom center. Finally, the tree is decorated with small beads and finished with a top hanging loop threaded through a natural wooden bead.
🎯 D. SKILL LEVEL
Level: Intermediate 🟡
While the stitches themselves are basic, this pattern requires comfort with amigurumi construction and working into unworked loops.
Required Techniques:
- Magic Ring (MR)
- Single Crochet (sc) & Double Crochet (dc)
- Increases (inc) and Invisible Decreases (dec)
- Working in continuous spirals
- Working in Front Loop Only (FLO) and Back Loop Only (BLO)
- Basic amigurumi stuffing and closure
- Creating and attaching a yarn tassel
- Sewing small beads
📏 E. FINISHED SIZE
When using worsted weight yarn and a 3.5mm hook, the finished ornament measures approximately:
- Tree Height (Cone only): 4 inches (10 cm)
- Total Length (including tassel and top bead): 7.5 inches (19 cm)
- Width (at widest bottom tier): 3.25 inches (8.5 cm)
Note: The final length can be easily adjusted by trimming the bottom tassel shorter or longer to suit your preference.
🧮 F. GAUGE
Gauge is not critical, but tight, consistent stitches are essential. Your single crochet stitches on the main cone should be dense enough that the polyfil stuffing does not show through. If you can see holes between your stitches, switch to a smaller hook size.
🧶 G. REQUIRED YARN AMOUNTS
You will need a medium (worsted) weight yarn. Cotton or a high-quality acrylic works best to give the tiers crisp definition.
- 🧵 Main Color (e.g., Deep Pine Green or Cream): Approximately 60 yards (55 meters) per ornament. This includes the yarn required for the body, ruffles, and the bottom tassel.
🧰 H. MATERIALS
- Crochet Hook: US Size E/4 (3.5 mm)
- Yarn: Medium weight (Worsted/Aran, #4) yarn in your chosen tree color.
- Stuffing: High-quality polyester fiberfill.
- Wooden Bead: 1 natural wood bead, approx. 12mm – 14mm diameter.
- Decorations: Small gold star beads/sequins and small round red beads (approx. 4-6mm).
- Tapestry Needle: For weaving in ends and sewing on the tassel.
- Sewing Needle & Thread: A fine needle and matching thread to sew on the decorative beads.
- Scissors: Sharp scissors for trimming the tassel.
- Stitch Marker: Essential for keeping track of your continuous rounds.
- Cardboard: A 3-inch (7.5 cm) piece of cardboard to wrap the tassel.
🔤 I. ABBREVIATIONS – US TERMS
- BLO: Back Loop Only
- ch: Chain
- dc: Double Crochet
- dec: Invisible Single Crochet Decrease (insert hook through FLO of next 2 sts, yarn over, pull through both loops, yarn over, pull through 2 loops)
- FLO: Front Loop Only
- inc: Single Crochet Increase (2 sc in the same st)
- MR: Magic Ring
- R: Round
- sc: Single Crochet
- sk: Skip stitch
- sl st: Slip Stitch
- st(s): Stitch(es)
- ([action]) x#: Repeat the instructions within the brackets the specified number of times.
- ([count]): The total number of stitches at the end of the round.
📝 J. NOTES BEFORE YOU BEGIN
- Continuous Rounds: The main cone of the tree is worked in a continuous spiral. Do not join with a slip stitch or chain 1 at the end of rounds unless explicitly instructed. Move your stitch marker up to the first stitch of each new round.
- The BLO Rounds: Rounds 5, 10, 15, and 20 are worked in the Back Loop Only. This is the most crucial step of the pattern. The unworked Front Loops left behind on the surface are where you will attach your yarn later to crochet the scalloped branches.
- Tension for Ruffles: When you go back to crochet the ruffles into the FLO, maintain an even tension so the scallops lay flat and don’t curl upwards too aggressively.
🪡 K. COMPLETE PATTERN
🌲 Part 1: The Main Tree Cone
Color: Main Tree Color
Notes: Stuff the cone firmly as you go, particularly before the final decrease rounds.
R1: MR 4. (4)
R2: inc in each st around. (8)
R3: (1 sc, inc) x4. (12)
R4: sc in each st around. (12)
R5: ⚠️ In BLO: sc in each st around. (12) (Note: The unworked front loops create the line for Tier 1)
R6: (2 sc, inc) x4. (16)
R7: sc in each st around. (16)
R8: (3 sc, inc) x4. (20)
R9: sc in each st around. (20)
R10: ⚠️ In BLO: sc in each st around. (20) (Note: Tier 2 line)
R11: (4 sc, inc) x4. (24)
R12: sc in each st around. (24)
R13: (5 sc, inc) x4. (28)
R14: sc in each st around. (28)
R15: ⚠️ In BLO: sc in each st around. (28) (Note: Tier 3 line)
R16: (6 sc, inc) x4. (32)
R17: sc in each st around. (32)
R18: (7 sc, inc) x4. (36)
R19: sc in each st around. (36)
R20: ⚠️ In BLO: sc in each st around. (36) (Note: Tier 4 line)
Stop here and begin stuffing the tip and body of the cone firmly.
Closing the Base:
From this point forward, work in BOTH loops again.
R21: (4 sc, dec) x6. (30)
R22: (3 sc, dec) x6. (24)
R23: (2 sc, dec) x6. (18)
Finish stuffing the cone completely. The base should be flat, not bulging.
R24: (1 sc, dec) x6. (12)
R25: dec x6. (6)
Fasten off, leaving a 6-inch tail. Thread the tail onto a tapestry needle, weave through the FLO of the remaining 6 stitches, and pull tight to close the hole. Weave in the end.
✨ Part 2: The Scalloped Tiers (Ruffles)
You will now add the 3D branches by crocheting directly into the visible ridge of unworked front loops left behind from Rounds 5, 10, 15, and 20.
Preparation: Hold the stuffed cone upside down (with the flat base pointing up towards the ceiling, and the pointy tip facing down). This ensures the “right side” of your ruffle stitches faces outward.
Tier 1 (Top Ruffle – working into R5 loops):
- Attach yarn with a sl st to any unworked front loop of R5.
- Pattern: (sk 1 st, 4 dc in the next st, sk 1 st, sl st in the next st) repeat this sequence around the entire ridge.
- Math check: 12 sts total = 3 scallops.
- Join with a sl st to the first st. Fasten off and weave in ends.
Tier 2 (Working into R10 loops):
- Attach yarn to any unworked front loop of R10.
- Pattern: (sk 1 st, 4 dc in the next st, sk 1 st, sl st in the next st) repeat around.
- Math check: 20 sts total = 5 scallops.
- Join, fasten off, weave in ends.
Tier 3 (Working into R15 loops):
- Attach yarn to any unworked front loop of R15.
- Pattern: (sk 1 st, 4 dc in the next st, sk 1 st, sl st in the next st) repeat around.
- Math check: 28 sts total = 7 scallops.
- Join, fasten off, weave in ends.
Tier 4 (Bottom Ruffle – working into R20 loops):
- Attach yarn to any unworked front loop of R20.
- Pattern: (sk 1 st, 4 dc in the next st, sk 1 st, sl st in the next st) repeat around.
- Math check: 36 sts total = 9 scallops.
- Join, fasten off, weave in ends.
🧶 Part 3: The Tassel
- Cut a piece of cardboard to exactly 3 inches (7.5 cm) wide.
- Wrap your yarn around the cardboard approximately 25-30 times for a nice, thick tassel.
- Cut a separate 10-inch (25 cm) piece of yarn and thread it under the wrapped yarn at the top edge of the cardboard. Tie it tightly in a double knot to secure the top loops.
- Cut the yarn along the bottom edge of the cardboard to free the tassel.
- Cut another 10-inch piece of yarn. Wrap it tightly around the tassel about 0.5 inches (1.5 cm) below the top knot to create the “neck”. Tie securely and tuck the ends down into the body of the tassel.
- Trim the bottom of the tassel straight across so all strands are even.
🎨 L. STYLING / ASSEMBLY / STABILITY / FINAL SHAPING
Now it’s time to bring your tree to life with beautiful finishing touches!
1. Attaching the Tassel
- Thread the two top tie strings of your tassel onto a tapestry needle.
- Insert the needle directly into the center bottom of the stuffed tree cone (into the R25 closure).
- Pull the strings through and tie them securely to anchor the tassel tightly against the flat base of the tree. Weave the excess tails back into the cone to hide them.
2. Decorating the Tree
- Using your fine sewing needle and thread, randomly sew small gold star beads and red round beads onto the ruffles.
- 🧵 Tip: Bury your starting and ending thread knots deep inside the stuffed cone so they don’t show on the back of the “branches.”
- Distribute the beads evenly around the tree so it looks festive from every angle.
3. The Hanging Loop & Wooden Bead
- Cut a 12-inch (30 cm) length of your main yarn.
- Thread it onto a tapestry needle and pass it through the very top tip of the tree (R1). Pull it halfway through to create a two-strand loop.
- Thread both strands together through the hole of your natural wooden bead. Push the bead down so it rests snugly against the top of the crocheted tree.
- Tie the two strands together in a secure overhand knot at the top to form the hanging loop.
✅ Final Finishing Checklist
- ✅ Are all four tiers laying relatively flat and pointing downward? (Gently shape them with your fingers if needed).
- ✅ Is the base flat so the tassel hangs straight down?
- ✅ Are the decorative beads secure?
- ✅ Is the wooden bead pushed down to hide the yarn entry point at the top of the tree?
💡 M. HELPFUL CROCHET TIPS
- 💡 Keeping Ruffles Neat: When crocheting the scallops, make sure your slip stitches are pulled slightly tight. This pulls the scallop down and gives the “branch” a distinct, rounded shape.
- 💡 Invisible Bead Threading: If you are having trouble getting a standard sewing needle through the dense amigurumi body to attach your beads, use a longer doll-making needle, or sew the beads onto the FLO ridges before you crochet the ruffles (though this requires careful placement so the ruffles don’t hide them).
- 💡 Fluffing the Tassel: For an ultra-plush tassel, you can carefully comb out the yarn strands using a fine-tooth pet comb or wire brush after attaching it.
- 💡 Batch Making: If making these for a craft market or as multiple gifts, crochet all the cones first, then go back and do all the ruffles, then assemble all the tassels. Assembly line style is much faster!
🧼 N. CARE INSTRUCTIONS
- 🧼 Spot Clean Only: Due to the delicate beads, the wooden bead, and the polyfil stuffing, do not machine wash this ornament. Spot clean the yarn gently with a damp cloth if necessary.
- 🧼 Tassel Care: If the tassel gets crumpled in storage, gently steam it (do not touch the iron to the yarn) or comb it out with your fingers to straighten the strands.
- ⚠️ Safety Note: This ornament features small sewn-on beads and a wooden topper. It is intended strictly as a decoration and presents a choking hazard. Keep out of reach of babies, toddlers, and pets.
❓ R. FAQ
Q: My ruffles are flipping upwards instead of pointing down. How do I fix this?
A: This usually happens if you hold the cone right-side-up while working the ruffles. Make sure the pointy tip of the tree is facing away from you (towards the floor) when you attach your yarn to the front loops. Also, check your tension; if your double crochets are too tight, they will curl.
Q: Can I use different stitch patterns for the branches?
A: Absolutely! If you want a sharper, more pine-needle look instead of scallops, you can use a picot stitch border: (sc 1, ch 3, sl st in 1st ch, sc 1) repeated in the front loops.
Q: Is it possible to make the tree taller with more tiers?
A: Yes. The math for this cone expands by 4 stitches every tier. To add a 5th tier, simply continue the increase logic: R21 would be (8 sc, inc) x4 (40 sts), R22 would be sc around, and R23 would be the BLO round. Ensure your stitch count remains a multiple of 4 so the scallop pattern continues to fit perfectly.
Q: I don’t have polyfil stuffing. Can I leave it hollow?
A: You can, but the cone will likely collapse or dent over time, especially with the weight of the beads and ruffles. If you don’t have polyfil, you can stuff it firmly with yarn scraps or even cotton balls in a pinch.
Q: The hole in my wooden bead is too small for a yarn needle. Any tricks?
A: Try folding a small piece of thin wire (or a wire needle threader) in half, pass the wire through the bead, loop your yarn through the wire, and pull the wire back out, dragging the yarn through the bead with it.