Ice Blue Snowflake, Spiral & Bell Tassel Ornament
📖 B. INTRODUCTION
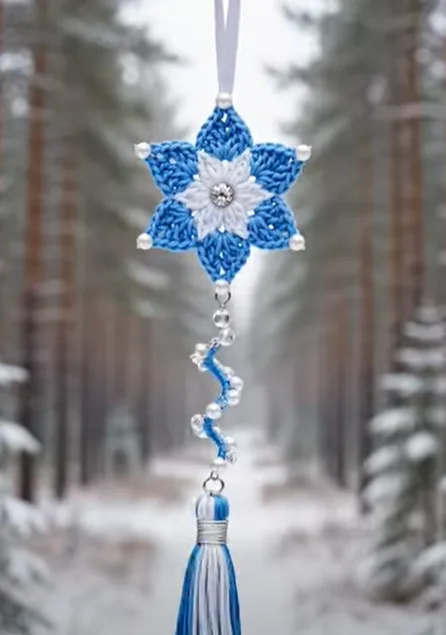
Bring a breath of frosted elegance into your home with this Ice Blue Snowflake, Spiral & Bell Tassel Ornament. Designed with a striking contrast between crisp snow white and serene ice blue, this handcrafted keepsake features a layered six-pointed snowflake center crowned with a sparkling gem and pearl tips. Below the central motif hangs a playful corkscrew spiral accented with lustrous pearls, terminating in a soft, two-tone fringe tassel bound with metallic shimmer.
This piece serves as an ideal holiday tree ornament, seasonal window suncatcher, mantle accent, or luxury gift topper. Whether you are creating a set of winter heirlooms or searching for a sophisticated handmade gift for a host, neighbor, or loved one, this ornament offers a deeply satisfying build with high-end visual impact.
Every element of the design is chosen for textural balance: the rigid, geometric points of the star motif complement the fluid, bouncy curve of the spiral tail, while smooth pearl beads add timeless luster across all three structural tiers.
Because this project uses small amounts of fine yarn, it is an excellent scrap-buster for mercerized cotton threads. You can easily adapt the palette to suit classic silver and gold themes, rich crimson holiday tones, or moody midnight blues while maintaining the exact same construction steps.
🔍 C. MAIN PATTERN OVERVIEW
This pattern combines delicate thread-work techniques with structural blocking and minor jewelry assembly to produce a professional, store-quality hanging ornament.
- ❄️ Central Snowflake Motif: A two-layer, six-pointed star featuring a white inner star center and a broader ice-blue outer framed petal layer, finished with a central sparkling rhinestone cabochon and pearl-accented tips.
- 🌀 Beaded Corkscrew Spiral: A springy, twisted crochet tail worked in ice blue yarn and studded with white glass pearls down its outer curved ridge.
- 🔔 Two-Tone Bell Tassel: A thick, luxurious fringe tassel made from blended white and ice blue strands, neatly wrapped at the neck with silver accent thread.
- 🎀 Hanging Loop & Connectors: A smooth satin hanging ribbon secured with a pearl accent at the top point, with small silver jump rings connecting each dangling lower component for effortless sway.
🎯 D. SKILL LEVEL
Level: Intermediate
- 🧵 Required Techniques: Magic ring, slip stitch joins, single crochet, half double crochet, double crochet, treble crochet, picot stitch, working in back loops only (BLO), corkscrew spiral increases, thread wrapping, hand sewing beads, and attaching basic jewelry jump rings.
📏 E. FINISHED SIZE
- 📏 Snowflake Diameter: 3.5 inches (9 cm) from tip to tip.
- 📏 Spiral Tail Length: 3.5 inches (9 cm) when gently extended.
- 📏 Tassel Length: 3.0 inches (7.5 cm) from neck to fringe tip.
- 📏 Total Hanging Length: Approximately 10.0 inches (25.5 cm) excluding the top ribbon loop.
Note: Yarn weight, hook size, stitch tension, and stiffening spray density will affect the final dimensions slightly.
🧮 F. GAUGE
- 🧶 Tension Target: 9 stitches x 9 rows = 1 inch (2.5 cm) in single crochet using a 2.25 mm hook.
- 💡 Gauge Note: Exact gauge is not critical for this ornamental project, but tight, even stitches are essential to ensure the star points maintain shape and the spiral holds a crisp twist.
🧶 G. REQUIRED YARN AMOUNTS
- 🧵 Yarn Weight: Fine / Sport Weight (Category 2) or Size 3 Mercerized Crochet Cotton Thread.
- 🤍 Color A (Snow White): Approx. 15 yards (14 meters).
- 🩵 Color B (Ice Blue): Approx. 25 yards (23 meters).
- 🩶 Color C (Metallic Silver/White Thread): Approx. 3 yards (2.7 meters) for tassel neck binding.
- 📊 Total Estimated Yarn: Approx. 43 yards (39.7 meters) total.
🧰 H. MATERIALS
- 🪡 Crochet Hook: Size 2.25 mm (US B-1) steel or aluminum hook.
- 🔮 Pearl Beads:
- 6 x 6mm round white glass pearls (for snowflake tips).
- 1 x 8mm round white glass pearl (for top hanging loop).
- 6 to 8 x 4mm-6mm round white glass pearls (for spiral tail).
- 💎 Rhinestone Center: 1 x 8mm flatback or sew-on clear rhinestone gem.
- 🎀 Hanging Ribbon: 12 inches (30 cm) of 3/8-inch (10mm) wide white satin ribbon.
- 🔗 Jewelry Findings: 2 x 6mm silver open jump rings.
- ✂️ Tools & Notions: Fine tapestry needle, sewing needle, white sewing thread, fabric/gem glue, sharp scissors, jewelry pliers, blocking pins, and fabric stiffener spray (or diluted PVA craft glue).
⚠️ Safety Note: This ornamental piece includes small beads and rhinestone elements. Keep out of reach of infants and pets.
🔤 I. ABBREVIATIONS – US TERMS
ch– chainsl st– slip stitchsc– single crochethdc– half double crochetdc– double crochettr– treble crochetst(s)– stitch(es)sp– spaceMR– magic ringBLO– back loop onlyFLO– front loop onlyinc– increase (2 stitches in indicated stitch)picot– ch 2, sl st in 2nd ch from hook
📝 J. NOTES BEFORE YOU BEGIN
- 🔄 Joined Rounds: All rounds in the snowflake motif are closed with a slip stitch into the first stitch of the round unless stated otherwise.
- 🧵 Color Changes: Cut yarn and fasten off between color changes to keep the back side tidy and prevent dark threads showing through light layers.
- 🪡 Tail Management: Leave 6-inch tails on all components to simplify sewing beads and securing joining nodes.
- 📐 Blocking is Crucial: Unblocked crochet lace curls easily. Pinning and stiffening the snowflake motif before final assembly guarantees sharp, professional points.
🪡 K. COMPLETE PATTERN
====================================================================
                        PATTERN ARCHITECTURE
====================================================================
🤍 Component 1: Central White Inner Star
- Purpose: Forms the detailed, 6-pointed white floral star in the middle of the ornament.
- Yarn: Color A (Snow White).
- Quantity: Make 1.
- Starting Point: Magic Ring.
- R1: In MR, ch 1, work 6 sc. Sl st to 1st sc to join. (6 sts)
- R2: Ch 1, work 2 sc in each st around. Sl st to 1st sc to join. (12 sts)
- R3 (Inner Petal Points): [Work (ch 3, 1 dc in 3rd ch from hook, ch 2 picot, 1 hdc in same chain base), skip 1 st of R2, sl st in next st of R2] repeat 6 times total. (6 white star points formed)
- Fasten Off: Cut yarn leaving an 8-inch tail. Weave tail securely along the back of R2.
                  [R3 Point Detail]
            (ch 3 + dc + picot + hdc)
                     /\
                    /  \
             -[sl st]----[sl st]-  (on R2)
🩵 Component 2: Ice Blue Outer Snowflake Frame
- Purpose: Frames the white inner star with larger, pointed blue petals, extending the star into a full 6-point snowflake.
- Yarn: Color B (Ice Blue).
- Quantity: Make 1.
- Starting Point: Attach yarn to any skipped stitch on R2 of Component 1 behind the white points.
- R1 (Backing Grid): Attach Color B with sl st to skipped st of R2 behind white point. [Ch 4, working behind the white petal, sl st into the back loop of the R3 picot tip of the white point, ch 4, sl st into the skipped st of R2 behind next white petal] repeat 6 times around. Sl st to initial joining point. (12 ch-4 arches formed behind white inner star)
- R2 (Outer Petal Shaping): Working into the ch-4 arches created in R1:
- [Into 1st ch-4 arch work: (3 sc, 1 hdc, 1 dc).
- Into the picot sl st at the peak work: (1 dc, 1 tr, ch 2 picot, 1 tr, 1 dc).
- Into 2nd ch-4 arch work: (1 dc, 1 hdc, 3 sc).
- Sl st into the base sl st between petals] repeat 6 times around.
- Stitch Count Verification: 6 large outer ice blue petal points, each topped with a ch-2 picot peak.
- Fasten Off: Invisible join to first stitch, fasten off and weave in ends.
🌀 Component 3: Pearl-Accented Spiral Tail
- Purpose: Creates the springy, twisted drop tail attached to the bottom of the snowflake motif.
- Yarn: Color B (Ice Blue).
- Quantity: Make 1.
- Starting Point: Foundation Chain.
- Row 1: Leaving a 10-inch starting tail, ch 26.
- Row 2: Starting in 2nd ch from hook, work 3 hdc in each ch across to end. (75 hdc)
- Fasten Off: Cut yarn leaving a 10-inch finishing tail.
💡 Note: The tight density of 3 hdc in every chain forces the strip into a natural, springy corkscrew spiral.
- Bead Embellishment: Thread a sewing needle with white sewing thread. Anchor thread at the top end of the spiral. Stitch 6 to 8 small (4mm-6mm) white pearl beads at equal intervals along the outer curved ridge of the spiral as it twists down. Fasten off thread securely.
       Top End (Jump Ring)
           |
         ( S )  <-- Pearl Bead on outer curve
        (  P  )
         ( I )  <-- Pearl Bead
        (  R  )
         ( A )  <-- Pearl Bead
           |
      Bottom End (Jump Ring)
🔔 Component 4: Two-Tone Bell Tassel
- Purpose: Forms the elegant hanging tassel at the bottom of the ornament.
- Yarn: Color A (Snow White) & Color B (Ice Blue).
- Quantity: Make 1.
- Step 1 (Strand Wrap): Cut a 4-inch (10 cm) sturdy cardboard template. Wrap Color A (Snow White) and Color B (Ice Blue) together around the cardboard 15 complete revolutions (producing 30 strands total across the top).
- Step 2 (Top Tie): Thread a 10-inch strand of Color B under the top bundle on the card. Tie tightly with a double knot. Slide bundle off cardboard.
- Step 3 (Neck Wrap): Cut a 12-inch strand of Color C (Metallic Silver/White thread). Position it 0.5 inches (1.2 cm) below the top tied knot. Wrap tightly around the tassel body 8 to 10 times to form a neat metallic collar. Tie knot securely, thread ends into the tassel interior using a needle.
- Step 4 (Fringe Trim): Cut the bottom loops open using sharp scissors. Combing strands straight, trim the bottom edge flat to approximately 3.0 inches (7.5 cm) in overall length.
🎨 L. STYLING / ASSEMBLY / STABILITY / FINAL SHAPING
====================================================================
                       ASSEMBLY DIAGRAM
====================================================================

                     [ Satin Ribbon Loop ]
                               |
                        ( 8mm Pearl Bead )
                               |
                   [ Top Tip of Snowflake ]
                               |
                    +--------------------+
                    |  (Rhinestone Gem)  |  <-- 6 Snowflake Tips
                    |  Central Snowflake |      (with 6mm Pearls)
                    +--------------------+
                               |
                   [ Bottom Tip Jump Ring ]
                               |
                     ( Corkscrew Spiral )   <-- Pearl accents
                               |
                     [ Lower Jump Ring ]
                               |
                    [ Two-Tone Bell Tassel ]
1. 💎 Rhinestone & Snowflake Tip Finishing
- Rhinestone Center: Apply a small dab of gem glue to the flat back of the 8mm rhinestone cabochon. Press firmly into the center MR of the white inner star. Allow to dry 2 hours.
- Outer Pearl Tips: Using a sewing needle and white thread, sew one 6mm white glass pearl bead onto the front face of each of the 6 outer Ice Blue picot tips.
2. 🎀 Top Ribbon Attachment
- Fold the 12-inch satin ribbon in half to form a loop.
- Thread both cut ends through the 8mm white glass pearl bead.
- Thread ends through the top picot point of the snowflake motif. Tie ends into a tight knot at the back side, securing the pearl flush against the top point.
3. 🌀 Connecting the Spiral Tail
- Open a 6mm silver jump ring using pliers.
- Pass jump ring through the bottom-most picot point of the snowflake motif and the top strand of the corkscrew spiral tail.
- Close jump ring completely.
4. 🔔 Attaching the Tassel
- Open second 6mm silver jump ring.
- Pass jump ring through the lower end strand of the spiral tail and through the top knot tie of the Two-Tone Bell Tassel.
- Close jump ring securely.
5. 🧼 Stiffening & Blocking Sequence
- Pin the completed snowflake motif face-down onto a foam blocking board, placing pins through each of the 6 outer pearl-accented tips to pull them taut and symmetrical.
- Lightly spray the back of the snowflake with fabric stiffener spray or brush on a 50/50 mix of PVA glue and water.
- Allow to dry completely (12–24 hours) before hanging.
💡 M. HELPFUL CROCHET TIPS
- 💡 Tip 1: Use mercerized cotton yarn; its tight twist prevents splitting and adds natural sheen to ornamental motifs.
- 💡 Tip 2: Keep your hook size small relative to yarn weight so that the stitches are firm and hold structural shape without sagging.
- 💡 Tip 3: When sewing pearl beads to outer tips, pass thread through the bead twice for maximum stability when hanging.
- 💡 Tip 4: Twist the corkscrew spiral in its natural rotation direction after stiffening to ensure maximum spring elasticity.
- 💡 Tip 5: Use jewelry pliers rather than hands to open and close jump rings laterally (twist, do not pull apart) to maintain round ring geometry.
- 💡 Tip 6: Steam or lightly iron the ribbon ends before tying to eliminate shipping creases.
- 💡 Tip 7: Apply a microscopic dot of clear craft glue inside the tassel neck wrap knot to prevent unwinding over time.
- 💡 Tip 8: Use stainless steel pins when blocking to avoid rust stains on white cotton yarn.
🧼 N. CARE INSTRUCTIONS
- 🧼 Cleaning: Spot clean gently with a damp micro-fiber cloth and cold water. Do not submerge or machine wash.
- 🧼 Drying: Air dry flat away from direct sunlight or heavy heat sources.
- 🧼 Storage: Store flat between sheets of tissue paper in a sturdy box. Do not bend or stack heavy items on top of blocked star points.
- 🧼 Shape Restoration: If star points soften over time due to humidity, re-pin on a foam board and re-apply fabric stiffener.
❓ R. FAQ
❓ Can I use acrylic yarn instead of mercerized cotton?
Yes, you can use acrylic yarn, but mercerized cotton is strongly recommended. Cotton blocking holds rigidity much longer than acrylic, and cotton provides cleaner stitch definition for fine lace detail.
❓ My spiral tail isn’t twisting enough—what should I fix?
If your spiral is too loose, ensure you are making 3 full stitches into every single chain space. If tension is too loose, downsize your hook by 0.25mm to increase spiral torque.
❓ How do I make the ornament larger or smaller?
To scale size up, use DK weight yarn with a 3.0 mm hook. To scale down into a delicate miniature size, use Size 10 crochet thread with a 1.5 mm steel hook.
❓ What is the best glue for securing the center rhinestone?
G-S Hypo Cement or E6000 Jewelry Glue works best. Avoid hot glue as it creates thick bulk that prevents the gem from sitting flush against stitches.
❓ Can I eliminate the jump rings and sew components directly?
Yes! You can sew the spiral tail directly to the bottom star tip using a needle and yarn tail. Jump rings are used primarily because they permit natural motion and sway when suspended.