Vintage Heirloom Burgundy Floral Granny Square Blanket & Pillow Set
📖 B. INTRODUCTION
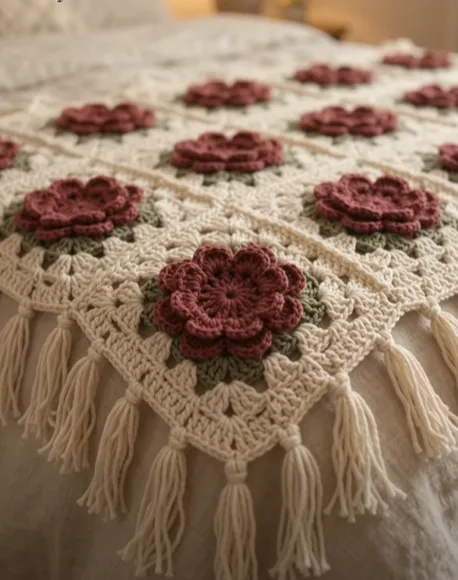
There is something deeply comforting about a handmade blanket that carries warmth, history, and craftsmanship in every single stitch. The Vintage Heirloom Burgundy Floral Granny Square Blanket & Pillow Set captures the timeless romance of classic cottage bedding. Featuring dimensional 6-petal burgundy blooms set against a soft ivory framework and finished with an ornate tassel fringe drop skirt, this ensemble elevates any bedroom into a tranquil retreat.
The design balances structured geometric framing with touchable 3D texture. Each motif begins with a rich maroon hub, blossoms into six velvety burgundy popcorn petals, and transitions smoothly into a crisp off-white square. Joined into a generous bedspread and paired with a matching accent pillow sham, this project turns yarn into an heirloom piece that lasts for generations.
Whether you are crafting a show-stopping bridal gift, updating a master bedroom, or creating a cozy winter bedspread, this pattern offers a rewarding rhythm. The individual squares are ideal for portable crafting, allowing you to stitch motifs on the go before bringing them together into a dramatic, coordinating set.
This complete guide provides step-by-step instructions for the 3D floral motif, seamless square assembly, pillow sham construction, decorative edging, and custom tassel fringe.
🔍 C. MAIN PATTERN OVERVIEW
This heirloom set consists of two main coordinating items:
- 🛏️ Component 1: The Floral Bedspread Blanket
A full-sized coverlet constructed from a grid of individual 3D floral granny squares. The squares are joined flat, framed with an ornate solid-and-mesh double crochet border, and finished along the sides with full yarn tassels. - 🛋️ Component 2: The Matching Floral Accent Pillow Sham
A structured 14″ x 26″ pillow sham featuring an 8-square front grid (2 rows of 4 squares), a flat envelope-style back opening for easy washing, and matching fringe along the outer short edges.
🎯 D. SKILL LEVEL
Intermediate
This pattern requires comfortable familiarity with basic crochet stitches as well as motif shaping, working into chain spaces, color transitions, and dimensional stitches.
Techniques Involved:
- 🌸 Working in the round (Magic Ring)
- 🍿 5-DC Popcorn Stitches for 3D petal texture
- 📐 Squaring a round/hexagonal floral core
- 🎨 Clean color changing at round joins
- 🪡 Invisible seam joining (whipstitch or flat slip stitch join)
- 🧶 Making and securing decorative tassel fringe
📏 E. FINISHED SIZE
- 🌸 Single Floral Square (Blocked): 6 in x 6 in (15 cm x 15 cm)
- 🛏️ Full Bedspread Blanket (10 x 12 grid + border & fringe): Approx. 64 in x 76 in (162 cm x 193 cm)
- 🛋️ Matching Pillow Sham (2 x 4 grid + border): Approx. 14 in x 26 in (35 cm x 66 cm)
Note: Total dimensions can be customized by adding or removing rows/columns of squares to fit Twin, Queen, or King beds.
🧮 F. GAUGE
- Individual Square Gauge: 1 individual blocked floral granny square = 6 in x 6 in (15 cm x 15 cm) using a 4.0 mm hook.
- Flat DC Swatch Gauge: 16 dc x 8 rows = 4 in x 4 in (10 cm x 10 cm).
Tension consistency across all individual squares is important to ensure easy assembly.
🧶 G. REQUIRED YARN AMOUNTS
All yarn estimates are calculated for Worsted Weight / Medium (#4) yarn.
- 🧶 Color A (Off-White / Cream / Ivory – Background, Border & Tassels):
~2,600 yards (2,377 m) / Approx. 13-14 skeins (100g / 200 yds each). - 🍷 Color B (Deep Burgundy / Maroon – Petals):
~850 yards (777 m) / Approx. 4-5 skeins (100g / 200 yds each). - 🌾 Color C (Dark Maroon – Flower Center Hubs):
~220 yards (201 m) / Approx. 1-2 skeins (100g / 200 yds each).
Per Square Breakdown:
- Color C (Center): ~2 yds
- Color B (Petals): ~7 yds
- Color A (Frame): ~18 yds
🧰 H. MATERIALS
- ⚓ Crochet Hook: Size 4.0 mm (US G/6) or size needed to obtain gauge.
- 🧵 Yarn: Worsted weight (#4) acrylic, cotton blend, or wool blend in Off-White (Color A), Deep Burgundy (Color B), and Dark Maroon (Color C).
- 🪡 Tapestry Needle: Size 16 or 18 blunt-tip yarn needle.
- ✂️ Scissors: Sharp craft shears.
- 📏 Measuring Tape: Flexible tape measure.
- 📍 Blocking Setup: Blocking board and rust-proof T-pins.
- 🏷️ Tassel Maker / Cardboard: 5 in (12.5 cm) sturdy cardboard piece for wrapping tassels.
- 🛋️ Pillow Form: 14 in x 26 in (35 cm x 66 cm) pillow insert for sham.
🔤 I. ABBREVIATIONS – US TERMS
- ch = chain
- sl st = slip stitch
- sc = single crochet
- hdc = half double crochet
- dc = double crochet
- popcorn = 5-dc popcorn stitch (see Notes)
- st(s) = stitch(es)
- sp(s) = space(s)
- ch-sp = chain space
- MR = magic ring
- FO = fasten off
- BLO = back loop only
- TOG = together
📝 J. NOTES BEFORE YOU BEGIN
- 🔄 Round Construction: All motif rounds are worked in joined rounds. Do not turn your work between rounds unless specified.
- 🍿 Popcorn Stitch (5-dc Popcorn): Work 5 dc into the specified stitch. Drop the loop from your hook. Insert hook from front to back through the top of the 1st dc of the 5-dc group. Pick up the dropped loop and pull it through the stitch. Chain 1 to lock the popcorn stitch. (Note: The locking chain does not count as a separate stitch).
- 🎨 Color Transitions: Fasten off the previous color securely at the end of Rounds 1 and 2. Join the new color in any designated space with a slip stitch or standing stitch.
- 📐 Blocking: Blocking each individual square before joining ensures straight edges, neat corners, and effortless assembly.
🪡 K. COMPLETE PATTERN
🌸 Component 1: 3D Burgundy Floral Granny Square
(Make 120 for Blanket, 8 for Pillow Sham = 128 Squares Total)
Square Round-by-Round Visual Logic:
R1 (Color C): 12 sc in Magic Ring (12 sts)
R2 (Color B): [Popcorn in st, ch 2, sk 1 st] x6 (6 petals, 6 ch-2 sps)
R3 (Color A): [3 dc in ch-2 sp, 1 dc in back of Popcorn] x6 (24 sts)
R4 (Color A): [5 dc, (2 dc, ch 2, 2 dc) corner] x4 (36 dc + 4 corner sps)
R5 (Color A): [9 dc, (2 dc, ch 2, 2 dc) corner] x4 (52 dc + 4 corner sps)
R6 (Color A): [13 dc, (2 dc, ch 2, 2 dc) corner] x4 (68 dc + 4 corner sps)
🌾 Center Hub
Round 1 (Color C – Dark Maroon):
Begin with a MR. Ch 1 (does not count as st). Work 12 sc into the ring. Pull ring tight. Join with a sl st to the first sc. Fasten off Color C.
(Stitch count: 12 sc)
🍿 Raised Petals
Round 2 (Color B – Deep Burgundy):
Join Color B with a sl st in any sc.
Ch 3 (counts as 1st dc), work 4 dc in same st, drop loop, insert hook into 3rd ch of starting ch-3, pull dropped loop through (1st Popcorn made). Ch 2, skip 1 st.
[Work Popcorn in next st, ch 2, skip 1 st] 5 times.
Join with a sl st to the top of the first Popcorn stitch. Fasten off Color B.
(Stitch count: 6 Popcorn petals, 6 ch-2 sps)
📐 Floral Frame & Squaring
Round 3 (Color A – Off-White/Cream):
Join Color A with a sl st in any ch-2 sp from Round 2.
Ch 3 (counts as dc), work 2 dc in same ch-2 sp. Work 1 dc into the back loop/bar behind the top of the next Popcorn stitch.
[Work 3 dc in next ch-2 sp, 1 dc into the back bar of next Popcorn] 5 times.
Join with a sl st to top of starting ch-3.
(Stitch count: 24 dc)
Round 4 (Color A – Squaring Round):
Ch 3 (counts as dc), 1 dc in next st.
In next st, work corner: (2 dc, ch 2, 2 dc).
[1 dc in each of next 5 sts, work corner: (2 dc, ch 2, 2 dc) in next st] 3 times.
1 dc in each of remaining 3 sts. Join with a sl st to top of starting ch-3.
(Stitch count: 36 dc + 4 ch-2 corner sps; 9 dc per side)
Round 5 (Color A – Frame Expansion):
Ch 3 (counts as dc), 1 dc in each st across to corner ch-2 sp.
[(2 dc, ch 2, 2 dc) in ch-2 sp, 1 dc in each dc across to next corner] 4 times.
Sl st to top of starting ch-3.
(Stitch count: 52 dc + 4 ch-2 corner sps; 13 dc per side)
Round 6 (Color A – Outer Motif Round):
Ch 3 (counts as dc), 1 dc in each st across to corner ch-2 sp.
[(2 dc, ch 2, 2 dc) in ch-2 sp, 1 dc in each dc across to next corner] 4 times.
Sl st to top of starting ch-3. Fasten off Color A, leaving an 18-inch tail for whipstitch assembly.
(Stitch count: 68 dc + 4 ch-2 corner sps; 17 dc per side)
🛏️ Component 2: Blanket Assembly & Grid Setup
📊 Layout Setup
Arrange 120 finished, blocked floral squares into a 10-square wide by 12-square long grid on a clean surface. Ensure all 3D popcorn petals face upward and orientation is uniform.
Blanket Grid Layout (10 x 12 Squares):
[S1 ][S2 ][S3 ][S4 ][S5 ][S6 ][S7 ][S8 ][S9 ][S10]
[S11][S12][S13][S14][S15][S16][S17][S18][S19][S20]
 ... (Rows 3-11)
[S111]....................................[S120]
🪡 Seam Joining Method
- Pair adjacent squares right sides together.
- Thread tapestry needle with Color A tail.
- Insert needle through Back Loops Only (BLO) of matching stitches across both squares.
- Pull yarn through evenly to form a flat, flexible join.
- Join all horizontal rows first, then join vertical columns.
🧶 Component 3: Blanket Ornate Border & Edging
Once all 120 squares are joined, work a border around the outer edge.
Round 1 (Border Base):
Join Color A with a sl st in any outer corner ch-2 sp.
Ch 3, (1 dc, ch 2, 2 dc) in corner sp.
Work 1 dc in each dc across side, working 1 dc into each seam junction between squares. Work (2 dc, ch 2, 2 dc) in each corner ch-2 sp.
Repeat around all 4 sides. Sl st to top of starting ch-3.
Round 2 (Mesh Drop Edge):
Ch 4 (counts as dc + ch 1).
[Skip 1 st, 1 dc in next st, ch 1] across to corner. In corner sp work (1 dc, ch 2, 1 dc, ch 1).
Repeat around all 4 sides. Sl st to 3rd ch of starting ch-4.
Round 3 (Solid Edge Finish):
Ch 1, 1 sc in each dc and 1 sc in each ch-1 sp around. Work 3 sc in each corner ch-2 sp.
Sl st to first sc. Fasten off and weave in ends securely.
🛋️ Component 4: Matching Floral Pillow Sham
🌸 Front Panel
- Make 8 floral granny squares following the Component 1 instructions.
- Block all 8 squares to 6 in x 6 in (15 cm x 15 cm).
- Join squares into a 2-row by 4-column grid (12 in x 24 in unbordered).
- Work Round 1 of the Blanket Border around the entire 2×4 rectangle to finish at approx. 14 in x 26 in (35 cm x 66 cm).
Pillow Sham Front Layout (2 x 4 Grid):
[ Square 1 ] [ Square 2 ] [ Square 3 ] [ Square 4 ]
[ Square 5 ] [ Square 6 ] [ Square 7 ] [ Square 8 ]
📄 Back Envelope Panels (Color A)
Construct two overlapping flat crochet panels for the envelope closure:
- Panel 1 (Left Flap):
Ch 54.
Row 1: Dc in 4th ch from hook and in each ch across. Turn. (52 dc)
Rows 2–18: Ch 3 (counts as dc), dc in each dc across. Turn.
Fasten off. - Panel 2 (Right Flap):
Ch 54.
Row 1: Dc in 4th ch from hook and in each ch across. Turn. (52 dc)
Rows 2–14: Ch 3 (counts as dc), dc in each dc across. Turn.
Fasten off.
🪡 Pillow Assembly
- Lay Front Panel face up. Overlap Left and Right back panels face down over Front Panel so edges align and center flaps overlap by ~3 inches.
- Pin edges together. With Color A, sc around all 4 outer edges through both layers to join.
- Turn right side out through center envelope slit and press flat.
🧵 Component 5: Luxe Tassel Fringe Skirt
Make 52 tassels for Blanket drop edges and 12 tassels for Pillow Sham short ends.
✂️ Making Individual Tassels
- Wrap Color A yarn around a 5-inch (12.5 cm) sturdy card 25 times.
- Thread an 10-inch strand of yarn under top wrapped loops; tie securely with a double knot.
- Cut bottom loops with sharp scissors.
- Wrap another 12-inch strand around tassel neck (approx. 1 inch below top tie) 5 times; knot tightly and bury ends inside tassel body.
- Trim tassel bottom evenly.
Tassel Step-by-Step Construction:
1. Wrap yarn 25x around 5" card ---> 2. Tie top strand securely
3. Cut bottom loops cleanly     ---> 4. Wrap & tie neck 1" below top
📍 Attaching Tassels
- Blanket: Attach 1 tassel to each square junction along the two long side edges and bottom edge of the bedspread using top tie strands.
- Pillow Sham: Attach 6 tassels evenly spaced along each short end.
🎨 L. STYLING / ASSEMBLY / STABILITY / FINAL SHAPING
    [ BEDSPREAD GRID ASSEMBLY ]
  +-------------------------------+
  |  [SQ]  [SQ]  [SQ] ...  [SQ]   |
  |  [SQ]  [SQ]  [SQ] ...  [SQ]   |
  |   :     :     :         :     |
  +-------------------------------+
  |||||||| TASSEL FRINGE ||||||||||
- 🌸 Popcorn Petal Fluffing: Gently pop every burgundy popcorn stitch forward from the back of the square so petals sit prominently above the background.
- 📐 Seam Flatness Check: Check that whipstitched seams lie completely flat without puckering. Steam block joins lightly if needed.
- ⚖️ Weight Distribution: The finished bedspread is substantial. Using a tight joining stitch keeps squares from pulling out of shape under their own weight.
🛠️ Final Finishing Checklist
- [ ] All 128 flower center popcorns popped forward
- [ ] Yarn tails woven into back of matching color sections
- [ ] Bedspread grid blocked flat and square
- [ ] Border worked evenly around all edges
- [ ] Tassels securely knotted and trimmed
- [ ] Pillow insert fitted into sham envelope
💡 M. HELPFUL CROCHET TIPS
- 💡 Consistency is Key: Use the same hook brand throughout the project to maintain uniform square sizes.
- 💡 Weave As You Go: Weave in center Color C and Color B tails immediately after completing Round 2 to avoid a massive tail-weaving task at the end.
- 💡 Petal Definition: When closing popcorn stitches, pull the working loop tight to draw all 5 dc stitches into a tight, rounded petal shape.
- 💡 Pre-Block Before Joining: Block individual squares before seaming; joining pre-blocked squares is significantly faster and cleaner.
- 💡 Use Locking Markers: Use stitch markers to align corners and midpoints when seaming long rows of squares.
- 💡 Cardboard Tassel Template: Use rigid cardboard or plastic for wrapping tassels so the template does not bend or shrink as yarn builds up.
- 💡 Yarn Dye Lots: Purchase all Color A background yarn from the same dye lot to ensure uniform cream tone across blanket, pillow, and tassels.
🧼 N. CARE INSTRUCTIONS
- 🫧 Washing: Hand wash or machine wash on gentle cycle in cold water using a mild wool/delicates detergent.
- 🛡️ Tassel Protection: Place blanket in a large mesh laundry bag before washing to prevent tassels from tangling.
- 🌬️ Drying: Lay flat on dry towels to air dry. Do not hang dry, as the weight of wet yarn will stretch the squares.
- 🚫 Heat Warning: Do not tumble dry high or apply a hot iron directly to acrylic yarn fibers.
❓ R. FAQ
❓ Can I make this blanket smaller for a sofa throw?
Yes! For a standard couch throw (approx. 48 in x 60 in), make a 8 x 10 grid (80 squares total) instead of 120 squares.
❓ What yarn fiber works best for this project?
An acrylic/cotton blend or high-quality soft acrylic yarn works best. Cotton provides crisp petal structure, while acrylic adds lightweight warmth and drape.
❓ Can I use Join-As-You-Go (JAYG) instead of whipstitch?
Yes, you can substitute a flat slip-stitch Join-As-You-Go method on Round 6 if you prefer joining while crocheting rather than sewing at the end.
❓ How do I stop my tassels from unraveling?
Tie top knots tightly with a double knot, and apply a small dot of clear fabric glue inside the wrapped neck knot for added security.
❓ How do I fit a standard pillow into the pillow sham?
The back of the sham features an envelope closure with overlapping panels. Gently flex your pillow insert, slide it inside the envelope slit, and smooth out the corners.